EXERCISES FOR BEGINNING CLASSICAL GUITARISTS
(In the First Year of Study)

"Douglas who?"
Douglas Niedt is a successful concert and recording artist and highly respected master classical guitar teacher with 50 years of teaching experience. He is Associate Professor of Music (retired), at the Conservatory of Music and Dance, University of Missouri-Kansas City and a Fellow of the Henry W. Bloch School of Management—Regnier Institute for Entrepreneurship and Innovation.
Doug studied with such diverse masters as Andrés Segovia, Pepe Romero, Christopher Parkening, Narciso Yepes, Oscar Ghiglia, and Jorge Morel. Therefore, Doug provides solutions for you from a variety of perspectives and schools of thought.
He gives accurate, reliable advice that has been tested in performance on the concert stage that will work for you at home.
PURCHASE AN ALL-ACCESS PASS
TO THE VAULT OF CLASSICAL GUITAR TECHNIQUE TIPS

"Hello Mr Niedt,
My name's Gretchen, and I'm so happy I purchased an All-Access Pass to the Vault. I love your awesome technique tips. I'm amazed how much I have improved my playing.
Thank you!"
ARE YOU LOOKING FOR PROVEN STRATEGIES
THAT WILL MAKE YOU A BETTER GUITARIST?
Check out the game-changing tips in my Vault—I promise they will kick your playing up to the next level.
Purchase an All-Access Pass to the Vault.
It's a one-time purchase of only $36!
You receive full access to:
- Over 180 technique tips in The Vault.
- Special arrangements of Christmas music
- Arrangement of the beautiful Celtic song, Skellig
- Comprehensive guide, How to Master the Classical Guitar Tremolo
All that for a one-time payment of only $36. Take me to the page to Purchase an All-Access Pass
EXERCISES FOR BEGINNING CLASSICAL GUITARISTS
(In the First Year of Study)
By Douglas Niedt
Copyright Douglas Niedt. All Rights Reserved.
This article may be reprinted, but please be considerate and give credit to Douglas Niedt.
THE “PRESS AND RELEASE” EXERCISE: Part 1—Four fingers together
It is essential for beginners to learn to apply the correct amount of left-hand finger pressure to play a note. Many players do not apply enough pressure, resulting in buzzy notes and chords. Others use too much pressure, resulting in a tense left hand and left-hand fatigue.
The “Press and Release” exercise will help fix both problems. Here are the steps to practice the exercise. Practice the exercise in 5th position. In 5th position, it is easier for beginners to maintain a good left-hand position because the frets are closer together.
WE PRACTICE THIS EXERCISE WITH THE LEFT HAND ALONE:
- Set the tips of all four left-hand fingers lightly on the 6th string in 5th position.
In other words, place the 4th finger at the 8th fret, the 3rd finger at the 7th fret, the 2nd finger at the 6th fret, and the 1st finger at the 5th fret. Place each finger directly behind each fret wire, not on top of the fret wire. This is correct: - PRESS the string down to the fret wires with all four fingers simultaneously. Apply just enough pressure so that the string touches the fret wires.
- RELEASE the pressure off the string, but keep all four fingers touching the string. Releasing the string empties the fingers of their tension.
- PRESS the string down to the fret wires again. Remember, only apply enough pressure so the string touches the fret wires. Press all four fingers simultaneously.
- RELEASE.
- REPEAT. Repeat the “press-release” cycle several times. Remember:
- Press with just enough pressure to make the string touch the fret wires.
- When you release, keep your fingers on the string.
- Keep your fingers behind the fret wires.
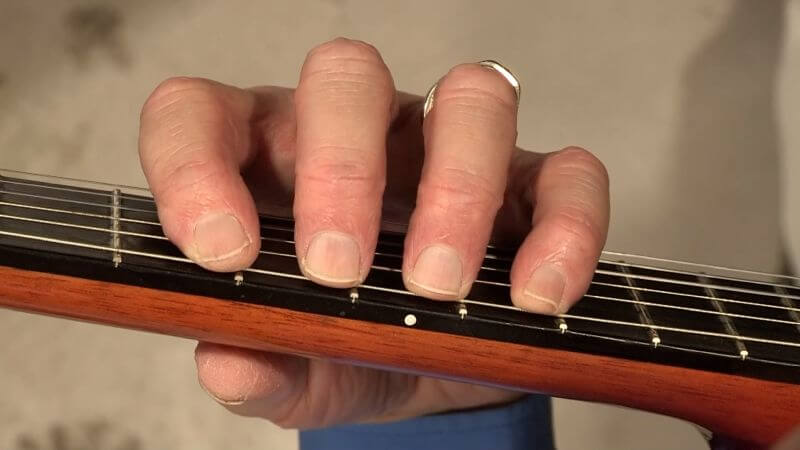
This is wrong. Do NOT set the fingers on top of the fret wires:
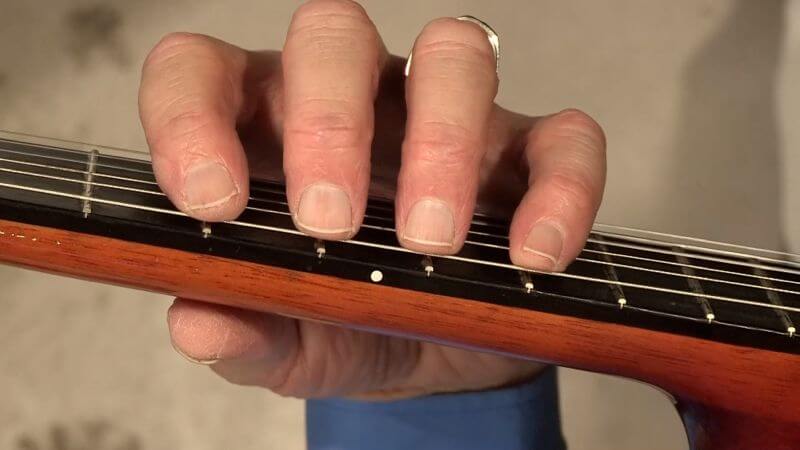
This is also wrong. Do NOT set the fingers in the middle of the fret area:
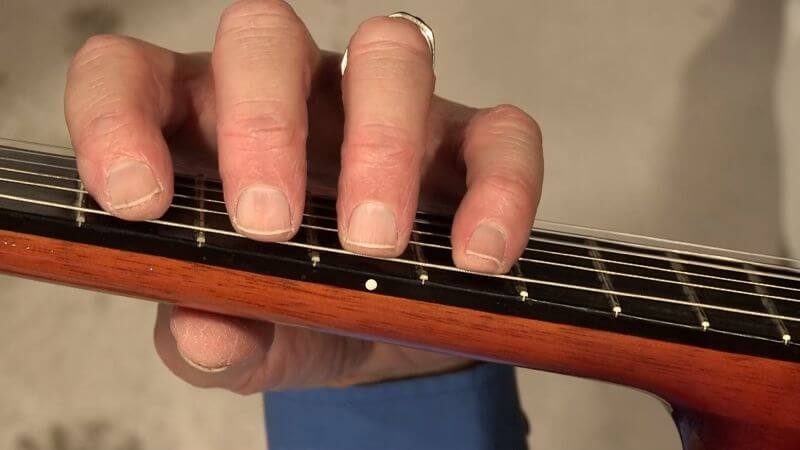
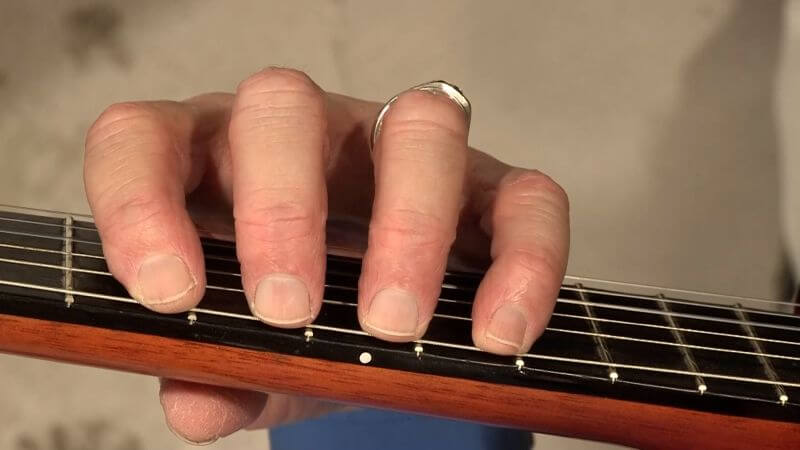

NEXT, DO THE EXERCISE ON THE 5TH STRING, 4TH STRING, 3RD STRING, 2ND STRING, AND 1ST STRING.
Watch me demonstrate the “Press and Release” Exercise: Part 1—Four Fingers Together, in Video #1.
THE “PRESS AND RELEASE” EXERCISE: Part 2—Individual Fingers
We will press each finger down, one at a time.
Practice the exercise with the left hand alone in 5th position. In 5th position, it is easier for beginners to maintain a good left-hand position because the frets are closer together.
WE PRACTICE THIS EXERCISE WITH THE LEFT HAND ALONE:
- As in Part 1, lightly set the tips of all four left-hand fingers on the 6th string in 5th position. In other words, place the 4th finger at the 8th fret, the 3rd finger at the 7th fret, the 2nd finger at the 6th fret, and the 1st finger at the 5th fret. Place each finger lightly on the string, directly behind each fret wire, not on top of the fret wire.
- Lift all four fingers off the string but keep them curved, over their fret, and close to the string (no more than ½ inch above the string).
- Keeping the 1st finger touching the string the entire time, press and release the 1st finger on the 6th string ten times. Press with just enough pressure to make the string touch the fret wire. Keep the other fingers curved, over their fret, and close to the string (no more than ½ inch above the string).
- Keeping the 2nd finger touching the string the entire time, press and release the 2nd finger on the 6th string ten times. Press with just enough pressure to make the string touch the fret wire. Important: keep the other fingers curved, over their fret, and close to the string (no more than ½ inch above the string).
- Keeping the 3rd finger touching the string the entire time, press and release the 3rd finger on the 6th string ten times. Remember, keep the other fingers curved, over their fret, and close to the string (no more than ½ inch above the string).
- Keeping the 4th finger touching the string the entire time, press and release the 4th finger on the 6th string ten times. Remember, keep the other fingers curved, over their fret, and close to the string (no more than ½ inch above the string).
NEXT, DO THE EXERCISE ON THE 5TH STRING, 4TH STRING, 3RD STRING, 2ND STRING, AND 1ST STRING.
You may not have time to practice all four fingers on all six strings daily. If that’s the case, practice one string a day.
Watch me demonstrate the “Press and Release” Exercise: Part 2—Individual Fingers in Video #2.
THE SWITCHING EXERCISE (Basic Version)
The switching exercise reinforces the concept of connecting notes (playing legato). The goal is to teach the guitarist to place a finger simultaneously as they lift another finger on the same string.
Practice the exercise in 5th position. In 5th position, it is easier for beginners to maintain a good left-hand position because the frets are closer together.
Here are the steps to practice the exercise. WE PRACTICE THIS EXERCISE WITH THE LEFT HAND ALONE:
- Lightly set the tips of all four left-hand fingers on the 6th string in 5th position. In other words, place the 4th finger at the 8th fret, the 3rd finger at the 7th fret, the 2nd finger at the 6th fret, and the 1st finger at the 5th fret. Place each finger lightly on the string, directly behind each fret wire, not on top of the fret wire.
- Lift all four fingers off the string but keep them curved, over their fret, and close to the string (no more than ½ inch above the string).
- Using the 1st finger, press the 6th string down to its fret wire at the 5th fret.
- Switch to the 2nd finger on the 6th string at the 6th fret. Lift the 1st finger at the exact moment you place the 2nd finger. Lift the 1st finger no more than ½ inch above the string.
- Switch back to the 1st finger on the 6th string at the 5th fret. Lift the 2nd finger at the exact moment you place the 1st finger. Lift the 2nd finger no more than ½ inch above the string.
- Continue switching 1-2-1-2-1-2. The fingers must switch simultaneously. It is helpful to close your eyes as you practice the exercise. Closing your eyes will help you focus on the feel of switching the fingers simultaneously. Ignore the sounds the fingers produce when landing on the strings. Do not lift any finger more than ½ inch above its string. NEVER LIFT ONE FINGER BEFORE PLACING THE NEXT. You can also think of the finger switching as shifting the weight from finger to finger.
- Practice all left-hand finger combinations: 1-2-1-2, 1-3-1-3, 1-4-1-4, 2-3-2-3, 2-4-2-4, 3-4-3-4. Keep the unused fingers curved, over their fret, and close to the string (no more than ½ inch above the string).
NEXT, PRACTICE ALL THE LEFT-HAND FINGER COMBINATIONS ON THE 5TH STRING, 4TH STRING, 3RD STRING, 2ND STRING, AND 1ST STRING.
You may not have time to practice all four fingers on all six strings daily. If that’s the case, practice one string a day.
Watch me demonstrate the Switching Exercise (Basic Version) with the left hand alone in Video #3:
ADD THE LEFT HAND
After you master the exercise with the left hand alone (one to two weeks), add the right hand and pluck the notes. Use the right-hand thumb to play the bass strings and the fingers (“im” and “ma” rest and free stroke) to play the treble strings.
Watch me demonstrate the Switching Exercise (Basic Version) with both hands together in Video #4.
THE SWITCHING EXERCISE: THE ADVANCED VERSION (BUT STILL FOR BEGINNERS)
In the advanced version of the switching exercise, practice the same finger combinations as the basic switching exercise. But plant the unused fingers on the next higher adjacent string.
Practice the exercise with the left hand alone in 5th position. In 5th position, it is easier for beginners to maintain a good left-hand position because the frets are closer together.
Here are the steps to practice the advanced version of the switching exercise.
WE PRACTICE THIS EXERCISE WITH THE LEFT HAND ALONE:
- Lightly set the tips of all four left-hand fingers on the 6th string in 5th position. In other words, place the 4th finger at the 8th fret, the 3rd finger at the 7th fret, the 2nd finger at the 6th fret, and the 1st finger at the 5th fret. Place each finger lightly on the string, directly behind each fret wire, not on top of the fret wire.
- Lift all four fingers off the string but keep them curved, over their fret, and close to the string (no more than ½ inch above the string).
- Press down the 3rd finger on the 5th string at the 7th fret and the 4th finger on the 5th string at the 8th fret. KEEP THE PLANTED FINGERS PRESSING DOWN ON THE 5th STRING.
- Using the 1st finger, press the 6th string down to its fret wire at the 5th fret.
- Switch to the 2nd finger on the 6th string at the 6th fret. Lift the 1st finger at the exact moment you place the 2nd finger. Lift the 1st finger no more than ½ inch above the string. KEEP THE PLANTED 3RD AND 4TH FINGERS DOWN.
- Switch back to the 1st finger on the 6th string at the 5th fret. Lift the 2nd finger at the exact moment you place the 1st finger. Lift the 2nd finger no more than ½ inch above the string. KEEP THE PLANTED 3RD AND 4TH FINGERS DOWN.
- Continue switching 1-2-1-2-1-2. The fingers must switch simultaneously. It is helpful to close your eyes as you practice the exercise. Closing your eyes will help you focus on the feel of switching the fingers simultaneously. Ignore the sounds the fingers produce when landing on the strings. Do not lift any finger more than ½ inch above its string. KEEP THE PLANTED 3RD AND 4TH FINGERS DOWN. NEVER LIFT ONE FINGER BEFORE PLACING THE NEXT. You can also think of the finger switching as shifting the weight from finger to finger.
Here is a chord diagram showing the exercise:
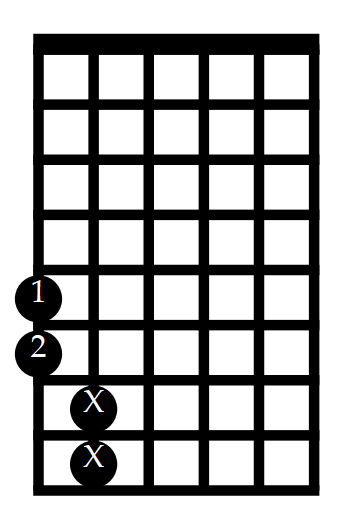
Or, this diagram:
e|-------------------------------------|
B|-------------------------------------|
G|-------------------------------------|
D|-------------------------------------|
A|---7(X)---8(X)-----------------------|
E|-----------------5--6--5--6--5--6----|
    Fingering: 1  2  1  2  1  2
EXPLANATION:
- 5th String (A):
- X: Indicates that the 3rd and 4th fingers are planted on the 5th string at the 7th and 8th frets. These fingers remain stationary on the string throughout the exercise.
- 6th String (E):
- Use your 1st finger (index) to press the string at the 5th fret.
- Use your 2nd finger (middle) to press the string at the 6th fret.
- Alternate between the 1st and 2nd fingers in a 1-2-1-2 pattern.
The advanced switching exercise is excellent for developing finger independence and coordination between the fingers that are moving and those that are stationary.
Practice these six fingering and planting combinations of the advanced version of the Switching Exercise:
PATTERN #1:

Or, this diagram:
e|-------------------------------------|
B|-------------------------------------|
G|-------------------------------------|
D|-------------------------------------|
A|---7(X)---8(X)-----------------------|
E|-----------------5--6--5--6--5--6----|
    Fingering: 1  2  1  2  1  2
EXPLANATION:
- 5th String (A):
- X: Indicates that the 3rd and 4th fingers are planted on the 5th string at the 7th and 8th frets. These fingers remain stationary on the string throughout the exercise.
- 6th String (E):
- Use your 1st finger (index) to press the string at the 5th fret.
- Use your 2nd finger (middle) to press the string at the 6th fret.
- Alternate between the 1st and 2nd fingers in a 1-2-1-2 pattern.
PATTERN #2:
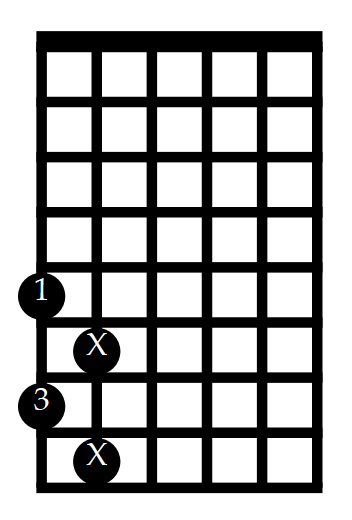
Or, this diagram:
e|-------------------------------------|
B|-------------------------------------|
G|-------------------------------------|
D|-------------------------------------|
A|---6(X)---8(X)-----------------------|
E|-----------------5--7--5--7--5--7----|
        Fingering: 1  3  1  3  1  3
EXPLANATION:
- 5th String (A):
- X: Indicates that the 2nd and 4th fingers are planted on the 5th string at the 6th and 8th frets. These fingers remain stationary on the string throughout the exercise.
- 6th String (E):
- Use your 1st finger (index) to press the string at the 5th fret.
- Use your 3rd finger (ring) to press the string at the 7th fret.
- Alternate between the 1st and 3rd fingers in a 1-3-1-3 pattern.
PATTERN #3:
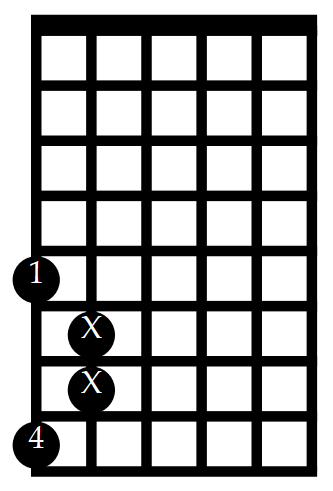
Or, this diagram:
e|-------------------------------------|
B|-------------------------------------|
G|-------------------------------------|
D|-------------------------------------|
A|---6(X)---7(X)-----------------------|
E|-----------------5--8--5--8--5--8----|
    Fingering: 1  4  1  4  1  4
EXPLANATION:
- 5th String (A):
- X: Indicates that the 2nd and 3rd fingers are planted on the 5th string at the 6th and 7th frets. These fingers remain stationary on the string throughout the exercise.
- 6th String (E):
- Use your 1st finger (index) to press the string at the 5th fret.
- Use your 4th finger (pinky) to press the string at the 8th fret.
- Alternate between the 1st and 4th fingers in a 1-4-1-4 pattern.
PATTERN #4:
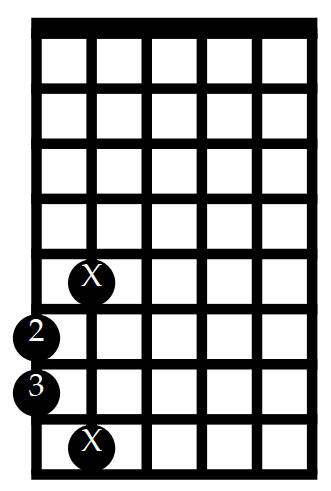
Or, this diagram:
e|-------------------------------------|
B|-------------------------------------|
G|-------------------------------------|
D|-------------------------------------|
A|---5(X)---8(X)-----------------------|
E|-----------------6--7--6--7--6--7----|
    Fingering: 2  3  2  3  2  3
EXPLANATION:
- 5th String (A):
- X: Indicates that the 1st and 4th fingers are planted on the 5th string at the 5th and 8th frets. These fingers remain stationary on the string throughout the exercise.
- 6th String (E):
- Use your 2nd finger (middle) to press the string at the 6th fret.
- Use your 3rd finger (ring) to press the string at the 7th fret.
- Alternate between the 2nd and 3rd fingers in a 2-3-2-3 pattern.
PATTERN #5:
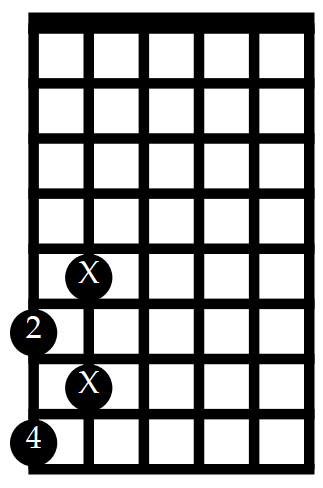
Or, this diagram:
e|-------------------------------------|
B|-------------------------------------|
G|-------------------------------------|
D|-------------------------------------|
A|---5(X)---7(X)-----------------------|
E|-----------------6--8--6--8--6--8----|
    Fingering: 2  4  2  4  2  4
EXPLANATION:
- 5th String (A):
- X: Indicates that the 1st and 3rd fingers are planted on the 5th string at the 5th and 7th frets. These fingers remain stationary on the string throughout the exercise.
- 6th String (E):
- Use your 2nd finger (middle) to press the string at the 6th fret.
- Use your 4th finger (pinky) to press the string at the 8th fret.
- Alternate between the 2nd and 4th fingers in a 2-4-2-4 pattern.
PATTERN #6:
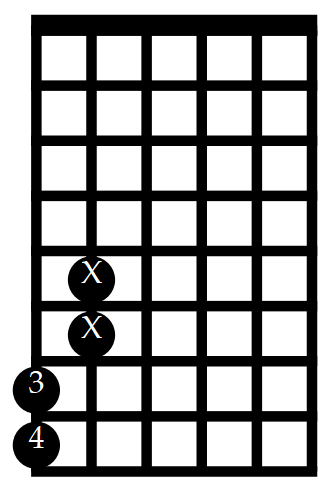
Or, this diagram:
e|-------------------------------------|
B|-------------------------------------|
G|-------------------------------------|
D|-------------------------------------|
A|---5(X)---6(X)-----------------------|
E|-----------------7--8--7--8--7--8----|
    Fingering: 3  4  3  4  3  4
EXPLANATION:
- 5th String (A):
- X: Indicates that the 1st and 2nd fingers are planted on the 5th string at the 5th and 6th frets. These fingers remain stationary on the string throughout the exercise.
- 6th String (E):
- Use your 3rd finger (ring) to press the string at the 7th fret.
- Use your 4th finger (pinky) to press the string at the 8th fret.
- Alternate between the 3rd and 4th fingers in a 3-4-3-4 pattern.
Finally, move the exercise across the fretboard.
- Plant fingers on the 4th string, play on the 5th string.
- Plant fingers on the 3rd string, play on the 4th string.
- Plant fingers on the 2nd string, play on the 3rd string.
- Plant fingers on the 1st string, play on the 2nd string.
Watch me demonstrate the Switching Exercise (Advanced Version) with the left hand alone in Video #5:
ADD THE RIGHT HAND. Play the Advanced Version of the Switching Exercise with Both Hands Together
After you master the exercise with the left hand alone (one to two weeks), add the right hand and pluck the notes. Use the right-hand thumb to play the bass strings. When playing the bass strings, plant the “ima” fingers on the treble strings. Use the fingers (“im” and “ma” rest and free stroke) to play the treble strings. When using the fingers, plant the right-hand thumb on a bass string. BE SURE YOU PLUCK THE STRING AT THE SAME MOMENT THE LEFT-HAND FINGER LANDS ON ITS STRING. The tendency will be to place the left-hand finger first and then pluck. The fingertips on both hands must touch the string at the exact same moment.
Watch me demonstrate the Switching Exercise (Advanced Version) with both hands together in Video #6.
CHROMATIC SCALES: LEFT HAND ALONE
Practicing chromatic scales is the next step up after mastering the switching exercises to master the concept of connecting notes (playing legato). The goal is to teach the guitarist to place/lift the fingers simultaneously and keep unused fingers hovering no more than ½ inch above the string. These chromatic scales are a simple left-hand finger pattern of 1-2-3-4-3-2-1 on each string. Here is how to do it step by step.
Practice the chromatic scales with the left hand alone in 5th position. In 5th position, it is easier for beginners to maintain a good left-hand position because the frets are closer together.
WE PRACTICE THIS EXERCISE ON ALL SIX STRINGS WITH THE LEFT HAND ALONE.
The Ascent:
- Set all four fingers on the string in 5th position. That means placing the 1st finger on the string at the 5th fret, the 2nd finger on the string at the 6th fret, the 3rd finger on the string at the 7th fret, and the 4th finger on the string at the 8th fret.
- Lift the fingers off the string no more than ½ inch.
- Place and press down on the 1st finger at the 5th fret.
- At the same instant you place/press the 2nd finger on the string at the 6th fret, lift the 1st finger. Do not lift the 1st finger more than ½ inch above the string. Be sure the 3rd and 4th fingers are still hovering directly above the string, no more than ½ inch. Do NOT lift the 1st finger before you place the 2nd finger. The note switch must occur simultaneously.
- At the same instant you place/press the 3rd finger on the string at the 7th fret, lift the 2nd finger. Do not lift the 2nd finger more than ½ inch above the string. Be sure the 1st and 4th fingers are still hovering directly above the string, no more than ½ inch. Do NOT lift the 2nd finger before you place the 3rd finger. The note switch must occur simultaneously.
- At the same instant you place/press the 4th finger on the string at the 8th fret, lift the 3rd finger. Do not lift the 3rd finger more than ½ inch above the string. Be sure the 1st and 2nd fingers are still hovering directly above the string, no more than ½ inch. Do NOT lift the 3rd finger before you place the 4th finger. The note switch must occur simultaneously.
The Descent
- The 4th finger is on the string at the 8th fret. The 1st, 2nd, and 3rd fingers should still be hovering above the string, no more than 1/2/ inch.
- Lift the 4th finger at the same instant you place/press the string with the 3rd finger at the 7th fret. Do NOT lift the 4th finger before you place the 3rd finger. The note switch must occur simultaneously.
- Lift the 3rd finger at the same instant you place/press the string with the 2nd finger at the 6th fret. Do NOT lift the 3rd finger before you place the 2nd finger. The note switch must occur simultaneously.
- Lift the 2nd finger at the same instant you place/press the string with the 1st finger at the 5th fret. Do NOT lift the 2nd finger before you place the 1st finger. The note switch must occur simultaneously.
Practice the chromatic scale with the left hand alone on all six strings in 5th position. In 5th position, it is easier for beginners to maintain a good left-hand position because the frets are closer together.
Watch me demonstrate the Chromatic Scale with the left hand alone in Video #7:
ADD THE RIGHT HAND
After you master the chromatic scale with the left hand alone (one to two weeks), add the right hand and pluck the notes. Use the right-hand thumb to play the bass strings. When playing the bass strings, plant the “ima” fingers on the treble strings. Use the fingers (“im” and “ma” rest and free stroke) to play the treble strings. When playing the treble strings, plant the right-hand thumb on a bass string. BE SURE YOU PLUCK THE STRING AT THE SAME MOMENT THE LEFT-HAND FINGER LANDS ON ITS STRING. The tendency will be to place the left-hand finger first and then pluck. The fingertips on both hands must touch the string at the exact same moment.
Watch me demonstrate the Chromatic Scale with both hands together in Video #8.
FINGER INDEPENDENCE: THE HOPPING EXERCISE
PLANT 3 FINGERS—HOP 1 FINGER
The “Plant 3 Fingers—Hop 1 Finger” exercise will help develop finger independence and hone finger movements across the fretboard (back and forth from the bass-string side of the neck and the treble-string side of the neck).
Practice the exercise in 5th position. In 5th position, it is easier for beginners to maintain a good left-hand position because the frets are closer together.
In 5th position, you will plant and hold three fingers on a single string and then hop the remaining finger back and forth on two other strings. There are many combinations we can practice, but for the beginning guitarist, focus on these:
PATTERN #1
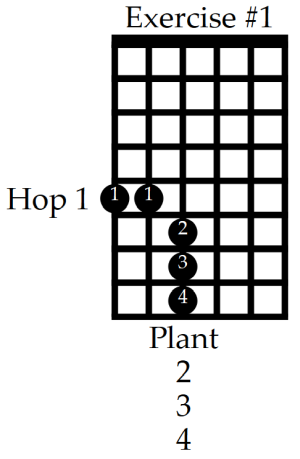
Or, this diagram:
e|------------------------------------------------|
B|------------------------------------------------|
G|------------------------------------------------|
D|---6(X)---7(X)---8(X)---------------------------|
A|------------------------------5(1)--------5(1)--|
E|------------------------5(1)--------5(1)--------|
                          Hop the 1st finger
Explanation:
- On the 4th string, plant the 2nd finger at the 6th fret, the 3rd finger at the 7th fret, and the 4th finger at the 8th fret. Do not lift the planted fingers—keep the planted fingers pressing down on the 4th string.
- “Hop” the 1st finger back and forth from the 5th fret on the 5th string to the 5th fret on the 6th string. Pluck the 5th and 6th strings with the right-hand thumb using free stroke. Plant the right-hand “ima” fingers on the first three strings.
PATTERN #2:
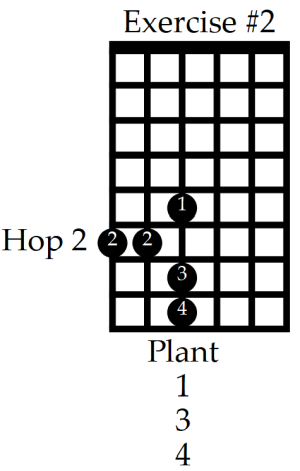
Or, this diagram:
e|------------------------------------------------|
B|------------------------------------------------|
G|------------------------------------------------|
D|---5(X)---7(X)---8(X)---------------------------|
A|------------------------------6(2)--------6(2)--|
E|------------------------6(2)--------6(2)--------|
                          Hop the 2nd finger
Explanation:
- On the 4th string, plant the 1st finger at the 5th fret, the 3rd finger at the 7th fret, and the 4th finger at the 8th fret. Do not lift the planted fingers—keep the planted fingers pressing down on the 4th string.
- “Hop” the 2nd finger back and forth from the 6th fret on the 5th string to the 6th fret on the 6th string. Pluck the 5th and 6th strings with the right-hand thumb using free stroke. Plant the right-hand “ima” fingers on the first three strings.
PATTERN #3:
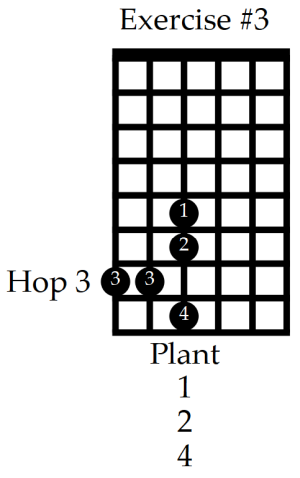
Or, this diagram:
e|------------------------------------------------|
B|------------------------------------------------|
G|------------------------------------------------|
D|---5(X)---6(X)---8(X)---------------------------|
A|------------------------------7(3)--------7(3)--|
E|------------------------7(3)--------7(3)--------|
                          Hop the 3rd finger
Explanation:
- On the 4th string, plant the 1st finger at the 5th fret, the 2nd finger at the 6th fret, and the 4th finger at the 8th fret. Do not lift the planted fingers—keep the planted fingers pressing down on the 4th string.
- “Hop” the 3rd finger back and forth from the 7th fret on the 5th string to the 7th fret on the 6th string. Pluck the 5th and 6th strings with the right-hand thumb using free stroke. Plant the right-hand “ima” fingers on the first three strings.
PATTERN #4:
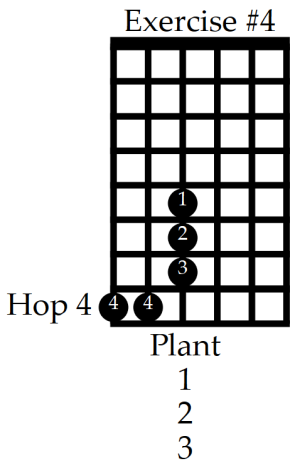
Or, this diagram:
e|------------------------------------------------|
B|------------------------------------------------|
G|------------------------------------------------|
D|---5(X)---6(X)---7(X)---------------------------|
A|------------------------------8(4)--------8(4)--|
E|------------------------8(4)--------8(4)--------|
                          Hop the 4th finger
Explanation:
- On the 4th string, plant the 1st finger at the 5th fret, the 2nd finger at the 6th fret, and the 3rd finger at the 7th fret. Do not lift the planted fingers—keep the planted fingers pressing down on the 4th string.
- “Hop” the 4th finger back and forth from the 8th fret on the 5th string to the 8th fret on the 6th string. Pluck the 5th and 6th strings with the right-hand thumb using free stroke. Plant the right-hand “ima” fingers on the first three strings.
Move the patterns across the fretboard:
- Plant on the 3rd string and hop on the 4th and 5th strings.
- Plant on the 2nd string and hop on the 3rd and 4th strings.
- Plant on the 1st string and hop on the 2nd and 3rd strings.
On all patterns, pluck with the thumb using free stroke.
Do not try to practice all the patterns and move them across the fretboard every day. Instead, rotate them.
Watch me demonstrate the Hopping Exercise in Video #9:
FINGER INDEPENDENCE: THE PLANT 2—MOVE 2 EXERCISE
The “Plant 2 Fingers—Move 2 Fingers” exercise will help develop finger independence and hone finger movements across the fretboard (back and forth from the bass-string side of the neck and the treble-string side of the neck).
Practice the exercise in 5th position. In 5th position, it is easier for beginners to maintain a good left-hand position because the frets are closer together.
In 5th position, you will plant and hold two fingers on a single string and then use the other two fingers to play on two other lower-pitched strings.
Pluck the bass strings with the right-hand thumb using free stroke. Plant the right-hand “ima” fingers on the first three strings.
Pluck the treble strings with “im” and “ma” rest and free stroke. When playing the treble strings, plant the right-hand thumb on a bass string.
There are many combinations we can practice, but for the beginning guitarist, focus on these:
PATTERN #1
e|--------------------------------------------------------------------|
B|--------------------------------------------------------------------|
G|--------------------------------------------------------------------|
D|---7(X)---8(X)------------------------------------------------------|
A|-------------------6(2)---5(1)------------------------5(1)---6(2)---|
E|---------------------------------6(2)---5(1)---6(2)-----------------|
Plant the 3rd and 4th fingers. Play with the 2nd and 1st fingers.
Explanation:
- On the 4th string, plant the 3rd finger at the 7th fret and the 4th finger at the 8th fret. Do not lift the planted fingers—keep the planted fingers pressing down on the 4th string.
- Using the 2nd and 1st fingers on the 5th string, play the 6th fret then the 5th fret.
- Still using the 2nd and 1st fingers, on the 6th string play the 6th fret, 5th fret, 6th fret.
- Finally, using the 1st and 2nd fingers, on the 5th string play the 5th fret then the 6th fret.
- Repeat several times.
PATTERN #2
e|--------------------------------------------------------------------|
B|--------------------------------------------------------------------|
G|--------------------------------------------------------------------|
D|---6(X)---8(X)------------------------------------------------------|
A|-------------------7(3)---5(1)------------------------5(1)---7(3)---|
E|---------------------------------7(3)---5(1)---7(3)-----------------|
Plant the 2nd and 4th fingers. Play with the 3rd and 1st fingers.
Explanation:
- On the 4th string, plant the 2nd finger at the 6th fret and the 4th finger at the 8th fret. Do not lift the planted fingers—keep the planted fingers pressing down on the 4th string.
- Using the 3rd and 1st fingers on the 5th string, play the 7th fret then the 5th fret.
- Still using the 3rd and 1st fingers, on the 6th string play the 7th fret, 5th fret, 7th fret.
- Finally, using the 1st and 3rd fingers, on the 5th string play the 5th fret then the 7th fret.
- Repeat several times.
PATTERN #3
e|--------------------------------------------------------------------|
B|--------------------------------------------------------------------|
G|--------------------------------------------------------------------|
D|---5(X)---8(X)------------------------------------------------------|
A|-------------------7(3)---6(2)------------------------6(2)---7(3)---|
E|---------------------------------7(3)---6(2)---7(3)-----------------|
Plant the 1st and 4th fingers. Play with the 3rd and 2nd fingers.
Explanation:
- On the 4th string, plant the 1st finger at the 5th fret and the 4th finger at the 8th fret. Do not lift the planted fingers—keep the planted fingers pressing down on the 4th string.
- Using the 3rd and 2nd fingers on the 5th string, play the 7th fret then the 6th fret.
- Still using the 3rd and 2nd fingers, on the 6th string play the 7th fret, 6th fret, 7th fret.
- Finally, using the 2nd and 3rd fingers, on the 5th string play the 6th fret then the 7th fret.
- Repeat several times.
PATTERN #4
e|--------------------------------------------------------------------|
B|--------------------------------------------------------------------|
G|--------------------------------------------------------------------|
D|---5(X)---7(X)------------------------------------------------------|
A|-------------------8(4)---6(2)------------------------6(2)---8(4)---|
E|---------------------------------8(4)---6(2)---8(4)-----------------|
Plant the 1st and 3rd fingers. Play with the 4th and 2nd fingers.
Explanation:
- On the 4th string, plant the 1st finger at the 5th fret and the 3rd finger at the 7th fret. Do not lift the planted fingers—keep the planted fingers pressing down on the 4th string.
- Using the 4th and 2nd fingers on the 5th string, play the 8th fret then the 6th fret.
- Still using the 4th and 2nd fingers, on the 6th string play the 8th fret, 6th fret, 8th fret.
- Finally, using the 2nd and 4th fingers, on the 5th string play the 6th fret then the 8th fret.
- Repeat several times.
PATTERN #5
e|--------------------------------------------------------------------|
B|--------------------------------------------------------------------|
G|--------------------------------------------------------------------|
D|---6(X)---7(X)------------------------------------------------------|
A|-------------------8(4)---5(1)------------------------5(1)---8(4)---|
E|---------------------------------8(4)---5(1)---8(4)-----------------|
Plant the 2nd and 3rd fingers. Play with the 4th and 1st fingers.
Explanation:
- On the 4th string, plant the 2nd finger at the 6th fret and the 3rd finger at the 7th fret. Do not lift the planted fingers—keep the planted fingers pressing down on the 4th string.
- Using the 4th and 1st fingers on the 5th string, play the 8th fret then the 5th fret.
- Still using the 4th and 1st fingers, on the 6th string play the 8th fret, 5th fret, 8th fret.
- Finally, using the 1st and 4th fingers, on the 5th string play the 5th fret then the 8th fret.
- Repeat several times.
PATTERN 6
e|--------------------------------------------------------------------|
B|--------------------------------------------------------------------|
G|--------------------------------------------------------------------|
D|---5(X)---6(X)------------------------------------------------------|
A|-------------------8(4)---7(3)------------------------7(3)---8(4)---|
E|---------------------------------8(4)---7(3)---8(4)-----------------|
Plant the 1st and 2nd fingers. Play with the 4th and 3rd fingers.
Explanation:
- On the 4th string, plant the 1st finger at the 5th fret and the 2nd finger at the 6th fret. Do not lift the planted fingers—keep the planted fingers pressing down on the 4th string.
- Using the 4th and 3rd fingers on the 5th string, play the 8th fret then the 7th fret.
- Still using the 4th and 3rd fingers, on the 6th string play the 8th fret, 7th fret, 8th fret.
- Finally, using the 3rd and 4th fingers, on the 5th string play the 7th fret then the 8th fret.
- Repeat several times.
Next, move the exercise across the fretboard.
- Plant fingers on the 3rd string and play the notes on the 4th and 5th strings.
- Plant fingers on the 2nd string and play the notes on the 3rd and 4th strings. (Pluck the notes with “im” and “ma” rest and free stroke).
- Plant fingers on the 1st string and play the notes on the 2nd and 3rd strings.
You will not have time to move the exercise across the fretboard and practice all the right-hand finger patterns every day. Rotate them throughout the week.
Watch me demonstrate the “Plant 2—Move 2 Exercise” in Video #10:
ODAIR’S FAVORITE DRILL (easy version)
In his outstanding book Pumping Nylon, Scott Tennant introduced an exercise by the virtuoso guitar duo Odair and Sergio Assad. This version is slightly easier for beginners. Beginning players can begin practicing it after their first year of study.
Practice on the 2nd and 4th strings. Use the thumb free stroke to pluck the notes on the 4th string and alternate “im” free stroke to pluck the notes on the 2nd string.
Practice in 5th position: The 1st finger plays the notes at the 5th fret, the 2nd finger plays the notes at the 6th fret, the 3rd finger plays the notes at the 7th fret, and the 4th finger plays the notes at the 8th fret:
An Easier Version of Odair’s Favorite Drill
e|-----------------------------------------------------------|
B|---8(4)----------7(3)----------6(2)----------5(1)----------|
G|-----------------------------------------------------------|
D|----------6(2)----------5(1)----------8(4)----------7(3)---|
A|-----------------------------------------------------------|
E|-----------------------------------------------------------|
The numbers in parenthesis are left-hand finger numbers
Explanation
This exercise is very tricky to play correctly. This is how to play it step by step. It is complicated, so read very carefully:
- Play the 2nd-string 8th fret with the 4th finger.
- Still holding the 4th finger on the 2nd string, play the 4th string 6th fret with the 2nd finger.
- Still holding the 2nd finger on the 4th string, lift the 4th finger at the exact moment you play the 2nd-string 7th fret with the 3rd finger.
- Still holding the 3rd finger on the 2nd string, lift the 2nd finger at the exact moment you play the 4th string 5th fret with the 1st finger.
- Still holding the 1st finger on the 4th string, lift the 3rd finger at the exact moment you play the 2nd-string 6th fret with the 2nd finger.
- Still holding the 2nd finger on the 2nd string, lift the 1st finger at the exact moment you play the 4th string 8th fret with the 4th finger.
- Still holding the 4th finger on the 4th string, lift the 2nd finger at the exact moment you play the 2nd string 5th fret with the 1st finger.
- Still holding the 1st finger on the 2nd string, lift the 4th finger at the exact moment you play the final note on the 4th string 7th fret with the 3rd finger.
RETURN TO STEP #1 TO REPEAT: - Still holding the 3rd finger on the 4th string, lift the 1st finger at the exact moment you play the 2nd string 8th fret with the 4th finger.
- Still holding the 4th finger on the 2nd string, lift the 3rd finger at the exact moment you play the 4th string 6th fret with the 2nd finger.
- Continue with Step #3.
Watch me demonstrate “Odair’s Favorite Drill (easy version)” in Video #11:
SUMMARY
Beginning students need to develop left-hand finger independence and agility. While learning early basic studies, the student can add the following exercises to their practice routine:
- The Press-Release Exercise: Part 1—Four Fingers Together
- The Press-Release Exercise: Part 2—Individual Fingers
- The Switching Exercise (Basic Version)
- Left hand alone
- Hands together
- The Switching Exercise (Advanced Version)
- Left hand alone
- Hands together
- Chromatic Scales
- Left hand alone
- Hands together
- The Hopping Exercise
- The Plant 2-Move 2 Exercise
- Odair's Favorite Drill (Easy Version). Practice this exercise after the first year of study.
After their first year of study, students may add exercises such as the Switcharoo Exercise (opposing motion) and the Spider Exercise.
