this is a blank placeholder
this is a blank placeholder

THE SWITCHAROO EXERCISE—OPPOSING FINGER MOTIONS AND LEFT-HAND FINGER INDEPENDENCE
By Douglas Niedt
Copyright Douglas Niedt. All Rights Reserved.
This article may be reprinted, but please be considerate and give credit to Douglas Niedt.
The switcharoo exercise trains opposing finger motions — pairs of left-hand fingers switching places on the strings — to build the finger independence every guitarist needs. This tip presents the basic 5-minute exercise, all six finger-pair combinations, and progressively harder versions with the two unused fingers planted or held stationary, taught step by step in a series of video demonstrations.
PLEASE READ THESE STUDY TIPS:
THIS TIP HAS TOO MUCH INFORMATION! Rather than trying to slog through the entire tip, pretend you are taking lessons from me!
First guitar lesson with Doug:Read the introductory section, “I Bet You Can’t Do This.” Watch Videos #1-3.
Then, read section #1, The Basic Switcharoo Exercise, and watch Videos #4-A and 4.
Read section #2, “You Have Two Goals” and watch Video #5.
Read section #3, “Kick It Up a Notch: Plant the Two Unused Fingers” and watch Video #6.
Read section #4: “Control the Two Unused Fingers Without Planting” and watch Videos #7 and #8.
Fourth guitar lesson with Doug:Read section #5, “What’s Next?” and watch Videos #9 and 10.
Grab your guitar and let’s get started!
NOTE: You can click the navigation links on the left (not visible on phones) to review specific topics.
this is a blank placeholder
I Bet You Can’t Do This:Try this and see if your fingers obey!
If you can do that, treat yourself to something special. For the rest of you, read on!
These finger movements are called opposing motion movements. I call them “switcharoos” because the left-hand fingers switch back and forth.
The switcharoo exercise develops basic elements of fundamental left-hand finger control and independence. If you cannot do these fundamental movements, your lack of finger independence will haunt every piece you play!
For example, in the next video clip, I play a phrase from Andante Op. 241, No. 5 by Ferdinando Carulli:

There I am, minding my own business, when all of a sudden, as the 3rd finger reaches across the neck to play the C on the 5th string in the final measure, the innocent and unsuspecting pinky gets pulled along with it. Kidnapped! Abducted by force! Watch this shocking video.
What should happen is that the pinky should be independent of the 3rd finger and stay on the treble-string side of the fretboard. Specifically, the pinky is going to play D on the 2nd string at the 3rd fret and therefore should hover above the 2nd string about 1/4 inch away:

Unfortunately, if you are one of the many who are afflicted with a shortage of finger independence, the third finger will pull the pinky with it over to the bass-string side of the fretboard. The innocent pinky is on the wrong side of the fretboard and must then scramble and lunge to return to the other side of the fretboard to get to the 2nd string in time to play the D.
Watch me as I demonstrate for my “studio audience” that if we develop our finger independence properly, with exercises such as the Switcharoo Exercise, we can position the 4th finger correctly.
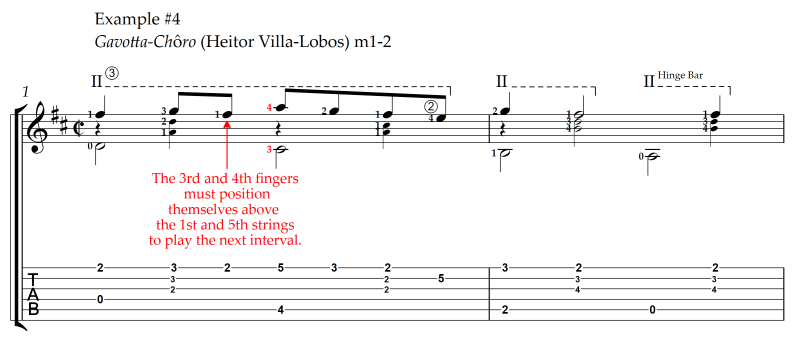
Here are a few other examples where fingers must move in opposing motion to play smoothly and effortlessly :

The switcharoo exercise will benefit guitarists of every level:
- Beginners: Develop fundamental finger independence.
- Intermediate: Continue developing and perfecting finger independence and increase finger control.
- Advanced and teachers: Use as a gentle warm-up exercise, maintain finger control and independence, and teach the exercise to your students.
In this technique tip, I will present the switcharoo exercise and break it down into its component parts. I will explain how to execute the movements for each pair of finger switches in detail and show the best ways to practice them.
this is a blank placeholder
1. The Basic Switcharoo Exercise
Here is the 5-minute version of the exercise in a nutshell:
Now that you see the basic idea, let’s do a deep dive into the mechanics of the switcharoo exercise. We will begin with the easiest combination using the 1st and 2nd fingers on the 2nd and 4th strings. We start in 7th position, where the frets are closer together, so the exercise is a little easier to play.
Points to Remember
- For now, the main goal is to land the two fingers of each pair simultaneously. If they don’t land together, intentionally place the other finger first. Sometimes just thinking to place the other finger first will help them land together.
- Only lift the fingers ½ inch as you switch positions.
- On the right hand, alternate pi pm. If that is too confusing, use all pi or all pm. You can add the alternation later. Intermediate and advanced students can also practice alternating pm pa or pa pi.
- Be sure you are always in a parallel hand position. The fingers will stay spread apart. In general, keep the little finger side of the hand close to the neck. Do not swing away from the neck.
- Don’t move your wrist. Only move the fingers for maximum benefit.
- You don’t have to place the 1st and 4th fingers on the fingertips.
- We will play detached changes, not legato. Scott Tennant recommends also practicing them legato, but I don’t find as much value in that as in playing staccato or detached changes.
For beginners, if the 2nd and 4th strings are too difficult, try adjacent strings such as the 2nd and 3rd or the 3rd and 4th.
PRACTICE SWITCHING ALL SIX FINGER PAIRS:
- 1st and 2nd fingers
- 1st and 3rd fingers
- 1st and 4th fingers
- 2nd and 3rd fingers
- 2nd and 4th fingers
- 3rd and 4th fingers
this is a blank placeholder
2. You Have TWO Goals
- Our first goal is to be able to place and lift the switching fingers simultaneously.
- The second goal is to keep the two unused fingers stationary.
The next addition to the switcharoo exercise is to PLANT THE TWO UNUSED FINGERS. This will help you accomplish goal #2.
this is a blank placeholder
3. Kick It Up a Notch: PLANT THE TWO UNUSED FINGERS
Planting the unused fingers on a string (usually the 3rd string) kicks the challenge up a notch. It develops the muscles so the unused fingers can eventually remain stationary (without planting, of course), hovering in the air as the switching fingers make their movements back and forth. Here is how to do it:
- Place a pair of switching fingers on their strings. Start with the 2nd and 4th strings.
- Plant the two unused fingers on the 3rd string.
- Move the switching fingers back and forth BUT KEEP THE TWO PLANTED FINGERS ON THE 3rd STRING.
On some finger pairs, planting the unused fingers on the 3rd string may be too difficult. The notes may get damped by the planted fingers or sound unclear or buzzy. If that happens, try this:
- Plant only one of the unused fingers. Do the finger switches.
- Next, plant only the other unused finger. Do the finger switches.
- Finally, try again to plant both unused fingers. Do the finger switches.
If that doesn’t work, try planting the unused fingers on the 1st string or even the 5th string.
Be sure to practice all six pairs of switching fingers with the two unused fingers planted on the 3rd string:
- If you are switching the 1st and 2nd fingers → Plant the 3rd and 4th fingers
- If you are switching the 1st and 3rd fingers → Plant the 2nd and 4th fingers
- If you are switching the 1st and 4th fingers → Plant the 2nd and 3rd fingers
- If you are switching the 2nd and 3rd fingers → Plant the 1st and 4th fingers
- If you are switching the 2nd and 4th fingers → Plant the 1st and 3rd fingers
- If you are switching the 3rd and 4th fingers → Plant the 1st and 2nd fingers
4. Control the Two Unused Fingers WITHOUT Planting
Once you can place the switching fingers simultaneously with and without planting, move onto the next step. Do the switcharoos on the 2nd and 4th strings for several repetitions with the unused fingers planted on the 3rd string. Then, take the planted fingers off the string. Do the finger switches. Are the unused fingers staying stationary, ½ inch above the 3rd string? They probably won’t obey.
What usually happens is that the switching fingers trigger one or both of the unused fingers to move. To eliminate the trigger, move the switching fingers in super slow motion. If the unused fingers still jump out of position, slow down even more to bypass the trigger. Once you are able to bypass the trigger, the fingers will remain relatively stationary. With more practice, you will be able to fine-tune your control over the unused fingers so that they stay stationary. Finally, very gradually increase the speed of the switching fingers in very small increments as your muscles and brain learn to bypass the trigger.
this is a blank placeholder
What’s Next?
Your practice time is limited, so you don’t want to spend two hours doing the switcharoos. There are many variations but explore them gradually over a period of months.
On the basic exercise and the planting version, over a period of months, gradually widen the distance between the switching fingers:
- Start on ② and ④. If that is too difficult, do the adjacent strings ② and ③ for a few weeks. Then try again with ② and ④.
- Master the 2nd and 4th strings and then try ② and ⑤.
- Finally, try the ② and ⑥.
For many students, it may be impossible to do the 2nd and 5th strings or the 2nd and 6th strings. That’s okay. You will benefit tremendously from only doing the 2nd and 4th strings (or adjacent strings).
Whichever string combination you are using, remember to practice all six pairs of fingers (without planting and with planting the two unused fingers):
- 1st and 2nd fingers
- 1st and 3rd fingers
- 1st and 4th fingers
- 2nd and 3rd fingers
- 2nd and 4th fingers
- 3rd and 4th fingers
Advanced students can practice every finger pair and string combination (the circled numbers are the string numbers).
Practice switching all six finger pairs on adjacent strings (without planting and with planting the two unused fingers):
① and ②
② and ③
③ and ④
④ and ⑤
⑤ and ⑥
Practice switching all six finger pairs (without planting and with planting the two unused fingers) with one string between the finger pair:
① and ③
② and ④
③ and ⑤
④ and ⑥
Practice switching all six finger pairs (without planting and with planting the two unused fingers) with two strings between the finger pairs:
① and ④
② and ⑤
③ and ⑥
Practice switching all six finger pairs (without planting and with planting the two unused fingers) with three strings between the finger pairs:
① and ⑤
② and ⑥
Plus, instead of only practicing in 7th position, you can practice in other positions as well. 9th position is challenging because the strings are higher above the fretboard. 1st position is challenging because the frets are further apart. Playing in different positions will help you experience the differences in string tension and the feel of the neck.
FINAL THOUGHTS
I consider this to be an essential exercise for beginning and intermediate students to master. If you spend five to ten minutes a day on the switcharoos, you will see a significant improvement in your finger independence and control in a few weeks. Remember, speed is not important.
Once learned, it can be part of any guitarist’s daily warmup routine. It is a low-impact exercise for the muscles as long as you begin with the combinations on adjacent strings or combinations with one string between the finger pair (the basic switcharoo). If you missed it, watch Video 4-A for the five-minute version.
Over a period of months, you can progress to wider string spacings and practice in all areas of the neck, without planting and with planting. When you are not planting, strive to keep the two unused fingers as stationary as possible. And again, remember, speed is not important. This exercise is all about developing finger independence and control.
DOWNLOADS
1. Download a PDF of the article with links to the videos. Depending on your browser, it will download the PDF (but not open it), open it in a separate tab in your browser (you can save it from there), or open it immediately in your PDF app.
Download the PDF: The Switcharoo Exercise—Opposing Finger Motions and Left-Hand Finger Independence (with links to the videos).
2. Download the videos. Click on the video link. After the video page opens, click on the three dots on the bottom right. Select "Download."
Switcharoos Video #1 : Can You Do This?
Switcharoos Video #2: The Little Finger Gets Pushed Around (Carulli Andante)
Switcharoos Video #3: The Solution to the Pinky Getting Pushed Around (Carulli Andante)
Switcharoos Video #4-A: How to Practice the Switcharoo. It’s a 5-minute exercise!
Switcharoos Video #4: A Deep Dive into How to Practice the Switcharoo Exercise
Switcharoos Video #5: We Have Two Goals
Switcharoos Video #6: Video #6: Planting the Two Unused Fingers
Switcharoos Video #7: Controlling the Unused Fingers Without Planting
Switcharoos Video #8: How to Bypass Trigger Fingers
Switcharoos Video #9: Widen the Distance Between the Switching Fingers
Switcharoos Video #10: Advanced Students can Practice ALL the Finger and String Combinations
Guitar Technique Tips
Your Personal Guitar Lesson

"Douglas who?"
Douglas Niedt is a successful concert and recording artist and highly respected master classical guitar teacher with 50 years of teaching experience. He is Associate Professor of Music (retired), at the Conservatory of Music and Dance, University of Missouri-Kansas City and a Fellow of the Henry W. Bloch School of Management—Regnier Institute for Entrepreneurship and Innovation.
Doug studied with such diverse masters as Andrés Segovia, Pepe Romero, Christopher Parkening, Narciso Yepes, Oscar Ghiglia, and Jorge Morel. Therefore, Doug provides solutions for you from a variety of perspectives and schools of thought.
He gives accurate, reliable advice that has been tested in performance on the concert stage that will work for you at home.
PURCHASE AN ALL-ACCESS PASS
TO THE VAULT OF CLASSICAL GUITAR TECHNIQUE TIPS

"Hello Mr Niedt,
My name's Gretchen, and I'm so happy I purchased an All-Access Pass to the Vault. I love your awesome technique tips. I'm amazed how much I have improved my playing.
Thank you!"
ARE YOU LOOKING FOR PROVEN STRATEGIES
THAT WILL MAKE YOU A BETTER GUITARIST?
Check out the game-changing tips in my Vault—I promise they will kick your playing up to the next level.
Purchase an All-Access Pass to the Vault.
It's a one-time purchase of only $36!
You receive full access to:
- Over 180 technique tips in The Vault.
- Special arrangements of Christmas music
- Arrangement of the beautiful Celtic song, Skellig
- Comprehensive guide, How to Master the Classical Guitar Tremolo
All that for a one-time payment of only $36. Take me to the page to Purchase an All-Access Pass
Contact Me
Do you have a question?
Comment?
Suggestion for the website?