
MORE THAN YOU EVER WANTED TO KNOW ABOUT:
GUIDE FINGERS ON THE CLASSICAL GUITAR
By Douglas Niedt
Copyright Douglas Niedt. All Rights Reserved. This article may be reprinted, but please be considerate and give credit to Douglas Niedt.
A guide finger is a left-hand finger that stays on its string as it moves from one fret to another during a shift, providing security and seamlessly connected notes. This in-depth article covers both types — the full-pressure and the released-pressure or “glide” guide finger — when to use them and when to avoid them, barres and hinge barres as guides, and Carlevaro’s argument against them, with musical examples and sound clips.
At first glance it would seem that a Tech Tip about guide fingers on the classical guitar should be pretty simple and straightforward. In fact, Cindy Egger, one of my former students, was here in our studio recording her new CD with my son Alex engineering. I explained that I was knee-deep in writing this article. She didn’t understand why it was taking so long to write the article and asked, “Don’t most guitar methods cover that in one paragraph?” Well, yes they do. In most guitar methods, the concept of the guide finger is explained in just a few sentences!
But, if we do a little digging into the topic, there is actually disagreement among very good players about whether guide fingers should even be used. If a player does use guide fingers, there are variations and nuances in their use. In fact, when I decided to choose guide fingers as the topic of this month’s article, I knew it would be more than just a few sentences. What I didn't know was that it would take me well over 20 hours to complete the entire essay including writing out the musical examples and recording the sound clips.
Guide Fingers are an Outdated Idea?
Abel Carlevaro was a respected Uruguayan guitarist, composer, pedagogue, and teacher of guitar great Eduardo Fernandez. In his School of Guitar, Exposition of Instrumental Theory, he states that the use of guide fingers is a "false concept" and that the very idea is "outdated." This viewpoint is a 180 degree shift of thinking from other schools of thought and is certainly worth considering.
In a nutshell, Carlevaro says that before the shift, the fingers must "abandon" the strings. They withdraw their pressure from the string, allowing themselves to be lifted perpendicularly off the strings. After being lifted, they enter into a momentary state of relaxation, before being transported by the arm to their new fret. Carlevaro strongly emphasizes that the perpendicular lift off the string is nearly imperceptible to the eye.
Carlevaro’s focus is to execute shifts with maximum accuracy and minimal effort. But an interesting side benefit of his shifting technique is that it eliminates string squeaks and other shifting noise, especially on the wound bass strings. When the fingers are lifted perpendicularly off the strings, friction is eliminated. Therefore, no noise is produced.
John Williams' Take on Guide Fingers and Finger Squeaks
This is not a tech tip about avoiding string noises or the mechanics of how to shift. But quickly as a sidelight and as a prelude to the rest of this tech tip, there is one very easy fix to eliminate string noises. I was speaking with John Williams after his concert in St. Louis a few years ago. He was very excited about the strings he was using: D'Addario Pro Arte Composites Lightly Polished EJ45LP-normal tension (you can order the basses separately). He explained that the basses were lightly polished and that he could now play things like the fast middle section of Villa-Lobos' Prelude No. 4 without having to lift his fingers off the strings (a la Carlevaro) and that there were no string noises. He played a passage to show me. He said he much preferred to leave his fingers down on the strings to produce perfectly legato (smooth, connected) shifts. He said that in the past, when he used other strings, he would lift his fingers to eliminate the string noises. But lifting his fingers produced an element of disjointedness between the chord changes that he never liked.
I Like Guide Fingers
Which brings me to the use of guide fingers. I'm with Williams. Although I understand and appreciate the Carlevaro approach (and use it time to time), I like the perfectly legato shifts that can be produced with the use of guide fingers. For those of us less neuro-muscularly gifted than Eduardo Fernandez, I also welcome the security guide fingers provide. Carlevaro would argue that with practice, his method of shifting without guide fingers would produce equal or greater security. I have not yet found that to be true in my own playing. And, I think that John Williams' (the greatest technician of our time) preference for using guide fingers is very significant. The Segovia school and the Romero school of playing use guide fingers both for technical security and the seamless, legato connections they provide.
There are Two Types of Guide Fingers
Simply put, when you move a left-hand finger from point "a" to point "b" while keeping it on the same string, it is called a guide finger.
But there are two basic types of guide fingers:
- One is where you keep the finger tightly pressing the string onto the frets with no letup as you move from one fret to the next. Perhaps we could call it the "full-pressure guide finger."
- The other is where your finger stays on the string, but with very light pressure, so that the string doesn't touch the frets as you move from one fret to the next. When the finger reaches its destination, it then presses the string fully onto the fret. We could call this the "released-pressure guide finger." Some call it a "glide" finger.
Guide fingers provide us with two major benefits:
- Security
- Seamlessly connected notes during shifts.
Here are some simple shifts where the guide finger stays tightly on the string as it moves quickly from fret to fret--the "full-pressure guide finger." There is absolutely no release of pressure on the string as the guide finger moves to its destination:

When executed well, the use of the full-pressure guide finger produces an inaudible shift, with the notes perfectly connected.
Even on long shifts, if you want the sound to be absolutely legato, you do not release any pressure off the string:
If you listen very carefully to the shifts in example #2, you may hear my guide finger whoosh across the frets. Let me play a shift for you, intentionally producing a louder whoosh in Soundclip #3.
The harder I press the string when I shift, the more fret noise will be produced. To eliminate or reduce the fret noise and retain the benefits of the guide finger, still maintain constant pressure on the string, pressing it continually onto the fretboard, but use slightly less pressure.
There is also another solution to reducing the whoosh noise on long shifts while still using a guide finger. As you are about to shift, release the pressure on the string so the finger stays on the string but the string is not pressed onto the fretboard--the "released-pressure guide finger." Shift to the new fret and on arrival, press firmly to play the note. The release of pressure greatly reduces the amount of friction so less noise is produced.
Incidentally, the common problem of unintentional glissando is not a result of using guide fingers, but of improper shifting technique. To shift using a guide finger, without producing glissando, requires practice. The crucial requirement is that both hands must be absolutely synchronized in their movements.
Glissando is produced when the left hand moves first and the right hand plucks second. To play without a glissando, the right-hand finger must touch the string at the same moment the left hand begins its shift.
Yet another digression--people often use the words glissando and portamento interchangeably or even incorrectly (Carlevaro or his translator incorrectly uses the term portamento). A portamento can be thought of as a "slide" of infinite pitches while a glissando consists of individual notes being sounded out however quickly the glissando is executed. Therefore, a violin produces portamento when the player moves his bow on the string and slides his finger smoothly up or down the fingerboard. The guitar, piano, and pitched mallet instruments are not capable of producing portamento. The piano sounds each individual note as the player glides a finger across the keys. A similar thing happens when a guitarist plucks a note and then slides the finger up or down the string. The finger "defines" each individual chromatic pitch as it slides up or down the fretboard. That is a glissando, not a portamento.
The Use of Guide Fingers to Intentionally Produce Glissando
Sometimes we use guide fingers intentionally to produce desired glissando effects. Villa-Lobos liked the sound of glissando on the guitar and many guitarists play this passage from Prelude No. 3 with pronounced glissando:

My guide fingers are still on the strings at all times, but they are not pressing the strings onto the fretboard as I shift. (The first finger is lifted totally off the string at each shift to avoid squeaks.)
Of course it is totally up to the performer to choose which effect to use. One could actually play the passage "dry" the first time through and "wet" on the da capo.
The "Released-Pressure Guide Finger" or "Glide Finger"
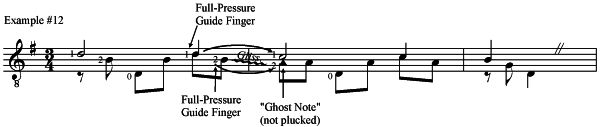
The use of the "released-pressure guide finger" or "glide finger"comes in handy to clean up chord changes in arpeggio passages. Here's a passage from Dionisio Aguado's well-known Estudio in A minor:
I know this can be fingered other ways. But bear with me. Just so you understand the concept, let's work with this fingering. Depending on how you use the first finger as a guide finger, there are three possible outcomes:

The first method of execution produces a "ghost" note. The full-pressure guide finger shifts from the 1st to the 2nd fret on the 2nd beat but only the open G is plucked. As a result of that "bare" slide of the 1st finger, a C# is heard on top of the open G. The C# isn't plucked, but is heard as the result of the 1st finger slide on the second beat of the measure.
The second method of execution eliminates the "ghost" note. This is done by maintaining pressure on the guide finger, but waiting to shift until the sixth 16th-note of the measure, i.e. shifting on the C#. It definitely sounds cleaner than the first method. But the harmony changes on the second beat from an A minor chord to an A7 chord. I don't want to hear the C natural (which is not part of an A7 chord) ringing at the change of harmony. Plus, it is kind of hard to make the finger shift on the sixth 16th note of the measure. Because the harmony changes on the 1st or second beat of every measure, it is more natural for the hand to shift precisely on the beats.
The third method is the best solution. You shift precisely on the second beat, you hear a clean change of harmony, and there are no extraneous noises.
You perspicacious players out there are probably screaming, “But Doug, but Doug; what about right-hand planting?” Yes, one could plant "i" and "m" on the second and first strings as the thumb plucks the open G on the second beat. Because the plant mutes the first and second strings, the plant would actually make all three guide finger techniques sound identical. But possibly in this example and definitely in other instances, we may prefer the sound of the upper strings ringing through the changes rather than being cut off at the plant. We cannot use planting when we want the upper strings to ring. In such cases, we need to carefully choose which type of guide finger to use for optimal results.
Planting and Guide Fingers Can Work Together to Mutual Advantage
In Matteo Carcassi's Study #3, we can use both the planting technique and guide fingers to mutual advantage:

In this piece, I plant at every change of harmony, which is usually the 1st beat of each measure. Planting produces a clean separation between harmonic changes which I find desirable here (although it also sounds very good without planting).
In measure 1 to measure 2 we can keep the second finger down as we shift from the second string C# to the D. Because I will plant "i", "m", and "a" on the first three strings as I play the sixth string G# in measure 2, I can keep the guide finger down tightly on the second string for security and stability as I make the chord change. The plant will eliminate the unwanted glissando from the 2nd string C# to D.
This technique also works for the chord change from measure 3 to measure 4. We want to keep the 1st and 2nd fingers down tightly on the second and third strings as we shift. If we don't plant "i", "m", and "a" on the first three strings, we hear lots of glissando.
With the plant, the unwanted glissandi on the two strings are eliminated.
The combined use of guide fingers and planting also allows us to use a very secure left-hand fingering for measures 17 through 20 of the same piece:

The second finger is our guide finger on the 3rd string. It can remain firmly pressing on the string, guiding the hand from chord to chord with no unwanted glissandi as long as the right hand plants on the first beat of each measure.
Know When to Use 'Em. Know When to Lose 'Em.
In Francisco Tarrega's Lagrima, we have a problem in the opening measure:

From the 2nd to 3rd beat, if we use both the second and fourth fingers as full-pressure guide fingers, we get a squeak from the 4th string.
I don't want to release the pressure off both strings. Although the squeak would be eliminated, I wouldn't get that absolute, connected legato sound from the A to the B melody notes on the first string. The solution is to keep the pressure down on the 4th finger to connect the A to the B, but release the 2nd finger off the 4th string to eliminate the string squeak.
From measure 1 to measure 2 we have to decide if we want a "soupy" glissando from the high B on the first string down to the F#, or whether we want it "dry." If we want the glissando, we keep the 4th finger pressing firmly on the first string as we drag it down to the F#.
If we don't want the glissando, we still use the 4th finger as a guide finger, but we release the pressure on the string as we shift.
The same technique used in the first measure of Lagrima can be used in this passage from Issac Albeniz's Asturias (Leyenda):

This passage and the similar octave passages that follow it are famous as squeak buckets. When listening to these passages in concerts or on recordings, the squeaks are often overwhelming, especially in a reverberant setting.
I should mention that with a little ingenuity in fingering, the squeaks can actually be totally eliminated:

But personally, I like the octaves fingered on the 1st and 4th strings as shown in Example #9. I like the melody notes all on the same string for continuity of tone quality, and I like the macho sound of the lower octave notes on the 4th string. To get rid of the squeaks, I could just follow John Williams' string recommendation. Or, I could do this:

I keep my 1st finger down tightly on the first string as my guide, connecting the melody absolutely flawlessly and musically with whatever amount of glissando I desire. I lift my 3rd finger at each shift to eliminate the squeaks. Actually, even when using the lightly polished "squeakless strings," a passage such as this generates a small amount of string noise.
Let’s look at another example where we must be selective in what guide fingers we employ. In this Waltz by Ferdinand Carulli, we could use the 1st and 2nd fingers as guide fingers:
Unfortunately, although we would get a great connection on the 2nd string D to C, we would get a glissando on the 3rd string from the 2nd finger traveling from the 4th fret B to the 2nd fret A.
The fix for this is shown in the next example:

As shown above, we can simply release the pressure from the 2nd finger off of the 3rd string as we make the shift. Or, we could lift it entirely off the string and then reset it in the second measure at the second 8th-note to play the A.
A common mistake in playing Fernando Sor's Study No. 2 (Segovia Edition) is to use the 2nd finger as a full-pressure guide finger to execute the chord change from measure 2 to measure 3 and then again from measure 3 to measure 4:

The proper execution is not to use the finger as a guide at all! Lift it perpendicularly off the string to prevent any glissando or string squeak:

Step Up Your Security Level--Pre-Plant a Guide Finger
A technique I frequently use is to pre-plant a finger on a string to use as a guide finger. A good example is found toward the end of Fernando Sor's Study No. 5 (Segovia Edition):

On the third beat of the 2nd measure above, I plant my 2nd finger on the 1st string at the 6th fret (A#). Then I use that 2nd finger as my guide finger to give me extra security for the shift to the G on the first beat of the next measure.
In Matteo Carcassi's Study #3 is another precarious shift toward the end of the piece:

As it stands, we have no guide fingers at all. But on the 4th beat of the first measure, we can pre-plant the 2nd finger on the first string 8th fret (C). On the downbeat of the next measure, we can use that pre-planted 2nd finger to guide us down to the first-fret F natural. As before, planting “i”, “m”, and “a” on the treble strings at the shift will eliminate any unwanted glissando. The technique turns an "iffy" shift into a very stable and relatively effortless shift. Whenever you encounter a shift or chord change that has no obvious guide fingers, ask yourself what finger is free at that moment. Look at your hand and see if there is a finger that is not currently holding down a note. Ask yourself if that finger can be planted on a string that isn’t ringing to serve as a guide finger.
Bars Also Make Nice Guide "Fingers"
In the well-known Romanza or Romance de Amor or Romance, is a difficult shift toward the end of the E major section:

Most guitarists simply "jump off the cliff" hoping their 4th finger lands securely enough on the first string 9th fret to hold that C# clearly while stretching to reach down to place the 1st and 2nd fingers at the 5th and 6th frets. Often they miss the C# altogether. Or they "lose" the C# as they stretch down to try to reach the other two notes. Or, they succeed in playing a clear 1st-string C# and keep it ringing, only to buzz one or both of the other two notes.
What works really well is to use the half-bar at the 9th fret as a guide finger:
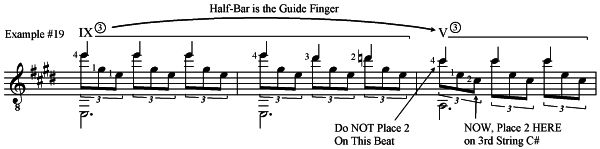
Keeping the half-bar at the 9th fret down tightly on the strings, slide it to the 5th fret as your 4th finger lands on the 9th fret C#. However, do NOT look at the bar or the 5th fret. Keep your eyes focused on the 9th fret. Train the bar to find its own way to the 5th fret. Also, the bar and 4th finger must reach their destinations simultaneously. Don't add the 2nd finger to the 3rd- string C# at the 6th fret until you have to pluck it. Do NOT try to place it on the 1st beat.
Here is a good exercise to practice first before trying the actual arpeggio:

I know the second chord is ugly. But this is the actual chord change you must make at the moment of the shift in the song. Remember, the 2nd finger is added later to the 3rd-string C#.
A fairly simple use of the bar as a guide finger occurs in Matteo Carcassi's Study #3 from measure 4 to measure 5:

The half bar at the 5th fret slides down to the 2nd fret on the downbeat of the second measure of the example. As mentioned previously, planting of the right-hand fingers on the treble strings eliminates any glissando effect. In this instance, the bar can be held with firm pressure during the shift or the pressure can be released or reduced and then reapplied at the 2nd fret.
Hinge Bars Also Make Great Guide Fingers
Full bars are seldom used as guide fingers. Moving a bar up or down the neck with either full or reduced pressure creates a lot of friction or drag. Freedom of movement is impaired. There are also major problems with bass string squeaks. Let the hinge bar come to your rescue. Let's look again at Romanza, this time at the beginning of the E major section:

In going from the 2nd measure to the 3rd measure, we have to shift the bar from the 2nd fret to the 7th fret. Do NOT keep the bar flat on the fretboard. Instead, as you shift, lift only the tip joint of the bar off the bass strings while still holding the first string with the inner part of the bar finger. Slide this hinge bar along the edge of the fretboard to the 7th fret. As you reach the 7th fret, place the tip of the bar back onto the bass strings. At no time does the inner part of the bar finger leave the first string or the edge of the fretboard. There should be constant, secure contact. The hinge bar allows complete mobility, speed of movement, and is very stable.
Use 'Em All
With a little thought, guide fingers can be used very creatively to make passages more musical AND secure to play. Going back once again to Carcassi's Study #3 we have a passage from Part II shown here with a very common fingering:

Using the half bar as a guide finger to shift from the 2nd fret to the 7th fret works well. But the change from the 7th fret half bar to the 9th fret full bar is not perfectly smooth and slightly unstable technically. Here is a rather creative way of playing this passage that I have just thought of as I am writing this article:

As you move from measure 1 to measure 2, use the 4th finger as a released-pressure guide finger from the 5th to the 7th fret on the 1st string. Because you are planting with the right hand, you could use a full-pressure guide finger. But I think that slightly releasing the finger pressure gives you more mobility to shift to the position required by the following chord which has the 2nd, 3rd, and 4th fingers all at the 7th fret.
Shifting on the 4th beat of the second measure from the B to the B# uses a full-pressure 4th finger guide. Then, the piece de resistance, as the 4th finger slides to B# at the 8th fret, pre-plant a hinge bar at the 6th fret. The 2nd finger AND the hinge bar are now your guide fingers to take you to the C# major full-bar chord on the downbeat of the third measure. If you get a bit of string noise, try releasing some pressure off the hinge bar and the 2nd finger when you shift. The melody is smoothly connected AND the change to the full bar chord is now secure and stable. Wow! It’s always exciting to come up with ingenious fingering solutions like that.
What Does All This Mean?
To conclude, although the Carlevaro school sees the use of guide fingers as a false concept, I am not quite prepared to abandon their use. I think it is significant that John Williams, the rest of the Segovia school, and the Romero school use guide fingers. I feel like I'm in good company!
For maximum effectiveness, use both types: full-pressure and released-pressure. Know when to use them and when not to.
When used correctly, guide fingers are of tremendous benefit:
- They provide seamless, musical connections between notes.
- They can clean up a chord change or shift, or add expressive glissando effects.
- They provide security and stability to difficult shifts.
- The pre-planting of a finger to use as a guide is extremely valuable in precarious shifts that would otherwise have no guide fingers.
- Bars and hinge bars can also be used very effectively as guide "fingers."
The integrated use of all these nuances and techniques of guide fingers will raise your playing to a new level of musicality and technical security.
The PDF Version
We have a PDF version of this article you can download to your computer.
"I can't save the PDF. I don't see a save button and if I right-click the PDF it doesn't give me an option to save. What do I do?"
Click Start. Click Programs.
Scroll down to Adobe Reader. Click it to open the program.
Click Edit.
Click Preferences.
Under Categories click "Internet" then uncheck the first option, "Display PDF in browser."
Click "OK" at the bottom of the window.
Close the program.
Then go back to the webpage and click the link for the PDF again.
If that doesn't work, try Firefox or Google Chrome.
If that doesn't work, you're on your own.
Guide Fingers on the Classical Guitar
Guitar Technique Tip of the Month
Your Personal Guitar Lesson

"Douglas who?"
Douglas Niedt is a successful concert and recording artist and highly respected master classical guitar teacher with 50 years of teaching experience. He is Associate Professor of Music (retired), at the Conservatory of Music and Dance, University of Missouri-Kansas City and a Fellow of the Henry W. Bloch School of Management—Regnier Institute for Entrepreneurship and Innovation.
Doug studied with such diverse masters as Andrés Segovia, Pepe Romero, Christopher Parkening, Narciso Yepes, Oscar Ghiglia, and Jorge Morel. Therefore, Doug provides solutions for you from a variety of perspectives and schools of thought.
He gives accurate, reliable advice that has been tested in performance on the concert stage that will work for you at home.
PURCHASE AN ALL-ACCESS PASS
TO THE VAULT OF CLASSICAL GUITAR TECHNIQUE TIPS

"Hello Mr Niedt,
My name's Gretchen, and I'm so happy I purchased an All-Access Pass to the Vault. I love your awesome technique tips. I'm amazed how much I have improved my playing.
Thank you!"
ARE YOU LOOKING FOR PROVEN STRATEGIES
THAT WILL MAKE YOU A BETTER GUITARIST?
Check out the game-changing tips in my Vault—I promise they will kick your playing up to the next level.
Purchase an All-Access Pass to the Vault.
It's a one-time purchase of only $36!
You receive full access to:
- Over 180 technique tips in The Vault.
- Special arrangements of Christmas music
- Arrangement of the beautiful Celtic song, Skellig
- Comprehensive guide, How to Master the Classical Guitar Tremolo
All that for a one-time payment of only $36. Take me to the page to Purchase an All-Access Pass

Contact Me
Do you have a question?
Comment?
Suggestion for the website?