this is a blank placeholder
this is a blank placeholder

How to Learn a Piece
On the Classical Guitar

"Douglas who?"
Douglas Niedt is a successful concert and recording artist and highly respected master classical guitar teacher with 50 years of teaching experience. He is Associate Professor of Music (retired), at the Conservatory of Music and Dance, University of Missouri-Kansas City and a Fellow of the Henry W. Bloch School of Management—Regnier Institute for Entrepreneurship and Innovation.
Doug studied with such diverse masters as Andrés Segovia, Pepe Romero, Christopher Parkening, Narciso Yepes, Oscar Ghiglia, and Jorge Morel. Therefore, Doug provides solutions for you from a variety of perspectives and schools of thought.
He gives accurate, reliable advice that has been tested in performance on the concert stage that will work for you at home.

Contact Me
Do you have a question?
Comment?
Suggestion for the website?
PURCHASE AN ALL-ACCESS PASS
TO THE VAULT OF CLASSICAL GUITAR TECHNIQUE TIPS

"Hello Mr Niedt,
My name's Gretchen, and I'm so happy I purchased an All-Access Pass to the Vault. I love your awesome technique tips. I'm amazed how much I have improved my playing.
Thank you!"
ARE YOU LOOKING FOR PROVEN STRATEGIES
THAT WILL MAKE YOU A BETTER GUITARIST?
Check out the game-changing tips in my Vault—I promise they will kick your playing up to the next level.
Purchase an All-Access Pass to the Vault.
It's a one-time purchase of only $36!
You receive full access to:
- Over 180 technique tips in The Vault.
- Special arrangements of Christmas music
- Arrangement of the beautiful Celtic song, Skellig
- Comprehensive guide, How to Master the Classical Guitar Tremolo
All that for a one-time payment of only $36. Take me to the page to Purchase an All-Access Pass
HOW TO LEARN A PIECE (SONG)
ON THE CLASSICAL GUITAR, Part 3
By Douglas Niedt
Copyright Douglas Niedt. All Rights Reserved.
This article may be reprinted, but please be considerate and give credit to Douglas Niedt.
*Estimated minimum time to read this article and watch the videos: 1 hour.
*Estimated minimum time to read the article, watch the videos, and understand the musical examples: 1 1/2 to 2 hours.
NOTE: You can click the navigation links on the left (not visible on phones) to review specific topics or videos.
In Part 1, we laid the groundwork for learning a new song:
- We set up our practice space.
- We learned to choose reliable editions of the piece we are going to learn.
- We learned that it is essential to listen to dozens of recordings and watch dozens of videos to hear the big picture as we learn a new piece.
- We learned that it is important to study and analyze our score(s).
- We learned how to make a game plan for practicing our new piece.
- We learned why it is so vital NEVER to practice mistakes and the neuroscience behind it.
- We learned practice strategies to master small elements, including "The 10 Levels of Misery," which ensures we don't practice mistakes.
Now, in Part 3, we will:
- Figure out where in the piece to start practicing.
- Learn the importance of learning small elements first.
- Learn the two most fundamental practice tools.
WHERE DO YOU BEGIN?
Allen Matthews of ClassicalGuitarShed.com writes, "We want to play music. We want to play music, and we want to play it now. So we want to speed up the process, skip steps, and jump right into playing the piece. And no one is going to be there to stop us. It takes discipline and patience to deny ourselves the immediate gratification of playing through the piece over and over (which actually produces a tremendous amount of damage to future precision and accuracy). Instead, we must take one step at a time and take enjoyment in mastering the elements that make up the whole."

Build a firm foundation
Piano pedagogue Graham Fitch points out that when an architect or engineer designs a building, he gives as much consideration to the parts you do not see, especially the foundations, as to the visible edifice. The foundations can take a long time to prepare in the building process, but no builder worthy of his reputation would stint on this crucial stage. Inadequate foundations will inevitably cause costly problems.
In music, good practice habits using the proper tools enable us to feel good about our work and our playing and save us hours of frustration and work fixing things we should have learned correctly in the beginning. Okay, so where do we start? Here are three possibilities.
Possibility #1: Start at the beginning
Your first thought might be to begin at the beginning. But that is not always the most efficient choice. Yes, the familiar, catchy material is often at the beginning and is fun to play. But some players get so caught up playing the fun, enjoyable parts that they neglect the rest of the song. The result is that the beginning parts of the composition sound great, but the performance gradually deteriorates toward the end. And more importantly, the playing quality at the end never catches up with that at the beginning. One way to minimize that problem, especially if it is a lengthy piece, is to get through page 1 on Monday, but on Tuesday, start with page 2. On Wednesday, start with page 3, etc.
But the beginning can be a logical place to start as long as you're disciplined enough to focus your attention evenly throughout the piece later on. If you started at the beginning of the composition, you would learn the melody or the primary and secondary themes, which the composer will probably develop later. If it's a fugue, you certainly want to start at the beginning so that you understand what the subject and countersubject are.
However, you must be careful how you proceed. Violist Molly Gebrian says in one of her excellent publications on practicing that "the WORST possible way to practice is to play from the beginning, play until you make a mistake and then either fix the mistake once and go on, or start over. All this does is reinforce your mistakes." In the early stage of learning a new piece, you must practice slowly and "hesitate, rather than err" so that you don't make mistakes.
Possibility #2: Start at the end
To prevent the piece from sounding weaker and less confident as you get to the end, some teachers recommend starting at the song's end and working back to the beginning. First, learn the final phrase or section of the piece. Then begin one phrase or section earlier, learn that, and combine it with the final phrase. Keep working backward until you arrive at the beginning and can play the whole song.
Possibility #3: Start with the most challenging parts
In Steps #20 and 21 of your score analysis in Part 1, you found "special measures or sections that seem different from the rest of the piece" and "difficult sections or measures that contain fast notes, complex rhythms, lots of accidentals, or many bar chords." These are probably going to be the most difficult parts of the piece to master.
Instead of starting at the beginning or end, I like to start with the most challenging parts because it makes the most sense efficiency-wise. For example, let's say you estimate or your teacher tells you that the most complex section will take at least three weeks to learn. If you master the rest of the piece and then tackle the tough spot, you just added three weeks to the time it will take to learn the entire song. But you can tackle the hard part first AND practice the more manageable sections at the same time. Due to the synergy of working on multiple elements simultaneously, you will automatically integrate the three weeks it takes to learn the hard part into the same amount of time it takes to learn the easy part.
Locate potential trouble spots, isolate them, and master them using the practice methods and tools I will explain. Once you perfect them in isolation, THEN you can go back and put them into a larger context.
What Do I Do If I'm Not Sure Where the Hardest Spots Are?
Without a teacher, it may be difficult to tell at first glance where the hard spots are in many pieces. For example, in Etude No. 1 by Heitor Villa-Lobos, everything on page one looks the same. There are a few bar chords from measures 7-11, but it is difficult to tell if one spot is difficult. Example #22:

On page two, again, everything looks pretty much the same until the very end. Example #23:

But when we watch videos of Etude No. 1, the monster-fast passage in measures 24-25 highlighted in yellow immediately grabs our attention. Example #24:

We know that passage is going to require a lot of extra attention and study. Watch Xingye Li play the passage in Video #7.
★ BE SURE TO WATCH ON FULL SCREEN. Click on the icon at the bottom on the right:
Video #7: Etude No. 1 (Heitor Villa-Lobos), m24-25, Xingye Li, Guitarist
But sometimes, the players are so good that they effortlessly execute difficult spots, and we don't recognize how difficult they are. For example, let's look at measures 11-12 of Etude No. 1. Example #25:

Here is Xingye Li playing measures 11-12 of Etude No. 1. Video #8.
★ BE SURE TO WATCH ON FULL SCREEN. Click on the icon at the bottom on the right:
Video #8: Etude No. 1 (Heitor Villa-Lobos), m11-12, Xingye Li, Guitarist
It doesn't look like he has any problem at all with the change. But that is probably the most challenging chord change in the piece to nail perfectly every time.
So, sometimes a video won't tell you the whole story after all. You will have to read through the music to discover its complexities. But once again, play slowly and "hesitate, rather than err." Try not to let mistakes settle into your playing in the early stages of familiarizing yourself with the piece.
No Matter Where You Begin: START SMALL.
You found all the piece's sections in your score study—large sections, smaller sections, and phrases. You have the big picture, so now you can zoom in to practicing small parts or chunks. Depending on what makes sense for a particular piece, a chunk can be anything from 16 measures to a fragment of two notes! For instance, chunk #1 could be measure 1 through 4. Or it might only be measure 1. Or it could be the last two notes of measure 4. The crucial thing is to practice a small enough chunk that you can play it flawlessly.
Remember, have a clear goal for each chunk you practice. For instance, you might decide you need to practice the right hand alone or the dynamics, articulation, focus on a shift or chord change, memorize the chunk, work it up to a tempo goal, add vibrato, focus on tone quality, etc.
When you practice chunks, you are breaking the music down into learnable units. It’s easy to get overwhelmed when faced with a lengthy new piece, but the music is much easier to learn if you start with small chunks. For example, if you have problems playing an entire phrase, it might be because there is one particularly difficult part in the phrase. Therefore:
- Break down the phrase into smaller pieces until you find the exact trouble spot.
- Next, break that trouble spot down into a small enough unit that you can play the small unit well.
- Then, gradually reconstruct the small units back into larger chunks and ultimately into the entire phrase.
If you can't seem to get it right, move on to something else in the music (or even another piece) or take a break. If you are physically or mentally tired, hungry, thirsty, not feeling well, or worried/thinking about something else, stop. Take a break or even stop for the day. Tend to your needs and come back to the piece later.
Keep listening to the piece between your practice sessions. Listening will give you a fresh perspective and help you hear how the small sections or fragments you've been practicing fit into the composition as a whole. When you go back to listening to a video, sometimes you will notice that you have been practicing the section incorrectly. For example, you may have been playing a wrong note or playing the rhythm incorrectly. Or you may be playing it too fast or too slow. Frequent review of a video will help nip problems in the bud.
Here are More Reasons Why You Should Practice Small Sections
Ease of Playing
People often remark that the great sports legends and master musicians "make it look easy." It looks easy because it IS easy for them. But that ease was not always there. They developed it by practicing correctly in the first place and continually fortifying it thereafter.
Our ultimate goal is to minimize the difficulties of physical execution so that our brainpower focuses on expression, musicality, and communication. Once we reach that stage, we play our piece with no conscious thought about the physical execution—our hands are on autopilot. It feels effortless, and we often wonder why we ever struggled. We get into a zone where we focus on feeling the music, playing with spontaneity and magic! Heaven forbid that when we perform the piece, we are thinking about what notes come next, the position of our elbow in measure six, or how to play the next chord change. When we practice correctly, we can reach or at least come close to this ultimate level.
How do we instill that ease into our playing? We do it by learning to play small fragments with ease. That is the secret. Playing an impossible four-measure phrase with ease may seem hopeless at first. But if we start with only two notes or chords of that phrase, learn to play those with ease, add a note or chord, play those three with ease, and keep building, before long, we will indeed be able to play the complete phrase with ease.
A lot is going on
If you try to master the notes and the expression of each passage you learn (which is what you should do), that is a lot of information for your muscles and mind to absorb. Therefore, you must practice small chunks to grasp it all.
YOUR PRACTICE TOOLS
You will use several tools to learn a new song. You will use different tools at different stages of the learning process. Some tools are helpful for certain types of passages (arpeggios, scales, chord changes, etc.) or lengths of passages. I will explain each tool and how, when, and where to use them.
We will begin with the two fundamental tools of all practicing strategies: The Feedback Loop and Slow Practice.

Practice Tool #1: The Feedback Loop
As I mentioned in Part 2, you must continually evaluate what you are doing. Do not dive in and get stuck in a mindless loop of playing things over and over, hoping they will eventually sound better. Instead, ask yourself, "Why am I playing this right now, and what am I trying to accomplish?" Or, in the neuroscience terms from Part 2, "Which neural pathway am I myelinating right now? Which pathway am I strengthening?"
The Feedback Loop is core to everything we do in the practice room; we will use it with all of the other practice tools. Yes, practicing relies on repetition, but not on mindless hit-and-miss repetition.
STEP #1 of the Feedback Loop consists of WHAT, HOW, and WHY:
-
STEP #1 of the Feedback Loop consists of WHAT, HOW, and WHY. Before each repetition, we must know what we are trying to achieve. We must decide on a specific practice tool to use.
-
WHAT are you going to practice? For example:
- the chord change in measure 3
- the shift in measure 2
- the crescendo from measure 16-20
- the rhythm at the end of measure 14
- the new fingering in measure 12
- the third phrase
- the second section
- the entire piece
-
HOW will you practice? What practice tool will you use? What will you do?
- I will use the Ultra-Slow Practice Method.
- I will use the Conventional Slow Practice Method.
- I will "hesitate, rather than err."
- I will play with the metronome at speed x.
- I will use blocked practice.
- I will use interleaved practice.
- I will use serial random practice.
- I will practice with altered rhythms.
- I will use "Six Levels of Misery" (see part 2).
- I will watch my little finger to be sure it is bent and in position.
- I will exaggerate my crescendo.
- I will listen for the buzz in the bar chord.
- I will adjust my shoulder position as I approach the shift.
- I will plant "im" on beat number two.
- I will sing the passage
-
WHY are you practicing this element?
- To avoid making a mistake.
- To make my crescendo audible to my audience.
- To make the chord change clear with no buzzes or muted notes.
- To make the shift inaudible.
- To lessen tension in my right hand.
- To play it faster.
- To play the rhythm precisely.
- To improve the tone.
-
WHAT are you going to practice? For example:
- STEP #2 of the Feedback Loop is to PLAY THE ELEMENT. In the early stages, to avoid practicing mistakes, we play slowly and "hesitate, rather than err." In later stages, we might use a metronome or practice at the final goal tempo. Graham Fitch recommends that if the element is fairly small, use imagery before you play. When a golfer addresses the ball, he spends time imagining exactly where he wants the ball to go. Only when the image is vivid in his mind does he swing the club. Likewise, we guitarists can precisely imagine how we want the element to sound before we play; no hesitation, no mistake, beautiful tone, clear chord, etc. In other words, mentally rehearse the element before you play. Vividly hearing the intended result before you play each repetition is hard to do and requires discipline. But it is very powerful and produces excellent results. Fitch explains that it is "akin to snapping the shutter on a camera once the subject matter has been composed and focused."
-
STEP #3 of the Feedback Loop is to EVALUATE OUR RESULTS. After each repetition, we evaluate whether it was good or bad. Guitarists routinely skip this step. If the result is bad, they immediately repeat the passage hoping for a better outcome. NO, NO, NO! Take your hands off the guitar and analyze what went right and what went wrong.
Complete the Feedback Loop by feeding the results of Step #3 back into Step #1. Readjust what you need to do based on what just happened.- Was the rear knuckle of your bar too low? ➔ Then, feed this result back into Step #1:
Bring the rear joint up higher on the bar chord - Did you not hesitate long enough to avoid the mistake?➔ Then, feed this result back into Step #1: Hesitate longer to prevent the error.
- Did you not prepare the little finger precisely enough?➔ Then, feed this result back into Step #1:
Focus harder on that little finger. - Do I need to break the passage into smaller elements?➔ Then, feed this result back into Step #1:
Break it down into a smaller segment. - Do I need to use a different or additional practice tool?➔ Then, feed this result back into Step #1:
Try a different practice tool or add an additional one.
If the result is good, then that's wonderful! You can move on. - Was the rear knuckle of your bar too low? ➔ Then, feed this result back into Step #1:
Examples of How to Use the Feedback Loop
Use the Feedback Loop in all stages of the learning process, from learning the notes to final polishing for a performance. Let's look at an example from Fernando Sor's Larghetto, op. 35, no. 3. Example #26:

By the way, if you did not do your due diligence of choosing a reliable edition of this Larghetto (as explained in "Part 1-Laying the Groundwork," you would be led astray by editions that notate the melody incorrectly as a dotted rhythm in measures 9 and 11. Example #27:

Here is a simplified example of two Feedback Loops for this passage. Of course, we would use additional tools, break the passage down into smaller elements, and do more repetitions, but these illustrations will give you a basic idea of the process. Here is the Feedback Loop for Repetition #1. Be sure to watch the video (click on the image). Example #28:

SUMMARY OF THE FEEDBACK LOOP FOR REPETITION #1:
♦ In Step #1 I decided what I would practice, how I would do it, and why.
♦ In Step #2, I played the passage (WATCH THE VIDEO—click the image above).
♦ In Step #3, I listened and watched what I did, noticed some problems, came up with specific solutions, and MARKED THEM IN THE MUSIC.
Now, I'm ready to try it again. The Feedback Loop for Repetition #2 looks like this. Be sure to watch the video (click on the image). Example #29:

SUMMARY OF THE FEEDBACK LOOP FOR REPETITION #2:
♦ Notice that I plugged my solutions from Repetition #1 into Step #1 of my new Feedback Loop. I'm very specific in stating what I'm going to practice, how I'm going to do it, and why.
♦ For Step #2, I played the passage (WATCH THE VIDEO—click the image above).
♦ In Step #3, I decided I liked what I did and that I achieved my goals, so now I can move on to something else. If I still had some problems, I would define the problems, find solutions, write them in the music, and start a new Feedback Loop for Repetition #3.
Remember, the Feedback Loop is the core strategy you will use to practice anything with any practice tool. It keeps you focused, stops mindless repetition in its tracks, and ensures that you practice with maximum efficiency.
Researchers have demonstrated the value of the Feedback Loop in numerous studies, including this one of basketball players. Check it out.
Best vs. worst
Two researchers from the City University of New York studied basketball players to see if they could discern a difference between the practice habits of the best free-throw shooters (70% or higher) and the worst free-throw shooters (55% or lower). There were many differences, but it boiled down to two in particular.
Difference #1: Goals were specific
The best free-throw shooters had specific goals about what they wanted to accomplish or focus on before each practice free throw attempt. As in, "I'm going to make 10 out of 10 shots" or "I'm going to keep my elbows in." That is our Step #1 in the Feedback Loop.
The worst free-throw shooters had more general goals – like "Make the shot" or "Use good form."
Difference #2: Attributions of failure were specific
Invariably, the players would miss shots now and again, but when the best free-throw shooters missed, they tended to attribute their miss to specific technical problems such as "I didn't bend my knees." Identifying specific causes of missed shots lends itself to finding specific solutions for the next practice attempt (Step #3 of the Feedback Loop). In addition, thinking about the solutions provides a thoughtful reflection process before the next free throw attempt (proceeding to Feedback Loop #2). Identifying solutions works far better than saying "I suck" or "What’s wrong with me?” or “I’m never going to get this.”
In contrast, the worst performers were more likely to attribute failure to non-specific factors, like “My rhythm was off” or “I wasn’t focused,” which doesn’t do much to inform the next practice attempt.
It’s not what you know, but whether you use it
You might be thinking that perhaps the worst performers didn’t focus on specific technical strategies because they didn’t know as much about the details of the correct technique of shooting free throws. But, on the other hand, perhaps the best performers could focus on the technique because they knew more about shooting a free throw with proper form.
The researchers thought of this and explicitly controlled this possibility by testing for the players’ knowledge of basketball free-throw shooting techniques. As it turns out, there were no significant differences in knowledge between the best performers and the worst.
So while both the top performers and the worst performers had the same level of knowledge to draw from, very few of the worst performers utilized this knowledge base. Instead, the best performers used their knowledge to think, plan, and direct their practice time more productively.
Take action
When you’re practicing something technical, make specific goals. Also, pay attention to how you talk to yourself after mistakes. Do you focus on technique? Or throw out a few curse words and jump right into another practice attempt without trying to figure out why you missed the last one?
Practice Tool #2: Practice S-L-O-W-L-Y
Pianist and pedagogue Graham Fitch tells us we cannot over-emphasize the value and importance of slow practicing. Teachers of all instruments universally acknowledge that slow practicing is a cornerstone of a day-to-day practice routine.
Remember the "10 Levels of Misery" in Part 2? You will recall that Wolfgang Mozart's father would place ten dried peas in his son’s left coat pocket, and for each successful attempt at a difficult passage, Mozart would move a single pea to his right pocket. Then, when he failed on any piece, even if it was the tenth repetition, all the peas had to be placed back in his left pocket — Wolfgang had to begin anew. This practice strategy helps ensure that the student slows down his tempo to play a passage perfectly. But a practice strategy called the Ultra-Slow Practice Method goes far beyond that.

Slow-Practice Strategy #1: The Ultra-Slow Practice Method
Ultra-slow practice can be more difficult than playing merely at a slow or moderately slow tempo. Really slow practice means playing in slow motion. It requires a deep understanding of what each movement requires. Yes, we have a goal (make a good shift, get a good chord change, play a fast scale) but the focus is on doing everything correctly along the way, examining every movement in fine detail. For example, are you keeping the muscles in the left hand loose? When you lift a finger, are you moving it to where it needs to be to play the following note? Is the left-hand little finger bent, pointing at its destination fret? Is your bar parallel with the fret? Are the right-hand fingers relaxing after plucking each string? Is the "a" finger playing with the desired tone quality? Are you pressing down too hard with the left-hand fingers?
Let's look at the first few notes of Adelita by Francisco Tárrega. Example #30:
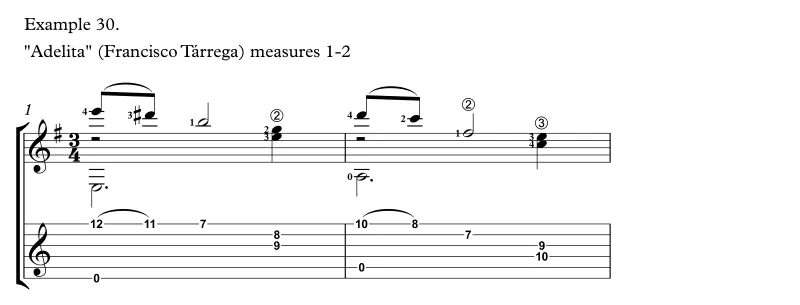
Watch me demonstrate the Ultra-Slow Practice Method on this opening passage from Adelita. Watch Video #11.
BE SURE TO WATCH ON FULL SCREEN. Click on the icon at the bottom on the right:
Video #11: Adelita (Francisco Tárrega), m1-2, Ultra-Slow Practice
The idea is to practice ultra-slowly in slow motion while still being fully focused and engaged, thinking deeply in real-time about every finger and hand movement of both hands. Music performance psychologist Dr. Noa Kageyama points out that "this is not a painful, torturous process, but often an engrossing and gratifying one. A way in which to open up the door to many satisfying micro-discoveries that could ultimately be the key to getting a phrase to sound just so, and exactly communicating what it is that you intend."
Another way to think about it is that practice is about construction. As we learned in Part 2, when we practice, we build neural circuits connection by connection. Slow practice allows us to pay attention to our actions so that we fire only the correct circuits or neural pathways. When we do that, we don't learn mistakes. But ultra-slow practice enables us to perform an action AND simultaneously observe the performance so we can coach ourselves. Whereas when we play fast, we are only performing or executing actions.
Kageyama explains that the point of super-slow practice is not only to play an element perfectly. Instead, it's about fine-tuning the execution, looking for additional ways to play it even better while playing slowly enough to monitor and think about every little detail. With ultra-slow practice, we can find inefficiencies and faulty finger motions and correct them. Therefore, we cultivate good habits so that the passage won't break down when we increase the tempo.
Think of ultra-slow practice as playing in slow motion. The "slow practice" most guitarists do is not ultra-slow practice. The point is that we want to be able to think, monitor, and analyze our technique in real-time as we play. Conventional slow practice is too fast for us to observe, process, and tweak every little detail. Ultra-slow practice allows us to pay attention to every subtle nuance of our mechanics, increase our awareness of what we are doing, and find solutions to improve our execution.
Let me emphasize that we don't want to use a metronome when we engage in ultra-slow practice. The metronome can drag us by the nose through a messy pigsty of mistakes, even at extremely slow speeds. Remember, we must "hesitate, rather than err" to avoid strengthening the wrong neuromuscular pathways.
Slow Practice Strategy #2: The Conventional Slow Practice Method
The Ultra-Slow Practice Method is a short-term, very specialized strategy. After a few minutes, hours, days, or weeks on a passage, it will be time to use the Conventional Slow Practice Method with and without a metronome.
So how slow is slow? In Abram Chasins’ book Speaking of Pianists, he recalls an encounter with the great pianist/composer Rachmaninov's slow practicing:
Rachmaninov was a dedicated and driven perfectionist. He worked incessantly, with infinite patience. Once I had an appointment to spend an afternoon with him in Hollywood. Arriving at the designated hour of twelve, I heard an occasional piano sound as I approached the cottage. I stood outside the door, unable to believe my ears. Rachmaninov was practicing Chopin’s etude in thirds, but at such a snail’s pace that it took me a while to recognize it because so much time elapsed between one finger stroke and the next. Fascinated, I clocked this remarkable exhibition: twenty seconds per bar was his pace for almost an hour while I waited riveted to the spot, quite unable to ring the bell. Perhaps this way of developing and maintaining an unerring mechanism accounted for his bitter sarcasm toward colleagues who practiced their programs “once over lightly” between concerts.
A great pianist such as Rachmaninov would know this particular study well, having had it in his repertoire for some years and already performed it publicly many times. An average tempo for a performance of this study would be 𝅗𝅥= 70. At twenty seconds per bar, Rachmaninov’s practice tempo, according to Chasins’ account, was 𝅗𝅥= 6!
Usually, when I tell students to play a passage slowly (conventional slow practice), they don't play it slowly enough. Instead, they play moderately slowly, which tends to lead to mindless repetitions of the passage. Or they start slow but then speed up (and make mistakes).
Slow practice does have a downside. It is kind of like zooming in on a painting. Zooming in reveals ever-greater detail, but we lose the sense of the whole. Example #31:

On the other hand, if we zoom out, we get a more complete overall picture but lose the detail. Example #32:

As musicians, we eventually need to proceed like a painter who alternates between close-up work on a small detail of the canvas and then steps back to see how the small element fits into the overall painting.
Practicing a passage or small segment at a slow tempo can be challenging, especially if the player lacks a strong sense of the content and the context. Again, practicing at a slow tempo enables the guitarist to concentrate on every single detail. But the drawback is that they might not see the forest for the trees—they may not understand how the passage fits into the piece as a whole. But playing the passage too fast might affect their accuracy.
For the guitarist, this means they should practice at a variety of tempos AFTER mastering the details. So, once again, at first, master the details with ultra-slow and conventional slow practice in the early stages of learning. Then strike a balance between "zooming in and zooming out" by trying a slightly faster slow tempo to hear the context. Of course, you may not want to take a chance on practicing mistakes at certain stages of learning. In that case, you can always listen again to the reference recording(s) you chose so that you can hear the passage in context. Remember, we talked about listening to reference recordings in Part 1, Laying the Groundwork, Step #3.
When my guitar students demonstrate their slow practice tempo, it is seldom slow enough. Even if they start at a slow tempo, they begin to speed up within a few measures, and they are back to their usual too-fast speed! This phenomenon is common to almost everyone, myself included. In this case, using a metronome is helpful to maintain a rock-steady slow speed. Although it isn't necessary or desirable to always use a metronome, I recommend that you use it occasionally to be sure your tempo is steady and that your rhythms are precise.
Choose a slow enough tempo that allows you to not only learn the correct fingering, notes, and rhythms but also master the phrasing, dynamics, and articulation from the early stages of learning the passage or piece. Then, months later, you don't have to go back and add the musical expression. That's like learning the piece all over again. As I pointed out in Part 2, who wants to do that? Master pianist Claude Frank wrote, "There is absolutely no substitute for slow practice. Let me embellish this by saying that, ninety-nine times out of a hundred, this slow practice should be very musical. There are very few instances in which slow mechanical practice is beneficial. Musical slow practice is the key."
Let's look again at the difficult chord change in measures 20-21 of Romance. Example #33:
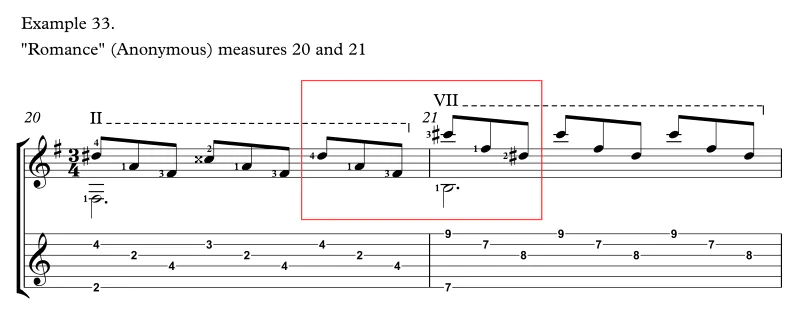
Watch me demonstrate how to practice the passage with the Conventional Slow Practice Method. Watch Video #12.
BE SURE TO WATCH ON FULL SCREEN. Click on the icon at the bottom on the right:
Video #12: Romance (Anonymous), m20-21, Conventional Slow Practice
The Slow-Yet-Fast Practice Method
"Slow Yet Fast" is a niche slow-practice technique we usually use for a passage containing multiple fast shifts of the left hand. It may appear to be a contradiction in terms, but in this strategy, the tempo is slow, but the motions are fast. This process is beneficial in fast passages where the hands must move with speed and precision in covering consecutive shifts of one or more frets. It is only possible to control such movements consciously when the tempo is slow; at a faster tempo, your hands' automatic pilot kicks in. This method allows us to make sure that our automatic pilot will be accurate every time.
As soon as you play each note or chord or interval, the hands and fingers travel immediately to the next position, with precise placement, and remain there, loosely, until the next shift. This process builds in extreme precision and speed in mastering fast, ever-moving hand shifts. Notice I am referring to both hands. The fingers on the right hand must also move quickly to their next destination.
Here is a passage with multiple quick short shifts from Rossiniana No. 1, op. 119 by Mauro Giuliani, which gave me problems for months. Example #34:

The following example shows how I would practice the fast thirds in the second half of measure #94 with the Slow-Yet-Fast Practice Method. Example #35:
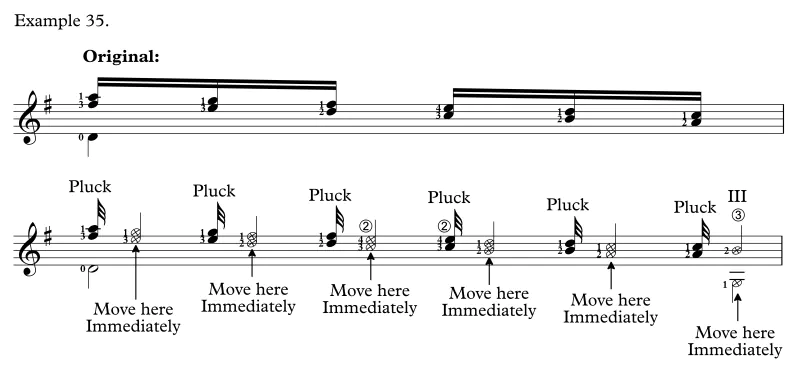
You will understand it better by watching me demonstrate the process in the video.
Here is how I mastered the passage with the Slow Yet Fast Practice Method. Watch Video #13.
BE SURE TO WATCH ON FULL SCREEN. Click on the icon at the bottom on the right:
Video #13: La Rossiniana, op. 119 (Mauro Giuliani), m93-94, The Slow-Yet-Fast Practice Method
The Slow-Yet-Fast Practice Method is valuable even for one or two shifts. For example, in Variations on a Theme by Mozart, op. 9 by Fernando Sor, measures 38 and 39 contain several tricky shifts. Example #36:

You will understand the following four examples when you watch the video. But here is the first shift I demonstrate in the video with the Slow-Yet-Fast Practice Method. Example #37:

Here is the second shift I demonstrate in the video with the Slow-Yet-Fast Practice Method. Example #38:

Here are both shifts extracted, showing how to practice them with the Slow-Yet-Fast Practice Method. Example # 39:


Now, watch me practice the shifts with the Slow Yet Fast Practice Method to make sense of all of this. Watch Video #14.
BE SURE TO WATCH ON FULL SCREEN. Click on the icon at the bottom on the right:
Video #14: Variations on a Theme by Mozart, op. 9 (Fernando Sor), m38-39, The Slow-Yet-Fast Practice Method
Remember these points about both the Ultra-Slow and Conventional Slow Practice Methods:
- Slow practicing is not just for beginners.
- Slow practicing is not only for learning notes in the early stages of practicing a piece. We use it for refining and maintaining passages in all phases of the learning process.
- Tempos chosen for slow practicing can be extremely slow.
- Slow practicing is an ongoing process for any given piece, which we can use right up to the day of a performance.
- Frequently, complex or fast passages will break down over time. Slow practice is ideal for restoring individual muscular actions because it gives the player time to think through the movements. One can also purposely (but temporarily) use larger, exaggerated movements to restore the individual reflexes.
As I noted previously, we usually begin with small sections or elements in the initial stage of learning a piece. And even with small elements, we must discipline ourselves to practice truly slowly over a substantial amount of time. What is a substantial amount of time? For an easy passage or element, it may be a few minutes, hours, or days. For a problematic passage, it might be weeks.
Fitch explains that it is easy to abandon slow work as soon as you sense the beginnings of fluency. Try not to do this: keep at it, day after day, and try to avoid the temptation to play something at speed straight after spending a few minutes working on it slowly. As I explained in Part 2 about the neuroscience of practicing, prematurely playing at speed can cause mistakes and wipe out the effects of careful practicing. The satisfaction at this stage has to come from doing the work. Trust the process. "Think about how you are myelinating only the correct neuromuscular pathways.
Here are some additional guidelines:
- Choose a VERY s-l-o-w practice speed so you can play the right notes and play musically with expression.
- You might need to practice the right hand or left hand alone (more on that later).
- After your slow practice, leave the passage or piece alone. Don't test it at tempo yet.
- Continue practicing most passages very slowly for at least several more days.
Next month we will examine more tools and procedures to learn a piece on the classical guitar.

DOWNLOADS
1. Download a PDF of the article with links to the videos. Depending on your browser, it will download the PDF (but not open it), open it in a separate tab in your browser (you can save it from there), or open it immediately in your PDF app.
Download the PDF: HOW TO LEARN A PIECE (SONG) ON THE CLASSICAL GUITAR Part 3 (with links to the videos)
2. Download the videos. Click on the video link. After the Vimeo video review page opens, click on the down arrow in the upper right corner. You will be given a choice of several different resolutions/qualities/file sizes to download.
Video #7: Etude No. 1 (Heitor Villa-Lobos), m24-25, Xingye Li, Guitarist
Video #8: Etude No. 1 (Heitor Villa-Lobos), m11-12, Xingye Li, Guitarist
Video #9: The Feedback Loop for Repetition #1
Video #10: The Feedback Loop for Repetition #2
Video #11: Adelita (Francisco Tárrega), m1-2, Ultra-Slow Practice
Video #12: Romance (Anonymous), m20-21, Conventional Slow Practice
Video #13: La Rossiniana, op. 119 (Mauro Giuliani), m93-94, The Slow-Yet-Fast Practice Method
Video #14: Variations on a Theme by Mozart, op. 9 (Fernando Sor), m38-39, The Slow-Yet-Fast Practice Method