HOW TO LEARN A PIECE (SONG)
ON THE CLASSICAL GUITAR, Part 4
By Douglas Niedt
Copyright Douglas Niedt. All Rights Reserved.
This article may be reprinted, but please be considerate and give credit to Douglas Niedt.
*Estimated minimum time to read this article and watch the videos: 1 hour.
*Estimated minimum time to read the article, watch the videos, and understand the musical examples: 2-3 hours.
In Part 4, we will learn about the "Slam on the Brakes" and the "STOP—Then Go" practice tools.
"Slam on the Brakes and "STOP—Then Go"
The "Slam on the Brakes" and "STOP—Then Go" practice tools will help us:
- Correct errors
- Improve technical control
- Reduce tension
- Improve memorization
1. Correct Errors: "Slam on the Brakes!"
Remember our mantra, "Hesitate, Rather Than Err," from Part 2? If not, here is the discussion again:
To prevent mistakes or "accidents," catch yourself before you make a mistake, just as you would if you found yourself about to walk off a cliff. Granted, catching yourself or anticipating an error in advance can be difficult. The guitarist who has fallen into the habit of making mistakes is usually the type whom the momentum of the rhythm leads around by the nose. Once on the verge of making a mistake, the rhythmic drive pushes the player over the edge, and he realizes the error too late. They might go back to correct the mistake once or twice, but as we shall see, doing so does little to counteract the learned muscular movement.
The solution to not making mistakes is to adopt this motto: "HESITATE, RATHER THAN ERR." Mistakes stick, but in time, one can easily bridge over hesitations of thought and action.
How do I learn to "hesitate, rather than err?"
Sit down with your husband, wife, significant other, son, daughter, best friend, or whomever. Explain that your goal is to play your piece (or a small section) from the beginning to the end without a mistake. Promise you will pay them $10 every time you make the slightest error and have to start over. I guarantee that as you get almost to the end several times and your "I Owe You" tab climbs rapidly, that your focus will become laser-like, and you will discover the meaning of "hesitate, rather than err" very quickly!
Another way to think of this is to "Slam on the Brakes" before a trouble spot. The trouble spot could be a single note, an interval, an ornament, or a chord. Here is the procedure:
- Start playing. Begin playing somewhere before the spot. How far back you go is up to you, but allow for an ample run-up.
- "Slam on the Brakes." Stop right before the trouble spot (one note or chord before).
- Analyze. Freeze! Hold your position (don't move a muscle!). Immediately analyze the positioning of the left AND right-hand fingers, hands, and arms to be sure they are in the correct positions to play the error-prone element that follows.
- Play the element. It should sound perfect. If not, do another careful analysis of what you did wrong and find the solution. Remember "The Feedback Loop" in Part 3?
- Repeat. "Slam on the Brakes" several times until you are comfortable stopping, are sure your preparation is perfect, and that the problem element sounds flawless.
- Repeat again but don't slam on the brakes and play the problem spot (with the corrections made). So, don't hesitate BUT stop on the problem spot—do NOT go on. Don't play even one extra note past the problem spot. All your focus should be on playing that one element perfectly.
- Alternate your repetitions. Do one or two repetitions slamming on the brakes before the problem spot. Then play a few without the pause before the problem spot. Go back and forth until you are fully confident of the corrections you applied.
- Repeat the entire process daily. Practice the whole process every day for a week, and return to it periodically even if you think you mastered the passage.
Here is a passage from Fandanguillo (Joaquin Turina) that haunted me for years in concerts. I was never confident that I would always play it cleanly. However, if I had known about this practice technique back then, it would never have been a problem. Example 41:
Watch me "Slam on the Brakes" to master the passage. Watch Video #15.
★ BE SURE TO WATCH ON FULL SCREEN. Click on the icon at the bottom on the right:
Video 15: "Slam on the Brakes," Fandanguillo (Joaquin Turina)
Speaking of haunting, this passage in Leyenda (Isaac Albéniz) scares most guitar students to death. Example 42:
Watch how you can "Slam on the Brakes" to master this difficult passage. Watch Video #16.
★ BE SURE TO WATCH ON FULL SCREEN. Click on the icon at the bottom on the right:
Video 16: "Slam on the Breaks," Leyenda (Isaac Albéniz)
2. Improve Your Technical Control with "STOP—Then Go."
We can use "STOP—Then Go" even on easy pieces if the passage consists of notes in a consistent rhythmic pattern. For example, here are measures 9-16 from Mauro Giuliani's Scottish Dance. (By the way, you can find the complete piece in Charles Duncan's A Modern Approach to Classical Guitar Repertoire, Part 1.) The passage consists of even 8th notes. Example #43:
The idea is to deliberately insert pauses at regular intervals to undo the muscle memory of a passage that is shakey or has failed before. I find it is also extremely useful for learning new passages.
For best results, use a systematic approach. In this case, we would:
- STOP on the 1st note of each measure, then go.
- STOP on the 2nd note of each measure, then go.
- STOP on the 3rd note of each measure, then go.
- STOP on the 4th note of each measure, then go.
Here is the "STOP—Then Go" procedure pausing on the 1st note of each measure. For a beginning student, I would notate it to make it easy to read simply by placing a fermata on the paused note. Example #44:
The actual rhythmic values could be this if we write it in 6/8 meter. Example 45:
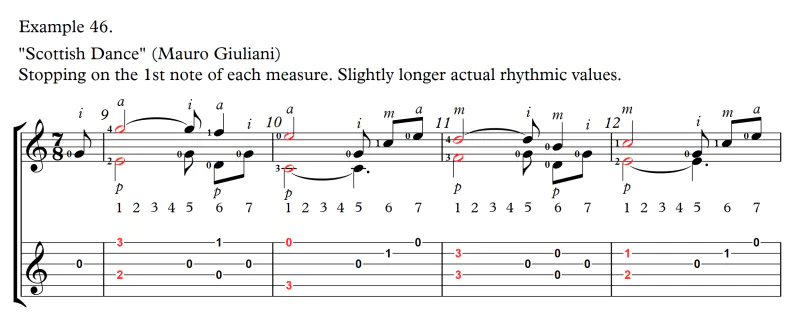
Or this if we write it in 7/8 meter. Example 46:
Here is "STOP—Then Go" on the 2nd note of each measure. Example 47.
Here is "STOP—Then Go" on the 3rd note of each measure. Example 48.
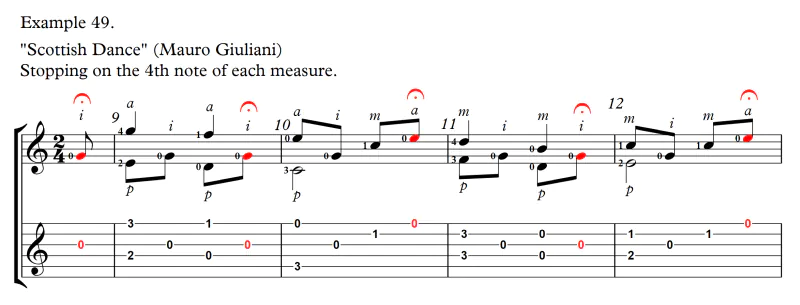
And finally, here is "STOP—Then Go" on the 4th note of each measure. Example 49.
Watch me demonstrate "STOP—Then Go" on the Scottish Dance. Watch Video #17.
★ BE SURE TO WATCH ON FULL SCREEN. Click on the icon at the bottom on the right:
Video 17: "STOP— Then Go," Scottish Dance (Mauro Giuliani)
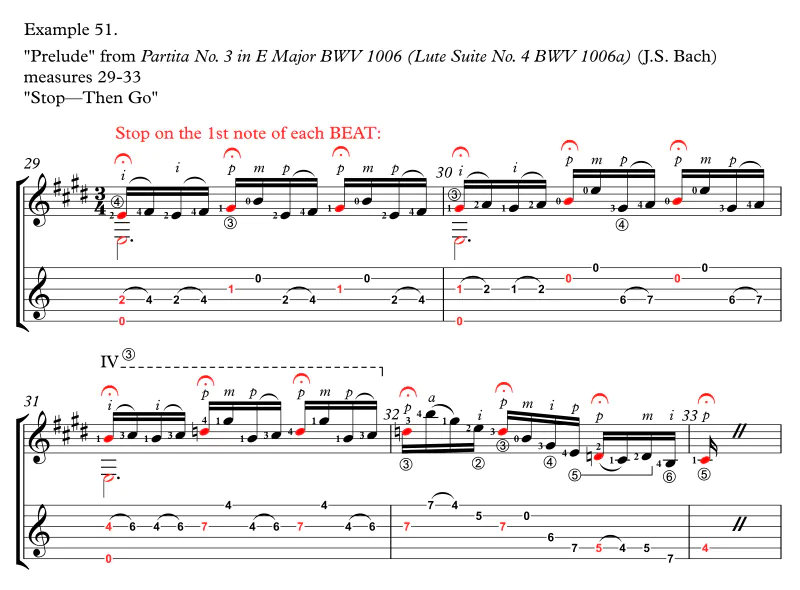
"STOP—Then Go" is particularly effective on difficult pieces, passages, or scales containing a stream of fast notes in a consistent rhythmic pattern. For example, the "Prelude" from J.S. Bach's Partita No. 3 in E Major BWV 1006 for violin (it is also, with some alterations, the "Prelude" from Lute Suite No. 4 BWV 1006a) is a fiendishly tricky piece. Here are measures 29-32 as transcribed by guitarist Christopher Parkening (with two fingering changes by me). Example #50:
In this case, the notes are extremely fast (MM=112 for a quarter note). Therefore, first, we will apply the "STOP—Then Go" to each beat instead of each measure:
- STOP on the 1st note of each beat, then go.
- STOP on the 2nd note of each beat, then go.
- STOP on the 3rd note of each beat, then go.
- STOP on the 4th note of each beat, then go.
Here is how I would practice the passage. Example #51:
Then, we can apply the "STOP—Then Go" to each measure:
- STOP on the 1st beat of each measure, then go.
- STOP on the 2nd beat of each measure, then go.
- STOP on the 3rd beat of each measure, then go.
Here is how I would practice the passage. Example #52:
Watch me demonstrate how to practice this difficult passage with the "STOP—Then Go" practice method. Watch Video 18.
★ BE SURE TO WATCH ON FULL SCREEN. Click on the icon at the bottom on the right:
Video 18: "STOP—Then Go," Prelude from Lute Suite IV (J.S. Bach)
3. Reduce Tension with "STOP—Then Go."
We all know that tension is our enemy. No matter where it is—the left hand, right hand, shoulders, neck, back, jaw, left arm, right arm—tension will slow you down and cause you to make mistakes. Even a brief moment of dysfunctional tension can wreak havoc with a shift, chord change, or group of notes.
We easily recognize tension in a long piece or an extended passage that requires stamina, contains many stretches, or uses lots of bar chords. Sometimes tension is harder to detect in short bursts of notes, but as we develop our awareness, we can detect those moments too. Fortunately, we can use "STOP—Then Go" practice to train ourselves to stay loose and reduce tension.
It's a straightforward process:
- Divide the piece or passage into sections and choose specific points where you are going to stop.
- If you are in the final stages of mastering the piece, play the piece or passage as you will play it in performance at full speed with expression and performance energy.
- If you are in the earlier stages of learning the piece, put yourself in the mindset of performing the piece or passage, but at a much slower tempo.
-
Stop at your first chosen point. Either:
- Drop your hands from the guitar and let your arms rest at your side. Then, skip to Step #6.
- Freeze and keep your hands in position.
- If you use step "b," take inventory of your muscles. Notice how they feel. Check the left hand, right hand, shoulders, neck, back, jaw, left arm, right arm, EVERYTHING. Release tension wherever you detect it. Now take note of how your body feels.
- Then-Go. When you are entirely loose, resume playing from where you left off and continue playing until you reach the next pre-chosen stopping point.
- Or, you can play the passage several times. Use "The Feedback Loop" and identify how you will reduce the tension on the next repetition. Keep eliminating muscle stress until the tension at the stopping point is minimal or at zero. Then proceed to the next tension-laden section or passage.
In Step #4, option "a" (dropping your hands and arms) helps achieve immediate and total relaxation. On the other hand, option "b" (freeze and keep holding the hands in position) may provide better feedback to help you feel the specific pressure points where tension had built up.
An excellent piece we can use to try out the "STOP—Then Go" method to reduce tension is Etude No. 1 by Heitor Villa-Lobos. Measures 7-11 require continuous full bar chords. And remember, you're supposed to repeat each measure. Excessive left-hand tension can cause total failure executing the chord change into measure 12. So, you could choose stop-points at the end of measures 9 and 11 (the stop signs) or measures 8, 10, and 11 (the hand signs). It's an excellent idea to vary the stop-points. Example #53:
Watch me demonstrate how to use these stop points in the Villa-Lobos "Etude." Watch Video #19.
★ BE SURE TO WATCH ON FULL SCREEN. Click on the icon at the bottom on the right:
Video 19: "STOP—Then Go" to Reduce Tension, Etude No. 1 (Heitor Villa-Lobos)
Here is another example from Leyenda where many students feel like "my hand is about to fall off." We hold the monster bar chord in measures 37-39 and make the difficult transition into measure 40. Now we have four more measures of full bar chords from measures 41-44. Ugh. I could insert stopping points every two measures. Example #54a:
Or perhaps I could insert them at the end of measures 39, 40, 42, and 44. Again, it's a good idea to vary the stopping points. Example 54b:
Watch me demonstrate how to use these stop points in this difficult passage in Leyenda. Watch Video #20.
★ BE SURE TO WATCH ON FULL SCREEN. Click on the icon at the bottom on the right:
Video 20: "STOP—Then Go" to Reduce Tension, Leyenda (Isaac Albéniz)
4. Improve Your Memorization with "STOP—Then Go."
"STOP—Then Go" practice deliberately interrupts the flow of muscle memory. Muscle memory is essential, but we can't rely on it. It tends to crumble under pressure.
Here is the basic strategy for rookies:
- Play a predetermined section (we'll call it "X."). For a beginner, it is best to start with one or two measures.
- Stop. Take your hands off the guitar. IMAGINE the next measure(s) "Y"—hear it, see your fingers on the fretboard, feel the finger and hand movements.
- Then Go. Play the measure(s) "Y" you just imagined.
- Continue by starting with the next measure(s) "Z" and repeat the process.
Let's try it out on "Andantino" by Matteo Carcassi. Example #55:
In the example below we:
- Play measure #1.
- Imagine measure #2.
- Play measure #2.
- Imagine measure #3.
- Play measure #3.
- Imagine measure #4.
- Play measure #4.
We practice like this. Example #56:
Watch me demonstrate the basic process on Carcassi's "Andantino." Watch Video #21.
★ BE SURE TO WATCH ON FULL SCREEN. Click on the icon at the bottom on the right:
Video 21: "STOP—Then Go" Basic Procedure for Improving Your Memorization, Andantino (Matteo Carcassi)
Try this on a piece you already know and play very well to get a feel for the process. Intermediate players can challenge themselves by playing more extended predetermined units. So, if going measure by measure was easy, try playing/imagining two, three, or four measures as a group instead of doing one measure at a time.
Here is the strategy for advanced players:
- Play a predetermined section. We'll call it "X."
- Stop playing and without a pause, take your hands off the guitar but hear the next predetermined unit (we'll call it "Y") in your head at the same tempo—listen to it, see your fingers on the fretboard, feel the finger and hand movements.
- Then-Go. Without pausing, resume playing, but don't play the unit "Y" you just imagined. Instead, play the next unit—unit "Z"—the one FOLLOWING unit "Y."
The following example will make it easier to understand. Notice that the "Stop" step of the advanced process is no longer a pause. Instead, we stop and start playing without interrupting the continuous rhythmic flow. Example 57:
Watch me demonstrate the advanced process on Carcassi's "Andantino." Watch Video #22.
★ BE SURE TO WATCH ON FULL SCREEN. Click on the icon at the bottom on the right:
Video 22: "STOP—Then Go" Advanced Procedure for Improving Your Memorization, Andantino (Matteo Carcassi)