
The Ultimate, Comprehensive Guide:
How to Learn to Play Leyenda (Asturias)

This amazing tutorial package will help you:
-
MASTER THE RIGHT-HAND TECHNIQUE
The Right-Hand Technique Annotated Score (33 pages) is in standard notation plus tab. In 33 pages with 29 musical examples and links to 25 videos, I explain the steps to master the right-hand technique in Leyenda so you can play it at the tempo you desire with precision and confidence. -
MASTER THE LEFT-HAND TECHNIQUE
The Left-Hand Technique Annotated Scores (355 pages) are in standard notation plus tab. The scores, with 581 musical examples and links to 165 videos provide detailed step-by-step instructions and alternative fingerings so you can master the left-hand technique of Leyenda in every measure of the piece. -
UNDERSTAND THE FORM AND STRUCTURE OF THE PIECE
The Form & Analysis Score (21 pages) is in standard notation. The score and links to nine videos explain the form and structure of Leyenda. It is essential to know this information to make your interpretation of the piece focused and balanced, so you can engage your listeners from beginning to end. -
CREATE YOUR INTERPRETATION
The Annotated Interpretation Score is in standard notation. In 58 pages and links to 46 videos, I provide you with countless options for dynamics, tone color changes, tempo changes, articulation, and more to help you supercharge your interpretation of Leyenda and add spontaneity to your performance.
The complete tutorial is certainly for those who want to learn how to play Leyenda from the ground up.
But it is also for those of you who know the piece and want to improve on the difficult parts. Or, for those who want to build their own interpretation.
No matter who you are, even if you have played Leyenda for 50 years, I guarantee you will learn something new from Play It Like a Pro: Leyenda.
It's complete and comprehensive.
Includes:
- Six detailed annotated scores (467 pages).
- 245 comprehensive instructional videos.
- 610 annotated musical examples.
- Over 14 HOURS of comprehensive classical guitar video instruction.
SEE SAMPLE SCORES AND VIDEOS BELOW.

Douglas Niedt Gives You His No-Risk, Nothing-to-Lose, Money-Back Guarantee
"These are the best video/internet lessons with the finest hi-tech production on the planet. But, if you are not satisfied with this course, I will refund your money. Just tell me why you did not like it so I can make it better for others."
This is a digital download.
You can download the six PDF files (with links to the videos) and any of the videos to your computers and devices.
This massive tutorial package is only $39.95. No shipping/handling charges.
Credit Card or PayPal.
Even though no physical product will be shipped, you will be asked for and must fill in your shipping address. Your email address is automatically captured when you order.
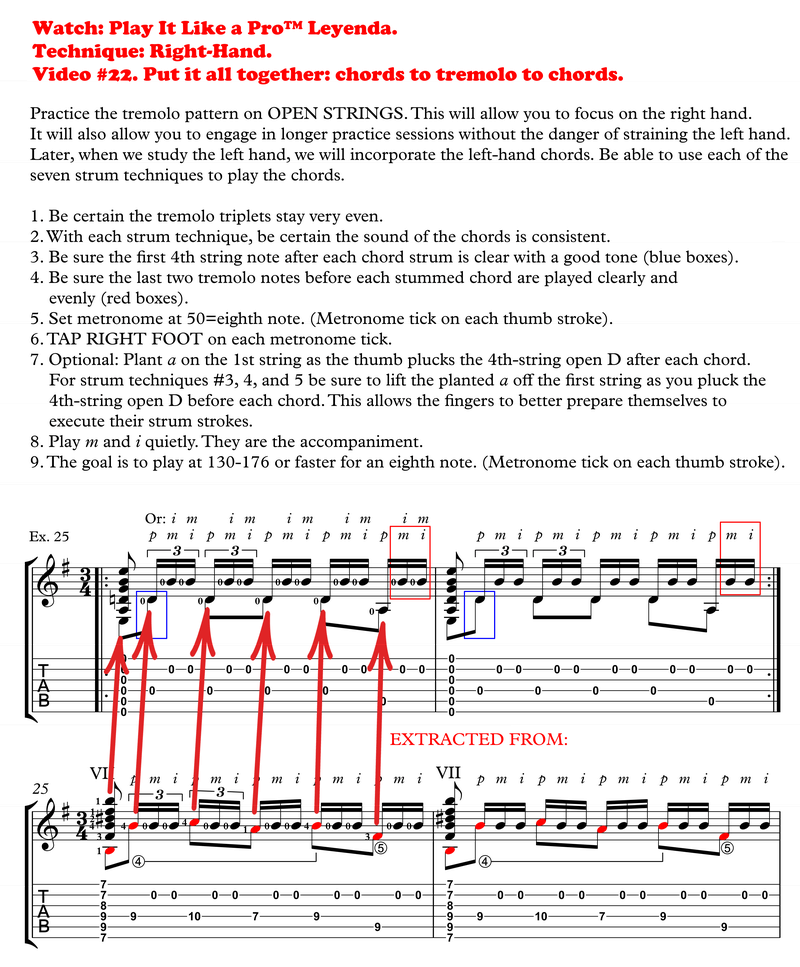
A sample from the RIGHT-HAND Technique Annotated Score
The score (33 pages) is in standard notation plus tab. In 33 pages with 25 videos and 29 musical examples, I explain the steps to master the right-hand technique in Leyenda so you can play it at the tempo you desire with precision and confidence.
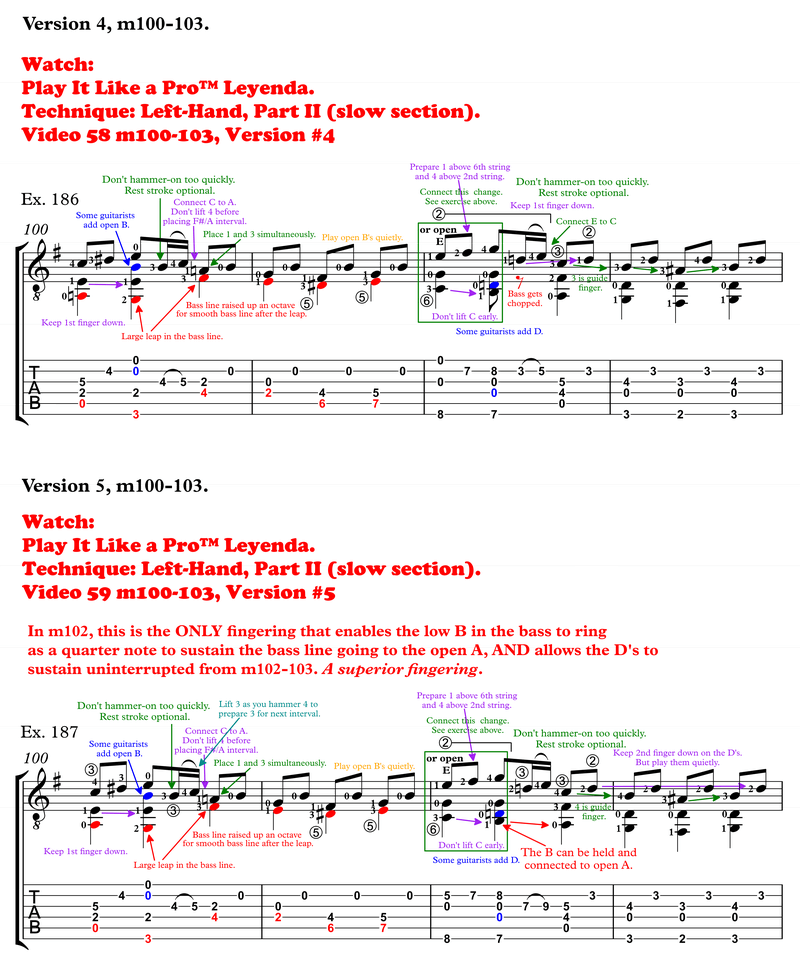
A sample from the LEFT-HAND Technique Annotated Score
The scores (355 pages) are in standard notation plus tab. The scores, with 165 videos and 581 musical examples, provide detailed step-by-step instructions and alternative fingerings so you can master the left-hand technique of Leyenda in every measure of the piece.
A sample from the FORM & ANALYSIS Score
The Form & Analysis Score (21 pages) is in standard notation. The score and nine videos explain the form and structure of Leyenda—information that is essential to know to make your interpretation of the piece focused and balanced, so you can engage your listeners from beginning to end.

A sample from the INTERPRETATION Score
The Interpretation Score is in standard notation. In 58 pages and 46 videos, I provide you with countless options for dynamics, tone color changes, tempo changes, articulation, and more to help you supercharge your interpretation of Leyenda and add spontaneity to your performance.

Watch an excerpt from one of the instructional videos
Doug's 245 detailed instructional videos contain HOURS of instructional video and will help you play Leyenda like a pro. Doug demonstrates how to play the piece measure by measure.
These are not "put your finger here and then put your finger there" type videos. Doug explains all the technical and musical details required to play the piece on a professional level. Watch these two videos as he teaches you the left-hand technique for two options to play the difficult high chord in measure #37 of Leyenda.
Watch it on full screen--after pressing play, click on symbol in lower right-hand corner to the right of "HD".
You will find a full transcript of these videos at the very bottom of this page.
Buy now—one of the best classical guitar lessons you will ever have.
It's complete and comprehensive.
Includes:
- Six detailed annotated scores (467 pages).
- 245 comprehensive instructional videos.
- 610 annotated musical examples.
- Over 14 HOURS of comprehensive classical guitar video instruction.
The total package costs less than one guitar lesson in most cities.
Douglas Niedt Gives You His No-Risk, Nothing-to-Lose, Money-Back Guarantee
"These are the best classical guitar video/internet lessons with the finest hi-tech production on the planet. But, if you are not satisfied with this course, I will refund your money. Just tell me why you did not like it so I can make it better for others."
This is a digital download.
You can download the six PDF files (with links to the videos) and any of the videos to your computers and devices.
This massive tutorial package is only $39.95. No shipping/handling charges.
Credit Card or PayPal.
Even though no physical product will be shipped, you will be asked for and must fill in your shipping address. Your email address is automatically captured when you order.
About Douglas Niedt
Douglas Niedt is a successful concert and recording artist and highly respected master classical guitar teacher with 50 years of teaching experience. He is Associate Professor of Music (retired), at the Conservatory of Music and Dance, University of Missouri-Kansas City and a Fellow of the Henry W. Bloch School of Management—Regnier Institute for Entrepreneurship and Innovation.
Doug studied with such diverse masters as Andrés Segovia, Pepe Romero, Christopher Parkening, Narciso Yepes, Oscar Ghiglia, and Jorge Morel. Therefore, Doug provides solutions for you from a variety of perspectives and schools of thought.
He gives accurate, reliable advice that has been tested in performance on the concert stage that will work for you at home.
Frequently Asked Questions
Is Leyenda difficult to play?
Guitarists at an intermediate or higher level can play Leyenda.
Does Leyenda have a lot of bar chords?
Leyenda contains a number of bar chords. However, Douglas Niedt's tutorial includes many options to play easier bar chords or to bar fewer strings.
Are there difficult stretches in Leyenda?
Leyenda contains a few stretches. However, Douglas Niedt's tutorial includes options to eliminate the stretches or to lessen their difficulty. Large hands are not required to play the piece.
What is the guitar tuning for Leyenda?
Leyenda is in standard tuning in the key of E minor.
Transcript from Video: Video 1 m36-37 transition Overview and Option A-1
[00:00:00] In the transition from measure 36 to 37, we have three options for the chord on the downbeat of measure 37. Option A, which we're looking at in this video, is this big bar chord. And it's probably the most difficult for most players. It's the option Andrés Segovia published in his transcription. However, Segovia actually used a different option, the option that I call Option C in his recordings and performances, and it's a lot easier to play.
But Option A does sound very good. It's very powerful sounding. And we're coming into it from the tremolo, like that. So, it's a huge chord to be able to have to grab all of a sudden. But I'll be showing you different ways to get into it.
Option A-1 is to simply prepare the fingers above the [00:01:00] strings as you play the G on the fifth string. To expand the hand, shoot the first finger out for the bar at the eighth fret. The little finger, shoot over to the first string 12th fret here, like that. And, the second finger shoots across to the third string. And, notice I have these fingers prepared really close to the strings, no more than a quarter of an inch above the strings, and right above the strings so that I can just drop them into place for the chord change.
Now, the way to practice this is to start by practicing the left hand alone. Put your third [00:02:00] finger on the fifth string because again, in context, we're coming from that third finger, like that. So, for the exercise, left hand alone, put your third finger on the fifth string 10th-fret G, and just practice placing the chord, lifting, placing, lifting, like that; maintaining the spread of the fingers, the shape of the fingers, each finger no more than a quarter of an inch above its string, so that they can't miss when you land them. Notice the third finger stays put.
Now, the other problem with this is that you must land the fingers simultaneously. You can't land the strong fingers, these two first, and then the little finger. You'll be late. So, they have to land together. Now, if it's the case that your first and [00:03:00] second fingers tend to land first and then the little finger follows, the way to undo that is to intentionally place the little finger first, and then add the other two. Do that over and over again. Once you have the ability to do that, usually your hand will then have the ability to land the three fingers simultaneously. So, the practice technique is: whichever finger lands last, put down first. And that helps undo what the hand wants to do. So that's step one.
Then, do the same exercise, both hands together. So, your third finger's down. Play that, and then play your chord. And at first, you might have to do it fairly slowly, like that. But eventually, you're going to want to do it quickly, like that. [00:04:00] Now, don't over practice this because as your hand gets tired, it'll get worse and worse. So, take a break, shake out the hand, just a few repetitions at a time.
Now again, what you want to be focusing on is making sure you land the fingers simultaneously, and that you have the fingers prepared really close to the strings.
Now, the other big problem with this is of course, that the chord may not be clear. That's a tough chord to play clearly, a very tough bar chord. Um, if it's not clear, things to try out: one that is the most common is this rear joint on the bar that a lot of people pull down like this. And there's, you know, effort to get the chord clear. They'll pull down, and that's the last thing you want to do. You actually want to do the opposite. Raise the back joint upwards, because when you raise the joint up, it [00:05:00] flattens the bar across the fret. When you bend it down, that raises the middle joint off the fretboard. So, raise that back joint.
For pressure, for power, don't squeeze between the thumb and the bar. Those muscles are not very strong. Instead, use your arm strength. I've written some technique tips about this. You pull the guitar against your chest with both arms if you need to apply more force to the bar onto the fretboard. Do not squeeze super hard with your thumb and finger. The thumb should be a passive participant.
Uh, make sure of the basics. Make sure your bar is parallel with the fret wire. Some people, because they have to reach with the little finger, the bar goes crooked on them. So, the treble-string side of the bar is on top of the fret and is not holding down the strings well. So, make sure the bar stays [00:06:00] parallel.
Keep the thumb, the left-hand thumb opposite the first finger, or usually between the first and second fingers, sometimes opposite the second finger. You'll have to experiment. And again, the thumb is a passive participant.
And, probably one most important things is figure out exactly where the problem is. Hold the chord down. Now, it's usually, if it's the bar's fault that it's not clear, that you're hearing buzzes, it's going to be either the second string, fourth string, or the sixth string, because those are the strings the bar is holding down. The bar is not responsible for the first string, because the little finger's hold that down. The third string, the second finger is holding that down. Or the fifth string, because your third finger's holding that down. So, don't blame the bar if you hear buzzes. Make sure that you know what the problem is. Don't just automatically blame the bar. It could be one of the fingers that is buzzing, that isn't holding its string down well. [00:07:00] So make sure you test that.
Other basics are to roll the bar into the fret wire. Sometimes just the opposite works for some people, so experiment with that. Different positions of the left-hand elbow, tucking the elbow in tight to the side or winging out to the left will sometimes make a difference for some players. And also, try holding the neck at different positions, more horizontally or more vertically. Sometimes that will make a big difference.
So, and oh; and also allow the left-hand fingers to lean to their right. Because again, in the effort to stretch, to reach this high E, it makes it easier for a lot of players, including me, if I let my fingers lean towards the little finger. It helps, helps me to reach that high E and get the chord clear. So, try all of those [00:08:00] techniques to get your bar chord clear, if it's not coming out clear.
The next step to practicing this transition is back to left hand alone, but approach from one note sooner, one beat sooner. So, we're going to go first finger, third finger, and then place the chord. Because again, in the song, we're going first finger, third finger, and then the big chord. So, left hand alone: first finger, third finger, prepare, place. First finger, third finger, prepare, place. Do that a bunch of times, until you got it.
And again, the same rules apply. Make sure you're placing the fingers simultaneously and that you're preparing them, each finger, no more than a quarter of an inch above its string.
Then finally, [00:09:00] practice the transition from measure 36 to 37 both hands together, incorporating the tremolo. So, we're going from the F-sharp to the G, preparing, and landing the chord. Do that a few times. Slowly at first, that's fine. But eventually, you're going to have to go for the speed bursts, until you're clear like that. And if it crashes, you go back to the basics, making sure you're preparing your fingers precisely, and that your bar-chord technique is good.
And finally, if you give it a little bit more context, the entire measure before, check how you're doing on the preparation by stopping, right there, before you have to play the chord to make sure everybody's prepared, that you're [00:10:00] doing everything properly. And then, you're certain you're incorporating what you've been teaching your fingers left-hand alone at slow speeds, and that they're operating the same way at high speed.
Transcript from Video: Video 2 m36-37 transition Option B
[00:00:00] For the transition from measure 36 to 37, Option B is to play this chord on the downbeat of measure 37, this fingering. It sounds like this. We are approaching it from the tremolo. Like that.
[00:00:19] Now, two options on fingering this chord. One is to do a traditional bar chord; bar five strings and lay the bar flat across all five strings, like that.
[00:00:34] The other option is to hyperextend the tip joint of the bar like this, so that you're only holding down the third, fourth, and fifth strings. Because in the chord, you only have to hold the fourth and the fifth strings. Just those two. When you do the hyperextended partial bar like this, it automatically bars three strings, whether you want it to or not, [00:01:00] which is fine in this case.
[00:01:02] Now, if you want to do the flat bar, nothing wrong with that, but the mistake a lot of people make is they try to manhandle the bar and hold all five strings down when they don't need to. Because of course the second, third, and fourth fingers are holding down the first three strings.
[00:01:19] So, if you're going to use a flat five-string bar, make sure you reserve all your strength, pressure, on the fourth and fifth strings. In other words, if I were doing this, I would be holding those two down, but the first and second strings are not really being held down clearly because they're being held by these fingers. So, keep that in mind.
[00:01:41] Personally, I much prefer the partial bar, but not everyone's tip joint has that flexibility to bend backwards like that. So, you'll have to experiment with that. And, what I would do is simply play the chord with the hyperextension. Play it with the flat bar, back [00:02:00] and forth, and see which comes out the best for you. So, experiment with that.
[00:02:06] Now, we're going to practice getting into the Option-B chord left hand alone, first. And, what we're going to be doing, of course, in context, we go from the first finger, slide up like that, and then into the chord, the high chord like that. So, left hand alone: F-sharp, G, place. F-sharp, G, and then either flatten the entire bar or do the collapse-the-tip-joint when you're ready to place the other fingers. And, those fingers and the hyperextension or the placement of the flat bar have to happen simultaneously. Makes sure everyone lands together. Whoever lands last, [00:03:00] retrain them by putting them down first to undo their natural tendencies, and soon, you'll be able to place them together.
[00:03:08] Now, you have another option on this change. One option that I just showed you is simply prepare these three fingers. So, you've got one, slide up, prepare these three fingers right above their strings, no more than a quarter of an inch above their strings, so you can't miss when you put them down.
[00:03:28] Or what you can do is: F-sharp, and then when you slide to the G, pre-plant the little finger, so it looks like: F-sharp, plant the little finger; and then what that does, it gives you a lot of stability. All you have to do is add these two stronger fingers, and you're there for your chord. So, practice that too. First finger, slide up, plant, and then place the rest of the chord.
[00:03:58] Then, do both [00:04:00] hands together. So practice the tremolo, without the pre-plant, but with good preparation here. So that you just drop those fingers into place like that. And then, practice it with the pre-plant of the little finger into the chord like that. Try it both ways. No pre-plant; pre-plant.
[00:04:26] Now, even though the pre-plant is certainly more secure, a lot of people have difficulty with just getting the pre-plant down, and they're better off not doing that. But give it a shot and see what you think about it.
[00:04:43] Then, once you've rehearsed left hand alone, both hands together, without pre-planting the pinky, with pre-planting the pinky; then, try everything in context. Start with measure 36 with the tremolo and try it [00:05:00] without the pre-plant and with the pre-plant, in full context, and test that out. So, that was without. Without pre-planting, like that.
[00:05:14] Then, try it with pre-planting the pinky finger. Like that. See which one you prefer. Personally, I'm fine without pre-planting. I think I do better without the pre-plant, but it may be different for you. So, try those techniques out, and you should be able to do pretty well with that transition using that chord shape. For a lot of people, that is a lot easier to get clear and get to in time than Option A, the big bar chord like that, spread out. This is a lot easier to get to. A lot of guitarists use this. John Williams uses it. A lot of other [00:06:00] very fine guitarists use it.
Get a free taste of my approach: see my Fabulous Fingering for the notorious measure-37 bar chord in Leyenda.