
How to Learn a Piece
On the Classical Guitar

"Douglas who?"
Douglas Niedt is a successful concert and recording artist and highly respected master classical guitar teacher with 50 years of teaching experience. He is Associate Professor of Music (retired), at the Conservatory of Music and Dance, University of Missouri-Kansas City and a Fellow of the Henry W. Bloch School of Management—Regnier Institute for Entrepreneurship and Innovation.
Doug studied with such diverse masters as Andrés Segovia, Pepe Romero, Christopher Parkening, Narciso Yepes, Oscar Ghiglia, and Jorge Morel. Therefore, Doug provides solutions for you from a variety of perspectives and schools of thought.
He gives accurate, reliable advice that has been tested in performance on the concert stage that will work for you at home.
PURCHASE AN ALL-ACCESS PASS
TO THE VAULT OF CLASSICAL GUITAR TECHNIQUE TIPS

"Hello Mr Niedt,
My name's Gretchen, and I'm so happy I purchased an All-Access Pass to the Vault. I love your awesome technique tips. I'm amazed how much I have improved my playing.
Thank you!"
ARE YOU LOOKING FOR PROVEN STRATEGIES
THAT WILL MAKE YOU A BETTER GUITARIST?
Check out the game-changing tips in my Vault—I promise they will kick your playing up to the next level.
Purchase an All-Access Pass to the Vault.
It's a one-time purchase of only $36!
You receive full access to:
- Over 180 technique tips in The Vault.
- Special arrangements of Christmas music
- Arrangement of the beautiful Celtic song, Skellig
- Comprehensive guide, How to Master the Classical Guitar Tremolo
All that for a one-time payment of only $36. Take me to the page to Purchase an All-Access Pass
HOW TO LEARN A PIECE (SONG)
ON THE CLASSICAL GUITAR, Part 7
By Douglas Niedt
Copyright Douglas Niedt. All Rights Reserved.
This article may be reprinted, but please be considerate and give credit to Douglas Niedt.
*Estimated minimum time to read this article and watch the videos: 1 hour.
*Estimated minimum time to read the article, watch the videos, and understand the musical examples: 2-4 hours.
NOTE: You can click the navigation links on the left (not visible on phones) to review specific topics or videos.
In Part 1, we laid the groundwork for learning a new song:
- We set up our practice space.
- We learned to choose reliable editions of the piece we are going to learn.
- We learned that it is essential to listen to dozens of recordings and watch dozens of videos to hear the big picture as we learn a new piece.
- We learned that it is important to study and analyze our score(s).
- We learned how to make a game plan for practicing our new piece.
- We learned why it is so vital NEVER to practice mistakes and the neuroscience behind it.
- We learned practice strategies to master small elements, including "The 10 Levels of Misery," which ensures we don't practice mistakes.
- We learned where to start practicing in a new piece.
- We learned that it is vital to master small elements first.
- We learned the two most fundamental practice tools—The Feedback Loop and S-L-O-W Practice.
In Part 4, we learned how to use the "Slam on the Brakes" and "STOP—Then Go" practice strategies to:
In Part 5, we learned how to practice with the right hand alone to:
- Apply planting or double-check the precision of your planting technique
- Correct or improve the balance between the melody, bass, and accompaniment
- Apply or improve string damping
- Master passages with difficult string crossings
In Part 6, we learned how to practice with the left hand alone to learn, improve, and master:
- The "lag behind" technique
- How to lift fingers to avoid string squeaks
- Left-hand finger preparation
- Synchronization of left-hand finger movements
In Part 7, I will continue my discussion of practicing with the left hand alone.
PRACTICING WITH THE LEFT HAND ALONE, Part 2
So, in Part 1, we learned how to practice with the left hand alone to learn, improve, and master:
- The "lag behind" technique
- How to lift fingers to avoid string squeaks
- Left-hand finger preparation
- Synchronization of left-hand finger movements
In Part 2, we will learn how to practice with the left hand alone to learn, improve, and master:
- Shifts
- Pre-planting the left-hand fingers
- Collapsing (hyperextending) the tip of the first finger going into and out of a bar chord
- Difficult chord changes without tiring, injuring, or "locking up" the left hand by practicing with light finger pressure.
5. Practice the Left Hand Alone to Master Shifts
Sometimes, too many things are happening at once to master a problematic shift by practicing both hands together. However, practicing with the left hand alone can provide focus so you can understand the precise movements the fingers, wrist, and arm must make to execute the shift cleanly. I use this difficult shift from the famous anonymous Romance (Romanza, Romance de Amor) in many of my technique tips. Example #106:

As I noted in the musical example above, one of the secrets to playing the shift successfully is to change the full bar at the 2nd fret to a hinge bar as it slides up the neck to provide support, eliminate squeaks, and serve as a guide finger. The other secret is to place only the 3rd (or 4th) finger on the 1st-string C# at the 9th fret. Wait to add the 2nd finger to the 3rd string.
When trying to learn this shift, we do not want to be distracted by the right hand or buzzes in our bars. Therefore, learn the technique by practicing with the left hand alone first. Example #107:

Once the left hand understands the motions, practice slowly with both hands together. But use the "S-L-O-W Practice" and the Stop-Then-Go" practice tools first.
This technique is not only for the Romance. You can use a hinge bar as a guide finger on bar chord shifts in many pieces for stability and to eliminate extraneous string noise.
Watch me demonstrate how to master this type of shift in Video #33.
★ BE SURE TO WATCH ON FULL SCREEN. Click on the icon at the bottom on the right:
Video #33: Romance (Anonymous), m19-21, Practice Left Hand Alone to Use a Hinge Bar as a Guide Finger
A few measures later, in Romance, we have another challenging shift. Example #108:
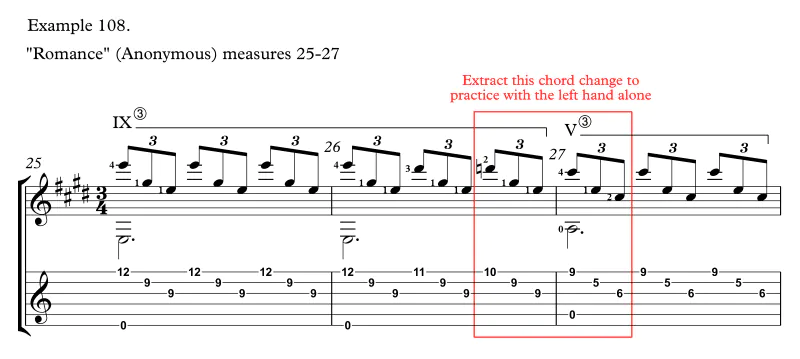
The most stable way to execute this chord change is to use the 3-string bar as a guide finger. Once again, it is best to master the left-hand finger, wrist, and arm movements by practicing first with the left hand alone. Example #109:

This technique does not apply only to this piece! You can use 2, 3, and 4-string bars as guide fingers in many pieces to provide stability for shifts.
Watch me demonstrate how to master this shift in Video #34.
★ BE SURE TO WATCH ON FULL SCREEN. Click on the icon at the bottom on the right:
Video #34: Romance (Anonymous), m25-27, Practice Left Hand Alone to Use Half Bars as Guide Fingers
6. Practice the Left Hand Alone to Learn to Pre-plant Fingers in Difficult Passages
Although we can learn to pre-plant left-hand fingers while practicing both hands together, once again, practice with the left hand alone offers clarity and focus so that we can master the technique more quickly and efficiently.
In Vals Venezolano No. 3 by Antonio Lauro, we have a challenging shift from measure 17 to 18. Many things can go wrong in this passage! At first glance, we have no sure way to land the chord in measure 18 because we have no contact with the fretboard between the last open E of measure 17 and the chord in measure 18. It is a "no man's land." Example #110:

But to eliminate the risk of failure, we can pre-plant one or even two fingers before the shift to ensure we arrive safely at our destination in m18. Example #111:

Some players find that the complexity of pre-planting two fingers is not worth it. They prefer to only pre-plant the 4th finger. That is my preference as well. We can learn to pre-plant by practicing first with the left hand alone. Example #112:

Once the left hand understands the objective, we can methodically practice with both hands together. Example #113:
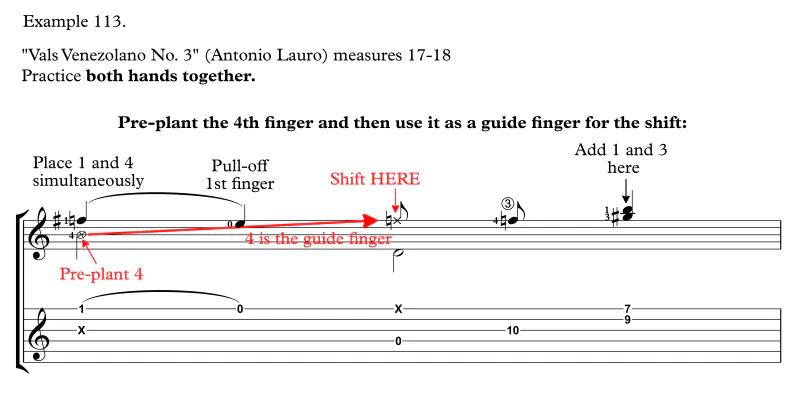
Finally, we can play the passage in context with the correct rhythms but at a plodding and halting tempo. Example #114:

Watch me demonstrate the procedure in Video #35.
★ BE SURE TO WATCH ON FULL SCREEN. Click on the icon at the bottom on the right:
Video #35: Vals Venezolano No. 3 (Antonio Lauro), Practice Left Hand Alone to Learn to Pre-Plant Left-Hand Fingers
We can also see the value of practicing with the left hand alone in a passage from Una Limosna por el Amor de Dios (also known as "El ultimo trémolo" or "El último canto") by Paraguayan guitarist/composer Agustín Barrios Mangore. There is a challenging easy-to-miss shift going from m60-61. Although we already have the 4th finger as a guide, the change is still unstable. Example #115:

If we pre-plant the 1st finger on the 6th string at the 8th fret when we place the 2nd finger on the 5th-string F# at the 9th fret, we remove the danger of missing the shift. Example #116:

At first, this seems like a complicated maneuver, especially if you try to play the tremolo melody at the same time. But if we practice only the left hand, it is much easier to learn. We can extract the chords and easily understand what we must do. Example #117:

Once the left hand is secure, practice the shift with both hands together, including the tremolo. Example #118:
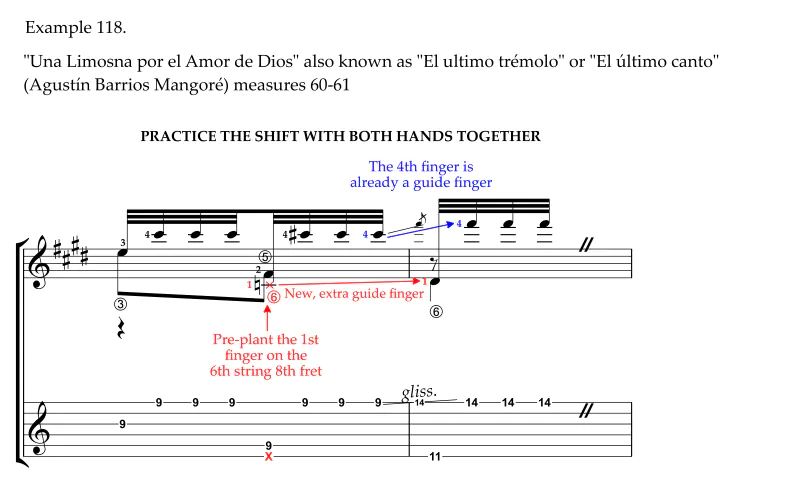
We can actually use even more guide fingers on this shift. In addition to the 1st and 4th fingers, we can also use the 3rd finger on the 3rd string and the 2nd finger on the 5th string as guide fingers. However, many players prefer to use only the 1st and 4th fingers for more mobility—using all four fingers as guide fingers can be cumbersome.
7. Practice the Left Hand Alone to Learn to Collapse the Tip of a Finger Into and Out of a Bar
In measure 19 of Estudio in C major by Francisco Tárrega, the 1st finger has a common yet tricky finger movement it must execute to play the melody within the arpeggio smoothly while sustaining the ringing accompaniment notes. Example #119:
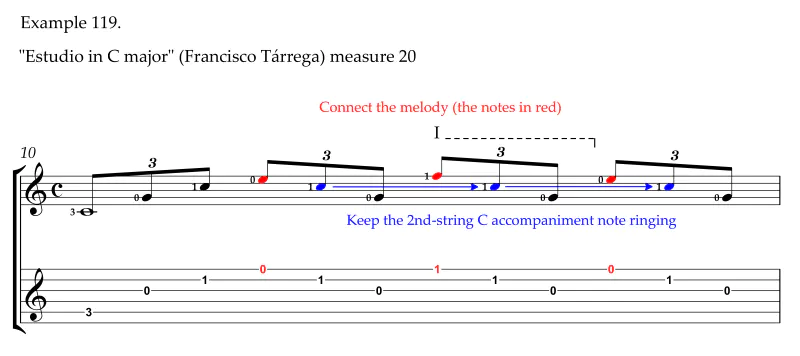
To accomplish our goals, we must use a 2-string bar on beat #3 and release it on beat #4. The best way to do this is to hyperextend the tip joint of the 1st finger (which is holding the 2nd-string C) and collapse into a 2-string hyperextended bar to play the 1st-string F while still holding the 2nd-string C. Then, re-bend the tip joint to release the F and roll back onto the fingertip to continue holding the 2nd-string C.
Watch me demonstrate in Video #36.
★ BE SURE TO WATCH ON FULL SCREEN. Click on the icon at the bottom on the right:
Video #36: Estudio in C Major (Francisco Tárrega), Practice Left Hand Alone to Learn to Collapse Fingertip into a Bar
What we absolutely do not want to do is lift the tip of the first finger entirely off the 2nd-string C, place the 2-string bar, and then lift the bar to reset the fingertip on the 2nd-string C. Example #120:

The resulting sound will be very choppy because the 2nd-string C gets cut short twice.
What if my finger doesn't bend backward (hyperextend) like yours?
Hyperextending the tip joint to collapse the joint into a 2-string bar is the ideal way to execute this passage. Unfortunately, due to genetic factors, arthritis, calcification, or previous injuries, some people have little mobility in the tip joint. As a result, they will be unable to hyperextend (collapse) the finger joint. In that case, the player must keep the 1st finger on the 2nd string but then lean the finger over to place a flat bar (not hyperextended) across the first two strings.
Watch me demonstrate in Video #37.
★ BE SURE TO WATCH ON FULL SCREEN. Click on the icon at the bottom on the right:
Video #37: Practice Left Hand Alone to Learn the Details of Hyperextending a Finger Into a Bar
Unfortunately, as I demonstrated in the video, flattening the 1st finger onto the first two strings to hold the bar requires the guitarist to change their hand position to hold both strings tightly. Changing the hand position invites finger misplacement and accidental damping of strings held by other fingers.
Also, as Charles Duncan points out in The Art of Classical Guitar Playing (the classic book in the field of guitar pedagogy), hyperextending or collapsing the tip joint of the first finger to hold a two or three-string bar is far more mechanically efficient (that means easier!) than keeping the finger flat or straight.
The bottom line is that although it is not as mechanically efficient or stable as hyperextension, you can still reap the benefits of sustaining the 2nd-string C and keeping the melody legato. It will certainly sound much better than if you lift the 1st finger entirely, place the bar, raise the bar, and reset the finger.
Learn to use hyperextension by practicing with the left hand alone
First, we need to teach the 1st finger what it means to hyperextend its tip joint. We do this away from the guitar with the left hand alone.
Watch me demonstrate in Video #38.
★ BE SURE TO WATCH ON FULL SCREEN. Click on the icon at the bottom on the right:
Video #38: Practice Left Hand Alone to Learn to Hyperextend a Finger
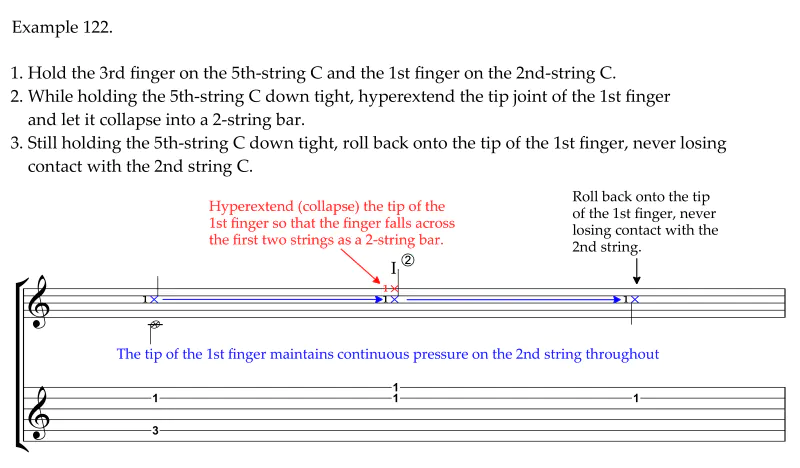
Next, we teach the finger to do the hyperextension on the guitar. Place the 1st finger on the 2nd string C, hyperextend the tip joint, and allow it to fall across the first two strings as a bar. Example #121:

In the Tárrega Estudio, we must execute this movement while holding the 5th-string C with our 3rd finger. So let's add that to our left-hand-alone practice. Example #122:
Next, practice the same movements with both hands together to be sure the notes are ringing clearly. Example #123:

Finally, with both hands together, play the entire measure slowly, applying the principles you mastered by practicing with the left hand alone. Example #124:

Learn more about using the hyperextension technique and view more examples in my technique tips, Bars: How to Collapse or Lean the First Finger to Move Smoothly to or from a Bar, Part 1 and Part 2.
8. Practice the Left Hand Alone With Light Finger Pressure to Learn a Difficult Chord Change Without Tiring, Injuring, or "Locking Up" the Hand
We often encounter a very challenging chord change that we know we need to practice hundreds of times. However, because it fatigues the hand very quickly, we can only repeat the change three or four times before our hand says, "No more." In fact, if we overpractice a change involving bar chords, our hand can "lock up." The hand muscles become so fatigued that the fingers become difficult to move.
So how do we play the hundreds of repetitions we know we have to do if our hand gives out after 3 or 4 attempts? The answer is to practice the change with the left hand alone but with very light pressure, not pressing the strings down to the frets. If you do that, you can practice a chord change (if it doesn't include a challenging stretch) literally a hundred times with no fatigue.
For example, here is a passage from Vals Venezolano No. 3 by Antonio Lauro with a challenging chord change in measures #38-39. Example 125:

The obvious strategy is to practice the tough spot. Example #126:

Many players will feel their left hand getting very tense, lock up, or feel pain in the bar finger before reaching their 10th repetition.
The solution is first to practice the passage with the left hand alone but use very light finger pressure on the strings. Do not press the strings down to the frets. Always place and lift the fingers sequentially. Example #127:

We can practice the movements using tools such as "S-L-O-W Practice and Ultra-S-L-O-W Practice", and STOP-Then-Go" Practice.
Next, we can add the right hand but still use light finger pressure on the left hand. The effect will be like a plonky pizzicato.
Finally, we can practice both hands together with normal left-hand finger pressure.
Not only will this practice technique save your left hand during practice, but it will also teach the fingers to use less pressure in performance.
Watch me demonstrate this practice technique in Video #39.
★ BE SURE TO WATCH ON FULL SCREEN. Click on the icon at the bottom on the right:
Video #39: Vals Venezolano No. 3 (Antonio Lauro), Practice Left Hand Alone With Light Finger Pressure
NEXT MONTH: More practice tools!
DOWNLOADS
1. Download a PDF of the article with links to the videos. Depending on your browser, it will download the PDF (but not open it), open it in a separate tab in your browser (you can save it from there), or open it immediately in your PDF app.
Download the PDF: HOW TO LEARN A PIECE (SONG) ON THE CLASSICAL GUITAR Part 7 (with links to the videos)
2. Download the videos.Click on the video link. After the Vimeo video review page opens, click on the down arrow in the upper right corner. You will be given a choice of several different resolutions/qualities/file sizes to download.
Video #33: Romance (Anonymous), m19-21, Practice Left Hand Alone to Use a Hinge Bar as a Guide Finger
Video #34: Romance (Anonymous), m25-27, Practice Left Hand Alone to Use Half Bars as Guide Fingers
Video #35: Vals Venezolano No. 3 (Antonio Lauro), Practice Left Hand Alone to Learn to Pre-Plant Left-Hand Fingers
Video #36: Estudio in C Major (Francisco Tárrega), Practice Left Hand Alone to Learn to Collapse Fingertip into a Bar
Video #37: Practice Left Hand Alone to Learn the Details of Hyperextending a Finger Into a Bar
Video #38: Practice Left Hand Alone to Learn to Hyperextend a Finger
Video #39: Vals Venezolano No. 3 (Antonio Lauro), Practice Left Hand Alone With Light Finger Pressure