By Douglas Niedt
Copyright Douglas Niedt. All Rights Reserved.
This article may be reprinted, but please be considerate and give credit to Douglas Niedt.
*Estimated minimum time to read this article and watch the videos: 1 hour.
*Estimated minimum time to read the article, watch the videos, and understand the musical examples: 2-4 hours.
In Part 5, we will begin looking at a tool that is undervalued in the guitar world but exceedingly helpful. That tool is Practicing with the Right and Left Hands Separately. In Part 5, we will focus on practicing with the right hand alone.
Practicing a passage or element with the left hand and right hand alone is a time-honored tool many piano teachers recommend to their students. The pianist can more easily focus on complex finger and hand motions and nuances of voicing and phrasing that they might overlook if they practice with the hands together. Most piano teachers recommend separate hand practice after the initial phase of learning a passage with both hands together. Even professional pianists continue to practice hands separately even after playing a piece for 25 years or more!
Another point of view: Hands separate practice is a waste of time. Some piano teachers and performers use it little, if at all.
Detractors say that hands-separate practice is not helpful beyond the elementary level. They argue that the student needs to hear the totality of the piece from the beginning stages of learning a piece. In addition, they believe that hands-separate practice is too detached from the real world—that it is impossible to develop the coordination for playing a passage with the hands together by practicing one hand without the other. They say a student will build coordination more quickly by practicing with the hands together rather than separately.
Practicing with the hands separate is a rather obvious idea for a pianist and can be done easily because both hands produce sound. However, for the guitarist, it is different. Yes, the right hand produces sound, but without the left hand, all we hear is the open strings. And if we practice the left hand alone, we hear nothing (except a few hammer-ons and stray noises). Nevertheless, as we shall see, isolating the left or right hand can be very valuable for the guitarist. In the early stages of learning a new piece, sometimes it is just not possible to play a difficult passage with both hands together perfectly with a good balance between the parts, good tone quality, clear dynamics, crisp articulation, etc. Isolating the hands provides us with a way to apply laser-focus to specific problems.
In the guitar world, I rarely come across the mention of practicing the hands separately. I can only say that as a performer, I use the tool several times a week. As a teacher, I use it with every student. It is easier to see, feel, and hear most problems and then fix them if we can focus 100% on just one hand and not be distracted by the other.
Hands-separate practice is also crucial for the thorough memorization of a passage or piece. If the right hand does not know what it is doing on its own, if it only follows the left hand, it can wreak havoc under pressure during a performance, both with precision and memory. Don't leave the right hand as an afterthought. Don't allow the right hand to do whatever it wants. Work out the right-hand fingerings as carefully as those of the left hand. Write them in the music. Don't assume you will remember them. For a thorough discussion of how to practice the right hand alone, see my extensive five-part technique tip, 27 Reasons to Practice the Classical Guitar with the Right Hand Alone . For now, I'm going to highlight a few examples of how separate-hand practice can be helpful in learning a piece.
I am a great believer in practicing the right hand in particular on its own because we tend to ignore the right hand. We allow it to do whatever it wants and don't pay much attention to it compared to the left hand. I also find that there is a broader range of problems one can improve with right-hand-alone practice than left-hand-alone practice. But we will look at both strategies.
As I mentioned above, playing with one hand alone on the guitar is quite different from doing it on the piano. On the piano, you still hear the music. But on the guitar, all we hear is the open strings. Plus, open strings feel different to the right hand than fretted notes. But the practice strategy is still very valuable. To counteract the disadvantages, I recommend that you try to hear the actual music as you play the right hand alone. If the passage contains bar chords past the 4th fret, try placing a capo on the guitar to simulate the feel of the fretted notes.
Sometimes, we decide to use the planting technique for our right hand on a piece or passage. Our intention is obvious in our minds. But when we play the music, we allow the difficulties of the left hand to hijack our attention and focus, and we discover (or our teacher tells us) the right hand is no longer executing its planting technique correctly.
For example, if we intend to play Leyenda (Asturias) at a fast tempo, in measures #41-44 (and many others in the piece), we must plant our right-hand fingers when our thumb plucks each melody note in the bass. Planting enables us to play this arpeggio at high speed with stability and precision. Example #58:
However, to learn to apply the planting technique or fine-tune it, we must repeat the passage many times. But practicing with both hands together would quickly tire the left hand due to the continuous bar chords we must hold. Therefore, here is a perfect opportunity to practice with the right hand alone. To do so, first, we must extract the open strings of the passage. In other words, we can rewrite the standard notation as open strings. Example #59:
Or, we can rewrite the tablature as open strings. Example #60:
So, here is a summary of the process. Example #61:
Now, we can focus 100% on our planting technique without fatiguing the left hand. Practicing the right hand alone will also prevent the transfer of tension from the left hand to the right hand. Adding tension to the right hand would hamper our efforts to learn or fine-tune our planting technique.
As I mentioned above, on a passage containing bar chords such as this, when practicing on open strings, try putting a capo on the guitar to simulate the string tension of the fretted notes.
If a piece or passage, whether easy or difficult, contains arpeggios on which you want to use planting, practice it first with the right hand alone. Once the right hand understands its role and is secure, then put both hands together. For more information about planting, read my technique tip, Right-Hand Planting Technique for Arpeggios.
Watch me demonstrate how practicing with the right hand alone on this passage works far better to work on your planting technique than practicing with both hands together. Watch Video #23.
★ BE SURE TO WATCH ON FULL SCREEN. Click on the icon at the bottom on the right:
Practicing with the right hand alone is an excellent way to fix or improve the balance between the melody and accompaniment.
Here is an excerpt from Allegro by Mauro Giuliani. (By the way, you can find the complete piece in Charles Duncan's A Modern Approach to Classical Guitar Repertoire, Part 1.) The melody jumps back and forth from the bass voice to being part of the arpeggio. Example #62:
If we don't emphasize the melody as it jumps from the bass to the arpeggio, the piece sounds like a generic arpeggio study. We would fail to realize that Giuliani has turned what appears on paper to be a relatively simple piece into a semi-virtuosic miniature in three voices. Here is the passage re-notated in three voices as it should sound when played correctly. Example #63:
Now, our "simple" piece has become more complicated. And, it becomes an ideal candidate for practice with the right hand alone. Learning to play the piece in three voices and emphasizing the melody is difficult to do if we have to keep track of both hands. Instead, let's extract the open strings. Example #64:
Now, it will be much easier to teach the right-hand fingers to keep the melody loud with "p," m," and "a" while keeping the accompaniment in the background by playing the "i" finger quietly with a light touch. Example #65:
Remember, when it comes to improving the balance between voices, exaggeration is helpful. Play "p," "m," and "a," very loud, and barely touch the repeated third-string notes with "i."
Once you achieve an exaggerated balance and the right hand feels confident, add the left hand. Still play slowly and try to maintain the exaggerated balance. Go back and forth between right hand alone and both hands together. Learn to switch your mental focus from hand to hand as desired.
Notice that we are only practicing measures #1-2, not the entire section or the entire piece. On any piece, always begin with a narrow focus—practice one or two measures over and over, very slowly at first. Play slowly enough that you don't make any mistakes.
Once you've got it, move on to the next measure or pair of measures. Combine the small groups into larger groups until you can play the entire passage or piece.
By the way, for more information on balancing intervals and chords, see my technique tip on Interval and Chord Balance.
Watch me demonstrate the process on the Giuliani Allegro in Video #24.
★ BE SURE TO WATCH ON FULL SCREEN. Click on the icon at the bottom on the right:
In my four-part series on String Damping, I ask:
Have you ever learned a piece, and even though you are playing it quite well, noticed that something still doesn’t sound quite right? You are playing all the right notes and the correct rhythms, but it just doesn’t sound clean?
One of the steps of polishing a piece that you might have missed is the application of string damping throughout the piece. It is one of those details that contributes to the overall impression of how you sound. A great way to clean up your playing is to damp unwanted resonances and clashes of notes and harmonies.
In many cases, applying some types of string damping to a passage can be an overwhelming task when attempted with both hands together. Let's have a look at a beginner-level piece titled Andante by Matteo Carcassi. (You can find the complete piece in Charles Duncan's A Modern Approach to Classical Guitar Repertoire, Part 1.) Example #66:
The open bass strings ring freely if we do not apply string damping, making the bass register very muddy. Example #67:
But if we apply string damping with the right-hand thumb where Carcassi has inserted 8th-note rests, most of our problems are solved. However, I would also damp the open E and A in measure #7. Example #68:
For a beginner (or an advanced player learning a difficult piece), learning the string damping while also playing the left hand will be difficult. Once again, practicing with the right hand alone comes to the rescue. First, let's extract the open strings. Example #69:
Now that we only have to deal with open strings, our task of learning the string damping is much easier to understand and teach to the right hand. Example #70:
We can focus 100% on training our thumb to damp the strings. At first, focus on one or two measures at a time. Play very slowly, so you don't practice mistakes. Also, as you play on the open strings, try to hear the actual music in your head or sing the melody out loud. Once the right hand is secure in that one measure or measures, add the left hand. Switch back and forth between the right hand alone and both hands together until the string damping is secure. Then add one measure or two measures. Continue to build the passage in small increments.
In Video #25, watch me demonstrate how to practice string damping with the right hand alone.
★ BE SURE TO WATCH ON FULL SCREEN. Click on the icon at the bottom on the right:
As you learn a new piece, it can be challenging to keep track of what your right hand is doing when you are focusing on the difficulties of the left hand. For example, learning or correcting string crossings is particularly tricky.
Here is a scale passage from Capricho Árabe by Francisco Tárrega. There are many ways to finger the scale. I like the sound of this fingering because it stays on the bass strings and only has one bad string cross, but the practice strategy I will describe applies to any fingering you choose. Example #71:
It is a fast scale. Some guitarists play it as fast as they possibly can. Others begin tentatively and make a dramatic accelerando to the end. Either way, the scale will crash and burn if we repeat a finger or make an unintended bad string cross.
To master the string crossings, first, we extract the open strings. Example #72:
Now, we can practice on the open strings. We can focus on following our right-hand fingering, so we don't repeat any fingers and play the string crosses correctly, including the bad string cross. Example #73:
Of course, practice very slowly at first. As you play the open strings, try to hear the music in your head. Sing the scale out loud.
On a problematic passage such as this, it is probably not a good idea to try to learn the complete scale at first. Instead, begin with a narrow focus.
The following steps use practice strategies called chunking, chaining, and speed bursts, which we have not studied. I will discuss these tools in detail later, but this discussion is an excellent introduction to those techniques as well. You will understand them better when you watch the video demonstration of how to practice this passage.
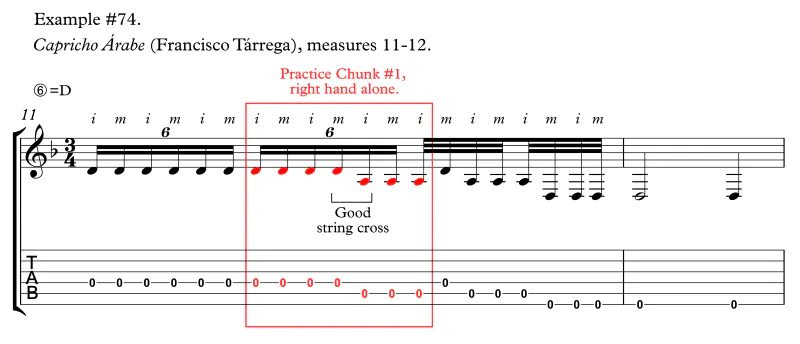
First, you might want to practice the second sextuplet to the first 32nd note of beat #3 with the right hand alone. We will call this Chunk #1. Example #74:
Play it slowly until it feels secure. Then play it very fast as a speed burst. Alternate between playing slowly and playing it as a fast speed burst.
Once that feels secure, practice Chunk #1 with both hands together. Example 75:
Play Chunk #1 slowly with both hands until it feels secure. Play it slowly enough that you don't make any mistakes. Then play it very fast as a speed burst. Alternate between playing slowly and playing it as a fast speed burst.
Then, alternate between practicing Chunk #1 with the right hand alone and both hands together. Practice slowly and with speed bursts.
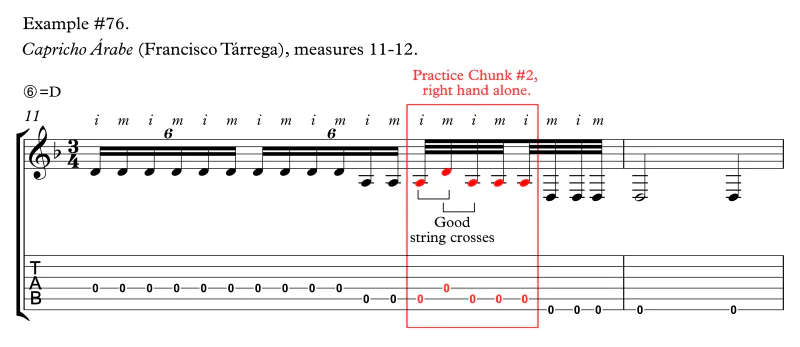
Next, practice the first five 32nd notes as Chunk #2 with the right hand alone. Example 76:
Play Chunk #2 slowly until it feels secure. Play it slowly enough that you always play it correctly. No mistakes! Then play it very fast as a speed burst. Alternate between playing slowly and playing it as a fast speed burst.
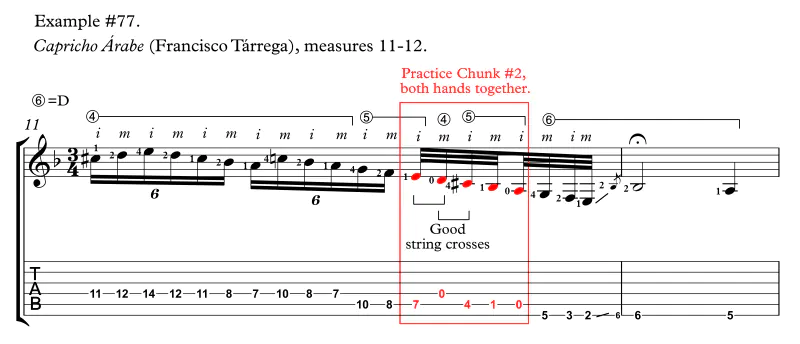
Once that feels secure, practice Chunk #2 with both hands together. Example 77:
Play Chunk #2 slowly with both hands until it feels secure. Play it slowly enough that you don't make any mistakes. Then play it very fast as a speed burst. Alternate between playing slowly and playing it as a fast speed burst.
Then, alternate between practicing Chunk #2 with the right hand alone and both hands together. Practice slowly and with speed bursts.
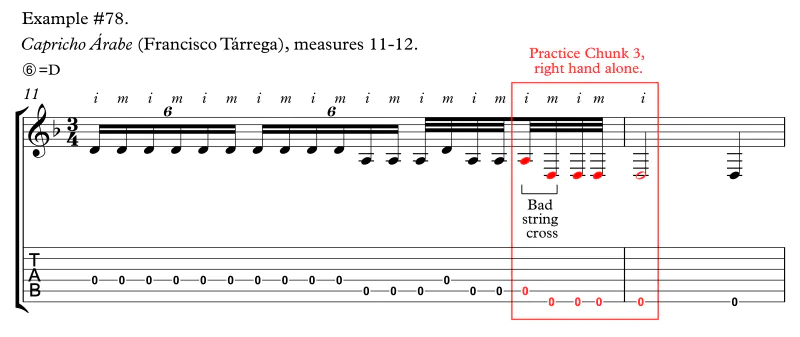
Next, practice the last four 32nd notes and the first note of measure #12 as Chunk #3 on open strings with the right hand alone. This chunk contains a bad string cross, so it will probably require extra practice. Example 78:
Play Chunk #3 slowly until it feels secure. Play it slowly enough that you make no mistakes. Then play it very fast as a speed burst. Alternate between playing slowly and playing it as a fast speed burst.
Once that feels secure, practice Chunk #3 with both hands together. Example 79:
Play Chunk #3 slowly with both hands until it feels secure. Practice it slowly enough that you play it flawlessly. Don't practice mistakes! Then play it very fast as a speed burst. Alternate between playing slowly and playing it as a fast speed burst.
Then, alternate between practicing Chunk #3 with the right hand alone and both hands together. Practice slowly and with speed bursts.
Then, combine chunks #2 and #3 together. First, practice with the right hand alone. Example #80:
Play the combined Chunk #2 + Chuck #3 slowly until it feels secure. Remember, play it slowly enough that you don't make mistakes. Then play it very fast as a speed burst. Alternate between playing slowly and playing it as a fast speed burst.
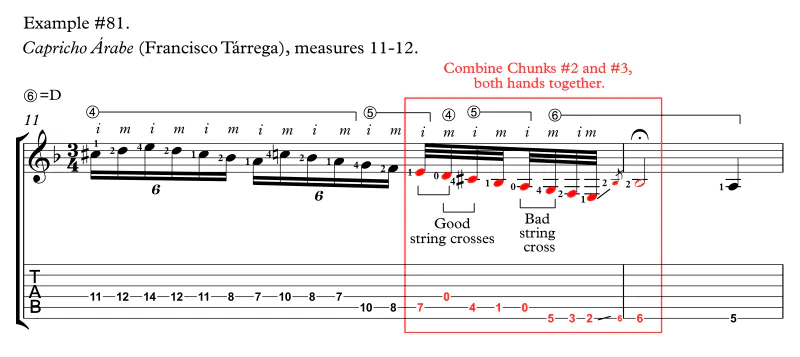
Once that feels secure, practice Chunk #2 + Chunk #3 with both hands together. Example 81:
Play the combined Chunk #2 + Chunk #3 slowly with both hands until it feels secure. Play it slowly enough that you play it correctly. Do not practice mistakes. Then play it very fast as a speed burst. Alternate between playing slowly and playing it as a fast speed burst.
Next, alternate between practicing Chunk #2 + Chunk #3 with the right hand alone and both hands together. Practice slowly and with speed bursts.
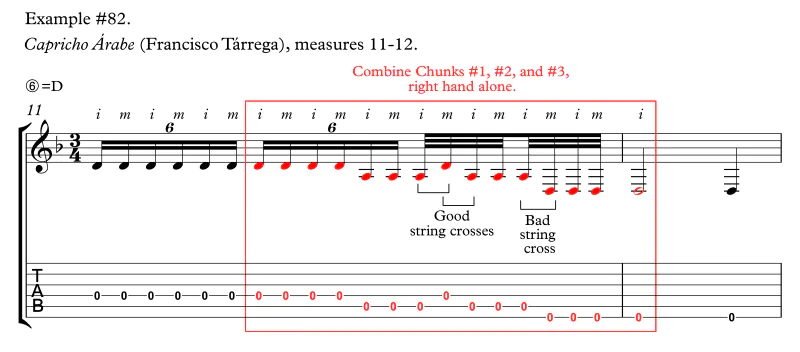
Then add Chunk #1, so you are playing Chunks #1-3 combined. Example #82:
Play the combined Chunk #1 + Chunk #2 + Chuck #3 slowly until it feels secure. Remember, play it slowly enough that you play it flawlessly. Then play it very fast as a speed burst. Alternate between playing slowly and playing it as a fast speed burst.
Once that feels secure, practice Chunk #1 + Chunk #2 + Chunk #3 with both hands together. Example 83:
Play the combined Chunks #1-3 slowly with both hands until this chunk feels secure. Do not practice mistakes! Play it slowly enough so that you play it flawlessly. Then play it very fast as a speed burst. Alternate between playing slowly and playing it as a fast speed burst.
Then, alternate between practicing the combined Chunks #1-3 with the right hand alone and both hands together. Practice slowly and with speed bursts.
Finally, add the first sextuplet, which gives you the complete scale. Practice the entire scale going back and forth between right hand alone and both hands together. Learn to switch your mental focus from hand to hand as desired. Occasionally, you may need to review specific chunks if you stumble. Break the scale down into smaller chunks and then reassemble it.
Mix it up:
With this practice strategy, you can master the scale in one to two weeks.
Watch me demonstrate in Video #26.
★ BE SURE TO WATCH ON FULL SCREEN. Click on the icon at the bottom on the right:
And again, if you study the five-part series on right-hand-alone practice, you can also:
Yes, we could make many of these improvements by practicing both hands together. BUT, it is far more effective and efficient to practice with the right hand alone.
Finally, practice with the right hand alone is not just something we do when we are learning the notes (ingraining the note patterns, learning the fingering, solving intricate technical issues, and so on). We can also use this practice strategy for maintenance and review too.