this is a blank placeholder
this is a blank placeholder

How to Learn a Piece
On the Classical Guitar

"Douglas who?"
Douglas Niedt is a successful concert and recording artist and highly respected master classical guitar teacher with 50 years of teaching experience. He is Associate Professor of Music (retired), at the Conservatory of Music and Dance, University of Missouri-Kansas City and a Fellow of the Henry W. Bloch School of Management—Regnier Institute for Entrepreneurship and Innovation.
Doug studied with such diverse masters as Andrés Segovia, Pepe Romero, Christopher Parkening, Narciso Yepes, Oscar Ghiglia, and Jorge Morel. Therefore, Doug provides solutions for you from a variety of perspectives and schools of thought.
He gives accurate, reliable advice that has been tested in performance on the concert stage that will work for you at home.

Contact Me
Do you have a question?
Comment?
Suggestion for the website?
PURCHASE AN ALL-ACCESS PASS
TO THE VAULT OF CLASSICAL GUITAR TECHNIQUE TIPS

"Hello Mr Niedt,
My name's Gretchen, and I'm so happy I purchased an All-Access Pass to the Vault. I love your awesome technique tips. I'm amazed how much I have improved my playing.
Thank you!"
ARE YOU LOOKING FOR PROVEN STRATEGIES
THAT WILL MAKE YOU A BETTER GUITARIST?
Check out the game-changing tips in my Vault—I promise they will kick your playing up to the next level.
Purchase an
All-Access Pass to the Vault.
It's a one-time purchase of only $36!
You receive full access to:
- Over 180 technique tips in The Vault.
- Special arrangements of Christmas music
- Arrangement of the beautiful Celtic song, Skellig
- Comprehensive guide, How to Master the Classical Guitar Tremolo
All that for a one-time payment of only $36. Take me to the page to Purchase an All-Access Pass
HOW TO LEARN A PIECE (SONG)
ON THE CLASSICAL GUITAR, Part 12
By Douglas Niedt
Copyright Douglas Niedt. All Rights Reserved.
This article may be reprinted, but please be considerate and give credit to Douglas Niedt.
*Estimated minimum time to read this article, watch the videos, and listen to the audio clips: 55 minutes.
*Estimated minimum time to read the article, watch the videos, listen to the audio clips, and understand the musical examples: 1.5-3 hours.
NOTE: You can click the navigation links on the left (not visible on phones) to review specific topics.
In Part 1, we laid the groundwork for learning a new song:
- We set up our practice space.
- We learned to choose reliable editions of the piece we are going to learn.
- We learned that it is essential to listen to dozens of recordings and watch dozens of videos to hear the big picture as we learn a new piece.
- We learned that it is important to study and analyze our score(s).
- We learned how to make a game plan for practicing our new piece.
- We learned why it is so vital NEVER to practice mistakes and the neuroscience behind it.
- We learned practice strategies to master small elements, including "The 10 Levels of Misery," which ensures we don't practice mistakes.
- We learned where to start practicing in a new piece.
- We learned that it is vital to master small elements first.
- We learned the two most fundamental practice tools—The Feedback Loop and S-L-O-W Practice.
In Part 4, we learned how to use the "Slam on the Brakes" and "STOP—Then Go" practice strategies to:
In Part 5, we learned how to practice with the right hand alone to:
- Apply planting or double-check the precision of your planting technique
- Correct or improve the balance between the melody, bass, and accompaniment
- Apply or improve string damping
- Master passages with difficult string crossings
In Part 6, we learned how to practice with the left hand alone to learn, improve, and master:
- The "lag behind" technique
- How to lift fingers to avoid string squeaks
- Left-hand finger preparation
- Synchronization of left-hand finger movements
In Part 7, we learned more on how to practice with the left hand alone to learn, improve, and master:
- Shifts
- Pre-planting the left-hand fingers
- Collapsing (hyperextending) the tip of the first finger going into and out of a bar chord
- Difficult chord changes without tiring, injuring, or "locking up" the left hand by practicing with light finger pressure
In Part 8, we began learning how to practice with Altered Rhythms. We learned the benefits and six specific strategies:
- How to practice the most common altered rhythms: dotted rhythms
- How to lengthen a particular note within each beat to alter the rhythm
- How to use extended pauses in altered rhythms to reduce tension in the hands
- How to lengthen a particular beat in each measure to alter the rhythm
- How to insert a very long pause (fermata) and play the following notes as grace notes to alter the rhythm
- How to change the accents to alter the rhythm
In Part 9, we concluded our discussion of practicing with Altered Rhythms. We learned:
- How to apply altered rhythms in divisions of 2 to a scale
- How to apply altered rhythms in divisions of 2 to a passage from a piece (not a scale)
- How to apply altered rhythms in divisions of 3 to a scale
- How to apply altered rhythms in divisions of 3 to a passage from a piece (not a scale)
In Part 10, we concluded our discussion of practicing with Altered Rhythms. We learned:
- Four-part harmony, the notation of choral music, and how that applies to the notation of voicing in guitar music
- The multi-dimensionality of music moving vertically and horizontally
- The limitations of guitar notation
- The notation of voices in guitar music
In Part 11-A, we began to learn how to practice the individual voices in a piece to:
- Learn to play the melody as the prominent part.
- Learn to find and fix flaws in the accompaniment.
- Learn to adjust the balance between the voices.
In Part 11-B, we continued our exploration of how to practice the individual voices in a piece to:
- Separate the music into its component voices so that you can examine the independent rhythms of each part and hold the notes for their correct duration.
- Practice the individual voices to learn to eliminate choppy playing and detect bad fingering.
- Practice the individual voices to help you choose whether to play a voice as a pure line (only one note ringing at a given moment) or to allow notes to ring together.
- Practice the individual voices to improve your tone quality.
- Practice the individual voices to improve the clarity of the notes within the voice (eliminate buzzes and muted notes).
In Part 11-C, we learned how to practice the voices of your music.
- We learned that practicing the individual voices is perhaps the most powerful tool you can use to improve the execution of contrapuntal passages and contrapuntal pieces such as fugues.
- We learned how to practice the individual voices to learn to hear each voice and how the voices interact with one another.
- We learned about the mystery of hidden or implied voices in both contrapuntal and non-contrapuntal music.
BASIC PRACTICE PROCEDURES
Part 12
Until now, most of my discussions focused on the science behind learning and practice tools. In Part 12, I will begin discussing Practice Procedures.

1. Learn the Notes or Master a Piece Measure by Measure
Practicing measure by measure is one of the time-honored basic procedures to learn or master a piece. It is practical and thorough. Here are the first eight measures of Sons de Carrilhões (Sounds of the Bells) by João Pernambuco (aka João Teixeira Guimarães). Example #337:

In this example, we will start with the incomplete measure at the very beginning. However, you can generally start with any measure in a piece. As I discuss later, it is often a good idea NOT to start at the beginning. We will stop on the first note of the next measure. That is not as easy to do as it might seem. Example #338:
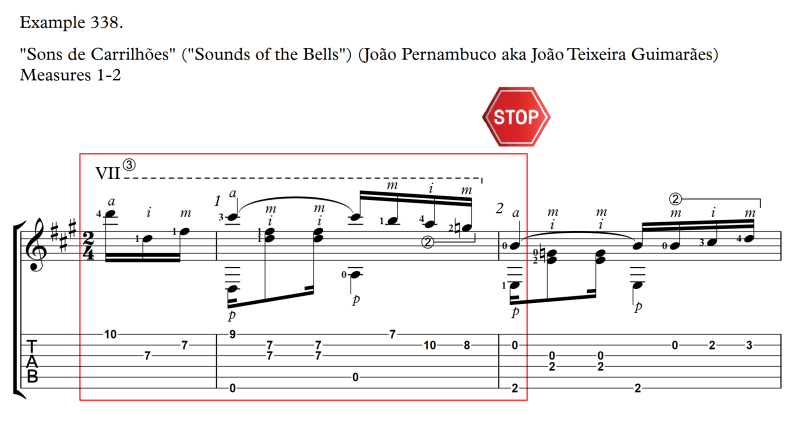
Many guitarists want to continue into the next measure, especially if they played the first measure well. You must discipline yourself to stop on that first note of the second measure. Otherwise, you will lose focus on the measure you are trying to learn or improve. Resisting the overwhelming temptation to go beyond the first note of the second measure is particularly difficult in music by Bach and others with strong rhythmic figures, where the musical momentum is strong. But again, stopping is essential to stay focused on the measure you want to learn.
The idea, of course, is to be able to play that measure and the first note of the second measure perfectly, several times in a row. How many times? I recommend a minimum of three. Or, you can go for the gold and try the "Ten Levels of Misery."
Regardless of how many repetitions you make, you must allow enough time between each repetition to use our essential tool, the feedback loop. Mindlessly repeating a measure can do a lot of damage.
And what does "perfectly" mean? That depends on what phase of learning you are in on the piece. For example, for the first few days or the first week, where you are in the earliest phase of learning the notes, you might devise the following stages as goals:
Stage #1: The earliest stage: learn the notes
If you are in the earliest stage of learning the notes and finding them on the fretboard, "perfectly" would mean:
- I am playing the right notes.
- I am using the correct fingering on BOTH hands (which you should write in the music!). By the way, that fingering may be different from the printed fingering in the score.
- I am not concerned with the rhythms. I am hesitating rather than making mistakes.
Watch me demonstrate measures 1-2 of "Sounds of the Bells," Stage #1, in Video #77.
Video 77. Stage #1: Earliest Stage Learning the notes
Stage #2: Learn to play the notes in rhythm very slowly with no metronome
- I am playing the right notes.
- I am using the correct fingering on BOTH hands (which you should write in the music!). By the way, that fingering may be different from the printed fingering in the score.
- I am playing the correct rhythms but at a VERY slow tempo.
Watch me demonstrate measures 1-2 of Sounds of the Bells, Stage #2, in Video #78.
Video 78. Stage #2: Play the notes in rhythm with no metronome
Stage #3: Play the notes in rhythm with a metronome at a very slow tempo
- I am playing the right notes.
- I am using the correct fingering on BOTH hands (which you should write in the music!). By the way, that fingering may be different from the printed fingering in the score.
- I am playing the correct rhythms.
- I can play the rhythms accurately with a metronome at a very slow tempo.
Note that if you are learning a complex piece where each measure has a ton of fast notes or challenging changes, you will want to split the measure into a smaller unit, perhaps half a measure.
Watch me demonstrate measures 1-2 of Sounds of the Bells, Stage #3, in Video #79.
Video 79. Stage #3: Practice very slowly with the metronome
The Final Phase: Refining a Piece for Performance
You will undergo many other stages before you are ready to refine your piece for performance. Some of those stages will include bringing the piece up to tempo, adding dynamics, tone color changes, string damping, working on relaxation, memorization, etc. However, in this simplified discussion, we will jump ahead to the final phase of refining a piece for performance.
When you reach the final phase of refining a piece for performance, playing "correctly" would also include:
Watch me demonstrate measures 1-2 of Sounds of the Bells, Final Phase, in Video #80.
Video 80. Stage 4: Final phase, refining for performance
Again, there will be many phases of learning, with multiple stages between the earliest phase of learning the notes and the final phase of refining the piece for performance. And, as you progress, the definition of "perfectly" will change significantly on the journey to mastering the piece.
Returning to our measure-by-measure practice procedure for learning "Sounds of the Bells," after learning measure 1 to the first note of measure 2, we would move on to starting on measure 2 and stopping on the first note of measure 3. Example #339:

We can continue working our way through the first eight measures in the same way. We could also begin the process of "chaining," which I will explain later in detail. But briefly, it would look like this.
First, we decide which measures we want to learn. Example #340:

Example #341:

Example #342:

Example #343:

Example #344:

Example #345:

Example #346:

Example #347:

Example #348:

2. PRACTICE PROCEDURES: Learn the Notes or Master a Piece Section by Section
This practice procedure is another time-honored and obvious approach to learning a new piece. But what is a section? That depends on the composition.
For example, short beginning studies such as Scottish Dance by Mauro Giuliani, Allegretto by Fernando Sor, or Waltz in G by Ferdinand Carulli are often in two, three, or four sections delineated by repeat signs.
Likewise, we find the same repeat-sign divisions plus divisions indicated by key signature changes in intermediate pieces such as Sons de Carrilhões (Sounds of the Bells) by João Pernambuco (aka João Teixeira Guimarães). Also, as I illustrate in Sounds of the Bells, we can call one phrase a section if we want to narrow our focus.
Click here to view my very cool image carousel showing these examples. This page will remain open, but the carousel will open in a new tab.
In many intermediate and advanced pieces, we can see or make divisions indicated by repeat signs, changes of key, tempo changes, and changes of texture (the vertical spacing of notes, the density of notes, the range of notes, chordal vs. linear). Josef Kaspar Mertz's "Fantasie Hongroise, Op. 65 No. 1" is an excellent example of how these elements indicate sections or divisions of the piece.
Click here to view an image carousel of my annotations showing the sections of Mertz's "Hungarian Fantasy". This page will remain open, but the carousel will open in a new tab.
In Laying the Groundwork, Step #4, we learned how important it is to "Study and Analyze the Score Without Your Guitar." We learned to find time signature and key changes, tempo markings, tempo changes, structural cues, dynamic markings, themes, parts that stand out from the rest of the piece, difficult sections and measures, and how to analyze the form of the composition. All of these elements will tell you where various sections are and where you should apply your focus.
Starting at the beginning is often not a good idea.
Starting with the first section is not always a good idea when learning section by section (or learning measure by measure). Usually, students who begin mastering the first section of their new piece and proceed section by section to the end play the beginning securely and confidently, but that security and confidence decrease as they reach the end. As piano pedagogue Graham Fitch puts it, "There is a gradual diminuendo of accomplishment for the piece, which often ends with a whimper." For that reason, in a lesson, I often ask the student to play the last or middle sections of their piece first.
Where Do I Start?
Where to begin? We discussed it here, and here are a few specific possibilities in reference to sections.
- Learn the piece backward. In other words, learn the last section, the second-to-last section, the third-to-last section, etc.
- Start somewhere in the middle and work forward or backward from there.
- Begin with the most challenging section first. Next, tackle the second most difficult section.
- Randomly choose a section to start.
I like to vary my starting point almost every day. I find it helps build my understanding and memory of the piece's structure, keeps things interesting so that I stay fresh and alert, and efficiently distributes my focus throughout the piece from day to day and week to week.
Also, remember that you will not go through every section of a piece in one practice session. If you were in the later stages of mastering the music, you might get through most of the composition or several sections. But in the early stages of learning the notes and rhythm, you may only hit one or two sections. That's the way it is supposed to be.
There are benefits to NOT practicing every section of a piece daily. Most importantly, an occasional skipped day gives your subconscious and your neuromuscular system time to process the changes and progress you made when you hit it hard the day or two before. After skipping a day or two, you will often find that you play the passage better when you return to it. Or you will find that specific points of execution are suddenly clear to you now.
How Large a Section Should I Practice?
The length of the section we practice will vary from person to person and depend upon age, level, and experience. And, if you are learning a piece from scratch, the sections will probably be smaller than if you are refining music you already know or reviving a composition you have played many times.
Remember our discussion about starting small? You will probably practice mistakes if you choose too large a section to learn. Therefore, it is best to narrow your focus to small sections you can play flawlessly with a few minutes or hours of practice. Perhaps you might practice the individual phrases of a section before attempting to play the entire section. Or half a phrase. If that doesn't work, go back to measure by measure. Once the individual measures are under control, build back up to larger units.
Number of Repetitions
Once again, we ask ourselves, "How many times should I repeat a section?" As with measure-by-measure practice, I recommend a minimum of three. But a lot depends on how long the section is. We can easily practice one 4 or 8-measure phrase six or ten times. But if a section is 32 or 64 measures long, it is a different story. On longer sections, three times is probably the max. But if you take a break and practice something else for five or ten minutes, you can come back and take another crack at three more repetitions. You can keep that up until you have done nine or even eighteen reps. The goal is to maintain your focus at all times. Too many repetitions will lead to boredom and a wandering attention span.
Regardless of how many repetitions you make, you must allow enough time between each repetition to use our essential tool, the feedback loop. Always engage your critical faculties and senses. Graham Fitch reminds us, "A vital part of the process of repeating sections happens between the repetitions. We rest between repetitions and reflect on how we did so that we have something tangible to work on during our next repetition." Remember, mindlessly repeating a section can do a lot of damage.
SUMMARY
- We learned the two basic practice procedures to learn the notes or even master an entire piece: practice measure by measure or section by section.
- We learned to be careful how large a section we practice at any one time.
- We learned that the definition of playing something "perfectly" changes on the journey to mastering a piece.
- We learned that the number of repetitions of a measure or section is crucial.
- We learned that starting at the beginning of a piece is often not a good idea.
- We reaffirmed the importance of the feedback loop and the dangers of mindless repetition.
DOWNLOADS
1. Download a PDF of the article with links to the videos. Depending on your browser, it will download the PDF (but not open it), open it in a separate tab in your browser (you can save it from there), or open it immediately in your PDF app.
Download the PDF: HOW TO LEARN A PIECE (SONG) ON THE CLASSICAL GUITAR Part 12 (with links to the videos).
2. Download the videos. Click on the video link. After the video page opens, click on the three dots on the bottom right. Select "Download."
Video 77: Stage #1: Earliest Stage Learning the notes
Video 78: Stage #2: Play the notes in rhythm with no metronome
Video 79: Stage #3: Practice very slowly with the metronome
Video 80: Stage 4: Final phase, refining for performance