this is a blank placeholder
this is a blank placeholder

How to Learn a Piece
On the Classical Guitar

"Douglas who?"
Douglas Niedt is a successful concert and recording artist and highly respected master classical guitar teacher with 50 years of teaching experience. He is Associate Professor of Music (retired), at the Conservatory of Music and Dance, University of Missouri-Kansas City and a Fellow of the Henry W. Bloch School of Management—Regnier Institute for Entrepreneurship and Innovation.
Doug studied with such diverse masters as Andrés Segovia, Pepe Romero, Christopher Parkening, Narciso Yepes, Oscar Ghiglia, and Jorge Morel. Therefore, Doug provides solutions for you from a variety of perspectives and schools of thought.
He gives accurate, reliable advice that has been tested in performance on the concert stage that will work for you at home.
PURCHASE AN ALL-ACCESS PASS
TO THE VAULT OF CLASSICAL GUITAR TECHNIQUE TIPS

"Hello Mr Niedt,
My name's Gretchen, and I'm so happy I purchased an All-Access Pass to the Vault. I love your awesome technique tips. I'm amazed how much I have improved my playing.
Thank you!"
ARE YOU LOOKING FOR PROVEN STRATEGIES
THAT WILL MAKE YOU A BETTER GUITARIST?
Check out the game-changing tips in my Vault—I promise they will kick your playing up to the next level.
Purchase an All-Access Pass to the Vault.
It's a one-time purchase of only $36!
You receive full access to:
- Over 180 technique tips in The Vault.
- Special arrangements of Christmas music
- Arrangement of the beautiful Celtic song, Skellig
- Comprehensive guide, How to Master the Classical Guitar Tremolo
All that for a one-time payment of only $36. Take me to the page to Purchase an All-Access Pass
HOW TO LEARN A PIECE (SONG)
ON THE CLASSICAL GUITAR, Part 11-A
By Douglas Niedt
Copyright Douglas Niedt. All Rights Reserved.
This article may be reprinted, but please be considerate and give credit to Douglas Niedt.
*Estimated minimum time to read this article and watch the videos: 45 minutes.
*Estimated minimum time to read the article, watch the videos, and understand the musical examples: 1.5-3 hours.
NOTE: You can click the navigation links on the left (not visible on phones) to review specific topics.
In Part 1, we laid the groundwork for learning a new song:
- We set up our practice space.
- We learned to choose reliable editions of the piece we are going to learn.
- We learned that it is essential to listen to dozens of recordings and watch dozens of videos to hear the big picture as we learn a new piece.
- We learned that it is important to study and analyze our score(s).
- We learned how to make a game plan for practicing our new piece.
- We learned why it is so vital NEVER to practice mistakes and the neuroscience behind it.
- We learned practice strategies to master small elements, including "The 10 Levels of Misery," which ensures we don't practice mistakes.
- We learned where to start practicing in a new piece.
- We learned that it is vital to master small elements first.
- We learned the two most fundamental practice tools—The Feedback Loop and S-L-O-W Practice.
In Part 4, we learned how to use the "Slam on the Brakes" and "STOP—Then Go" practice strategies to:
In Part 5, we learned how to practice with the right hand alone to:
- Apply planting or double-check the precision of your planting technique
- Correct or improve the balance between the melody, bass, and accompaniment
- Apply or improve string damping
- Master passages with difficult string crossings
In Part 6, we learned how to practice with the left hand alone to learn, improve, and master:
- The "lag behind" technique
- How to lift fingers to avoid string squeaks
- Left-hand finger preparation
- Synchronization of left-hand finger movements
In Part 7, we learned more on how to practice with the left hand alone to learn, improve, and master:
- Shifts
- Pre-planting the left-hand fingers
- Collapsing (hyperextending) the tip of the first finger going into and out of a bar chord
- Difficult chord changes without tiring, injuring, or "locking up" the left hand by practicing with light finger pressure
In Part 8, we began learning how to practice with Altered Rhythms. We learned the benefits and six specific strategies:
- How to practice the most common altered rhythms: dotted rhythms
- How to lengthen a particular note within each beat to alter the rhythm
- How to use extended pauses in altered rhythms to reduce tension in the hands
- How to lengthen a particular beat in each measure to alter the rhythm
- How to insert a very long pause (fermata) and play the following notes as grace notes to alter the rhythm
- How to change the accents to alter the rhythm
In Part 9, we concluded our discussion of practicing with Altered Rhythms. We learned:
- How to apply altered rhythms in divisions of 2 to a scale
- How to apply altered rhythms in divisions of 2 to a passage from a piece (not a scale)
- How to apply altered rhythms in divisions of 3 to a scale
- How to apply altered rhythms in divisions of 3 to a passage from a piece (not a scale)
In Part 10, we concluded our discussion of practicing with Altered Rhythms. We learned:
- Four-part harmony, the notation of choral music, and how that applies to the notation of voicing in guitar music
- The multi-dimensionality of music moving vertically and horizontally
- The limitations of guitar notation
- The notation of voices in guitar music
HOW TO PRACTICE THE VOICES OF YOUR MUSIC
In Part 10, we learned how to identify the individual voices in a piece of music. I mentioned that this skill provides many benefits:
- The most obvious benefit is that knowing which notes form the melody will help you practice playing those notes more prominently than those in subordinate voices. Usually, making the melody prominent is key to making a piece sound its best.
- If we can identify the voices in our music, we can use some advanced practice strategies in which we practice the voices separately to improve several elements of our playing.
- We can learn which notes form the accompaniment and practice it independently. That way, we can easily hear any flaws in our playing of the accompaniment and fix them. Practicing the accompaniment alone also increases our awareness of what the accompaniment sounds like by itself.
- If you know which voice is which, you can adjust the relative balance between two or more parts with great precision.
- Separating the music into its component voices allows you to see the independent rhythms of each part so that you hold the notes for their correct duration.
- Practicing the individual voices of a passage shines a spotlight on flaws in fingering and execution.
- Practicing the individual voices helps us choose whether to play a voice as a pure line (only one note ringing at a given moment) or allow notes to ring together.
- We can improve the tone quality of a voice.
- We can improve the clarity of the voices (eliminate buzzes and muted notes).
- In contrapuntal music, we can learn to hear the individual voices and how they interact. Then, we can apply practice tools to make those interactions crystal clear.
- An awareness of the voices of the music enables you to hear and appreciate the intricacies, uniqueness, creativity, and wonder of the composer or arranger's work. That awareness will permeate your playing, and your listeners will also sense and hear it.
- You can go even further by finding hidden or implied voices in both contrapuntal and non-contrapuntal music. When you differentiate these voices, you will give the piece the lifelike multi-dimensionality the composer intends it to have, rather than a dull, colorless, one-dimensional sound.
I also explained that practicing the individual voices of a song, section, or measure is a powerful practice tool you can use to learn a new piece or improve an old one. But it is complicated to use, and here in Part 11, I will explain several specific ways we can use it.
I should point out that finding the voices and knowing which notes belong to which voice is ALWAYS USEFUL. However, practicing individual voices is not always convenient. Sometimes figuring out how to play and practice an individual voice is so complex or time-consuming that it isn't worth the trouble. But in many instances, it is the best way to diagnose and fix problem passages.
1. Practice the Individual Voices to Learn to Play the Melody as the Prominent Part
Usually, the melody is king. Most pieces sound the best when the listener hears the melody as the prominent part of the music. Let's start with a simple example. Example #246:

Watch me play the passage and how I exaggerate the volume difference between the two voices. Watch Video #41.
★ BE SURE TO WATCH ON FULL SCREEN. Click on the icon at the bottom on the right:
Video 41: "Exaggerate the Volume Between Two Voices
Once the right hand can exaggerate the contrast in volume between the voices, you will find it easy to bring up the volume of the thumb and reduce the volume of the fingers to produce a more normal and pleasing balance between the two voices.
What is the correct balance? That is up to you to decide! However, a general rule is to play non-melody notes quieter than you think you should. Why? Because you are so familiar with the music, you would immediately recognize which notes are the melody and which are the accompaniment, even if you played the accompaniment louder than the melody. But your listener is probably unfamiliar with the music, so you need to make it extra clear which notes you want them to notice the most. So make it obvious for them.
That was a simple example. Let's look at a more challenging situation in an intermediate piece. Here is Lágrima by Francisco Tárrega. I notated it in advanced guitar notation to make it easy to see the voices. The left and right-hand fingerings are suggestions. There are many other ways to play it that are just as good. Example #247:

The middle alto voice and the bottom bass voice comprise the accompaniment. Playing the middle alto voice (the open Bs) very quietly will be easy if you practice slowly. In fact, it is a good idea to exaggerate and play the open Bs super quiet. Barely brush the string with the "m" finger.
However, notice that each melody note (the soprano upper voice) always has a bass voice note underneath it. So we must pluck the two notes simultaneously, yet we need to play the bass note very quietly but the melody note loud. And, as with the easy example, we want to exaggerate the difference in volume between the two notes to train the right hand. That is hard to do. I explain how to do it in detail in Interval and Chord Balance, Part 1, and Interval and Chord Balance Update.
Extract the intervals from the music where the thumb and a finger play simultaneously. Then, practice those intervals by themselves using the techniques I describe in the technique tips above. Example #248:
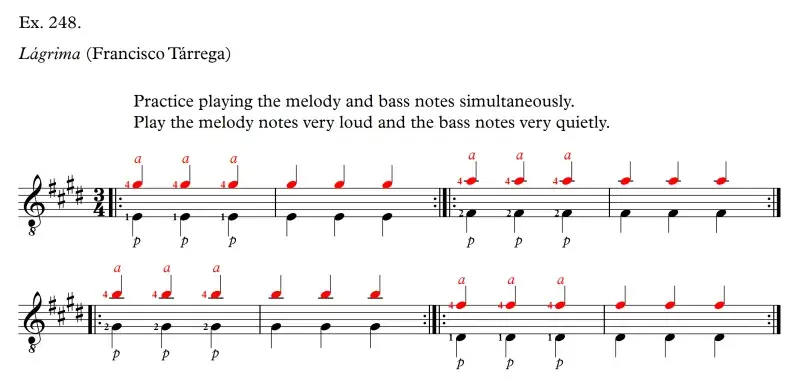
Now that you can keep the thumb extremely quiet while keeping the melody loud and the middle voice soft, go back and try playing all three voices together. Now, the melody sings prominently above the accompaniment notes. Success!
Let's go on and look at the four measures that follow. Example #249:

Tárrega uses a combination of advanced and abbreviated shorthand guitar notation. In measure 5, he separates out the bass part pointing the note stems downward. The melody notes have their note stems pointing upward. But for ease of reading, the alto voice shares note stems with the melody notes even though the high soprano melody notes are not part of the alto voice. Example #250:

In terms of voice leading, it would be better to notate the measure with advanced notation, giving each note its own note stem. As we saw in Part 10, the rhythm is a little harder to read, but which notes belong to which voice is now clear. Example #251:

After that, it is ambiguous where the melody goes, so most guitarists play the notes in measures 6 and 7 at the same volume, making it sound as though every note is part of the melody, producing a vague, unclear result like this. Example #252:

There is no differentiation between the melody and the accompaniment.
This unmusical approach sounds like this. Watch Video #42-A.
★ BE SURE TO WATCH ON FULL SCREEN. Click on the icon at the bottom on the right:
Video #42-A: No differentiation between melody and accompaniment Lágrima (Francisco Tárrega) m5-8
The problem is Tárrega's shorthand guitar notation. It raises three questions. Example #253:

I think it is clear that the low B in measure 7 is not part of the melody and belongs to the bass voice only. So, other than that, if we choose to stay close to Tárrega's notation, this would be the melody. Example #254:

In measure 6, we should play the G# very quietly, and in measure 7, the open E and low B quietly, so they do not sound like they are part of the melody.
Watch me demonstrate Interpretation #1 in Video 42b.
★ BE SURE TO WATCH ON FULL SCREEN. Click on the icon at the bottom on the right:
Video #42-B: The Melody, Interpretation No. 1, Lágrima (Francisco Tárrega), m5-8
Or, we could go with a different interpretation. If, in measure 6, the C# is only a bass note (not part of the melody), and in measure 7, the C# is part of the alto voice (not part of the melody), the real melody would be this. Example #255:

We can re-finger measures 6 and 7 to make the melody even more apparent. I rewrote it in advanced notation so you can see everything more clearly. Example #256:

Watch me demonstrate interpretation #2 in Video #42-C.
★ BE SURE TO WATCH ON FULL SCREEN. Click on the icon at the bottom on the right:
Video #42-C: The Melody, Interpretation No. 2, Lágrima (Francisco Tárrega), m5-8
There are many cases such as this where you will find that there is more than one way to interpret which notes belong to which voice. As is the case here with interpretation #2, sometimes rewriting the fingering improves the end result.
Once you decide which notes form the melody, proceed to practice very slowly and, once again, exaggerate the volume difference between the melody and accompaniment to improve the right hand's control over the balance.
Remember, if you do not know which notes comprise the melody, you might practice playing the wrong notes loud and the wrong notes quietly. Do your homework. Find the voices and identify which notes belong to which voice.
2. Practice the Individual Voices to Learn to Find and Fix Flaws in the Accompaniment
Many times we may notice that the way we are playing a passage in a song doesn't sound good. For example, maybe we hear a buzz or string squeak but aren't sure which finger is causing it. Let's look again at the first four measures of Francisco Tárrega's Lágrima. Many guitarists produce ugly string squeaks in these measures when they shift on the wound 4th string in the bass line. By the way, the left and right-hand fingerings are suggestions. There are many other ways to play it that are just as good. Example #257:

Trying to listen to all three voices at once and trying to pinpoint the problem and fix it is not easy. But if we play the accompaniment by itself (the bass and alto voices), we can focus our attention on just its notes to hear details better. We could practice only the notes that belong to the accompaniment like this. Example #258:

But not holding the melody notes changes the position and movement of the left hand. We need to stay in the real-world environment as much as possible. Therefore, a better way is to fret ALL the notes with the left hand (even the melody). But pluck only those that comprise the accompaniment. Example #259:
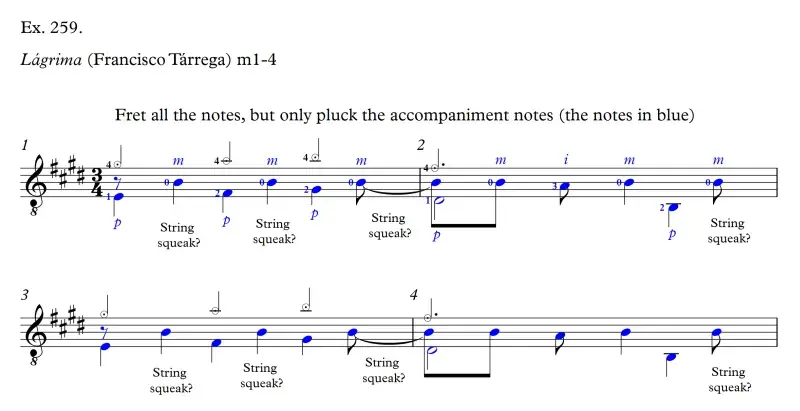
When we eliminate the distraction of the melody, we suddenly become more aware of how the accompaniment sounds and how our fingers are moving on the wound 4th string. We realize that sliding laterally on the string is producing the squeaks.
Plus, once we diagnose the problem, practicing only one voice or the accompaniment alone can be more efficient in solving it than playing all the voices together. Although it doesn't have anything to do with eliminating the string squeaks, an added benefit is that plucking only the accompaniment notes gives us additional awareness of whether or not we are following our intended right-hand fingering.
Watch me demonstrate these steps:
- Play the passage with the offensive string squeaks.
- Fret all the notes but play only the accompaniment to identify the problem.
- Practice the accompaniment without the melody to fix the problem.
Watch Video #43.
★ BE SURE TO WATCH ON FULL SCREEN. Click on the icon at the bottom on the right:
Video #43: String Squeaks, Lágrima (Francisco Tárrega), m1-4
Let's look at an example where buzzes and muted notes are a problem. It can be maddingly difficult to play the first eight measures of Cavatina by Stanley Myers (arranged by John Williams) without buzzes or muted notes in the accompaniment. Example #260:

Once again, if we play all the notes, the melody is distracting—making it sound good hijacks our attention. Therefore, it is not easy to pinpoint the precise locations of buzzes and muted notes in the accompaniment. But if we fret all the notes but pluck only the accompaniment notes, we can hear what is happening much better. By the way, the right-hand fingerings are suggestions. There are other fingerings that are just as good. Example #261:

Watch me demonstrate how to practice this passage in Video #44.
★ BE SURE TO WATCH ON FULL SCREEN. Click on the icon at the bottom on the right:
Video #44: Buzzes and Muted Notes, Cavatina (Stanley Myers), m1-8
3. Practice the Individual Voices to Learn to Adjust the Balance Between the Voices
In Lágrima, we learned to play the melody loud but keep the bass and alto voices (the accompaniment) quiet. Here again, are the first four measures. Example #262:

Remember that we focused on exaggerating the contrast. But we can go a step beyond keeping the melody loud and the accompaniment quiet. We can fine-tune the accompaniment by adjusting the relative volume of the alto and bass parts. But which part should be louder? I would vote for the bass part. We see that the alto part is nothing more than open Bs, albeit in a nice syncopated rhythm. The voice is supportive but isn't very interesting. However, the bass part functions as a harmony part, moving an interval of a 10th beneath the melody.
Let's choose a hierarchy. At the top level, we definitely want the melody loud and the accompaniment quiet:
- LOUD:
Melody - QUIET:
Accompaniment
Then, if we break down the accompaniment into its component parts, the alto and bass, the overall hierarchy looks like this:
- LOUD
Melody - QUIET:
Accompaniment- Bass voice: medium loud
- Alto voice: very quiet
To fine-tune the phrase to these levels, start by fretting all the notes but plucking only the alto and bass voices (the accompaniment) as we did when we learned to eliminate the string squeaks from this passage. Example #263:

Play slowly enough that you can keep the alto voice markedly quieter than the bass voice. Watch me demonstrate in Video #45.
★ BE SURE TO WATCH ON FULL SCREEN. Click on the icon at the bottom on the right:
Video #45: Adjust the balance between the voices, Lágrima (Francisco Tárrega), m1-4
Next, practice fretting all the notes but pluck only the melody and alto voices. Play the melody very loud and the alto extremely quietly. Example #264:

Watch me demonstrate in Video #46.
★ BE SURE TO WATCH ON FULL SCREEN. Click on the icon at the bottom on the right:
Video #46: Play the Soprano Voice (Melody) Loud and Alto Voice Quiet, Lágrima (Francisco Tárrega), m1-4
Next, review the balance between the melody and bass. Play the melody very loud and the bass very quietly. This combination is usually the most difficult for most players. If you need extra help, review my technique tips: Interval and Chord Balance, Part 1, and Interval and Chord Balance Update. Example #265:
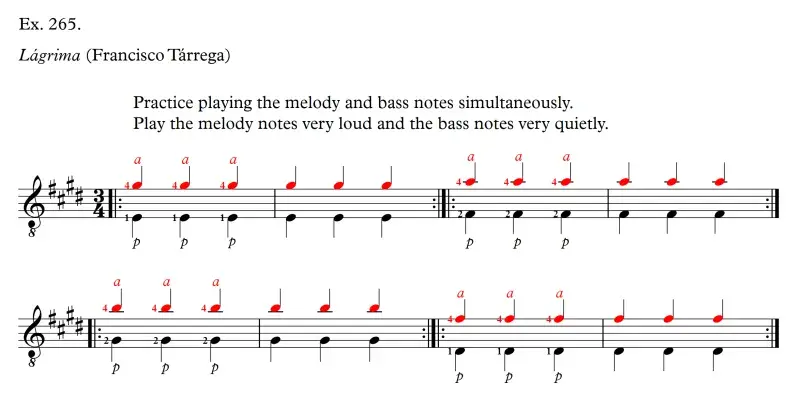
Watch me demonstrate in Video #47.
★ BE SURE TO WATCH ON FULL SCREEN. Click on the icon at the bottom on the right:
Video #47: Play the Soprano Voice (Melody) Loud and Bass Voice Quiet, Lágrima (Francisco Tárrega), m1-4
You have now developed the ability to balance each pair of voices:
- Bass-loud and alto-quiet
- Soprano-loud and alto-quiet
- Soprano-loud and bass-quiet
Therefore, you can now fine-tune the balance of all three voices together with your target balance of:
- Melody loudest
- Bass second loudest
- Alto quietest
You can apply this process to any piece you play or want to learn!
I used the same process many years ago
I used this exact process on a piece I couldn't get to sound right. It was Jorge Morel's brilliant arrangement of Fernando Bustamante's Misionera. I was having trouble with the opening four measures after the 16-measure introduction. It is in three distinct voices. Example #266:

I was playing all the right notes and playing them cleanly. But it still didn't sound right.
Here is why it doesn't sound right. First, each time I pluck a melody note, I accidentally accent the bass note underneath it. Then, because I'm trying to emphasize the melody note, I'm accidentally accenting the accompaniment chord right after it in the alto voice. Here is what is happening. Example #267:
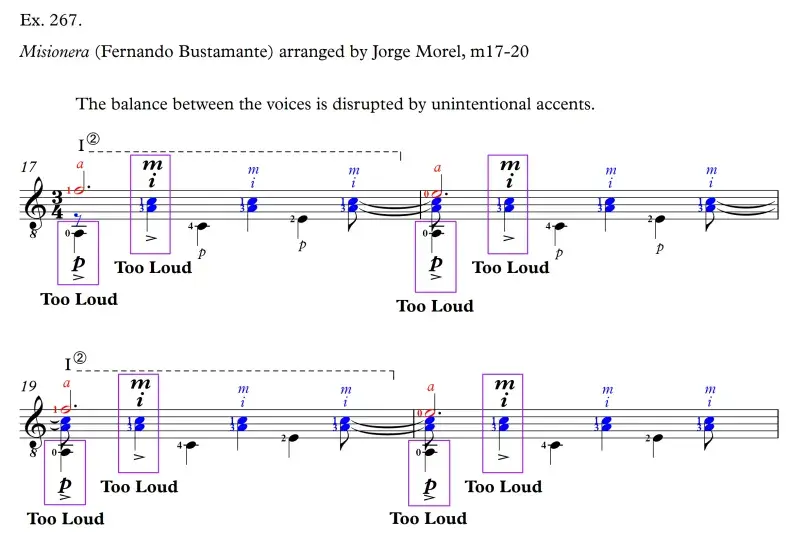
I thought about it logically and decided the first thing I needed to learn was to play the melody note loud and the bass note quiet. So I practiced that. Example #268:

It took me a few weeks to figure out how to do it. I also exaggerated, playing the melody note super loud and the bass super quiet so that I would have the ability to control it when I played at my fast target tempo.
By the way, I used that knowledge years later to write the technique tips I referenced earlier (Interval and Chord Balance, Part 1, and Interval and Chord Balance Update.)
Next, I knew that I needed to practice the melody and alto voice, taking care not to accent the chord after the melody note. But fretting the notes with the left hand at the same time was too much for me to handle. So I practiced on open strings with the right hand alone, playing just the loud "a" then quiet "mi" pattern. Example #269:
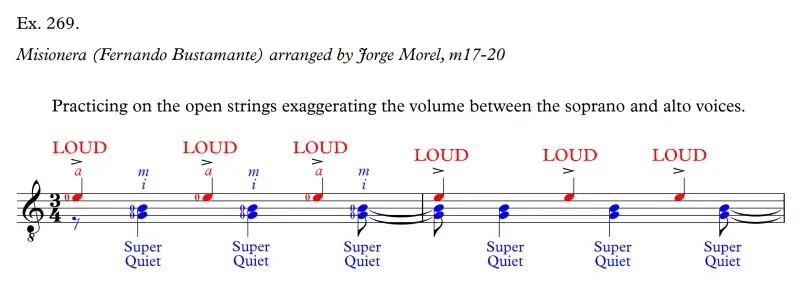
In fact, I exaggerated and played the chord so quietly I could hardly hear it.
That gave my right hand the extra control necessary to keep the chord quiet when I played the passage fast.
Then, I did the same thing again but added the left hand. I would have liked to fret all three voices while plucking only the soprano and alto, but this is one of those passages I alluded to at the beginning of this article in which trying to figure out how to do that is so complex or time-consuming that it isn't worth the trouble. So, therefore, I fretted only the soprano and alto voices. Example #270:

Next, I fretted all the notes with the left hand but only plucked the accompaniment notes (alto and bass). Example #271:

This combination was reasonably easy because all I had to do was play the alto (the little chords) quietly and dig into the bass a little more.
Watch how I do this in Video #48.
★ BE SURE TO WATCH ON FULL SCREEN. Click on the icon at the bottom on the right:
Video #48: Bass Voice Louder than Alto Voice, Misionera (Fernando Bustamante), m17-20
Finally, I put all three voices together, trying to monitor my right hand. But because there were so many things going on at once, it was hard for me to hear whether or not I was playing it right. So I came up with an idea to mute some of the strings with a wadded-up handkerchief or kleenex tissue. See my technique tip explaining The Kleenex Trick.
First, I muted the treble strings so I could hear if I was still accidentally accenting the first bass note of each measure. Then, I muted the bass strings and the first string to hear if I was accidentally plucking the first chord after each melody note too loud. Although "The Kleenex Trick" is low-tech, it works!
But watch me use a higher-tech handy-dandy tool (the "TremoloMute Bridge Dampening System") to accomplish the same thing a bit more easily.
Watch me demonstrate this cool tool in Video #49. You will love it!
★ BE SURE TO WATCH ON FULL SCREEN. Click on the icon at the bottom on the right:
Video #49: The Kleenex Trick and TremoloMute Bridge Dampening System on Misionera (Fernando Bustamante)
You can purchase the tool at Rosette Guitar Products.
I also had the bright idea to record myself without muting the strings. When I listened back, it was easy for me to hear if I was accenting the wrong notes. If I did it wrong, I re-rehearsed the three voice combinations with exaggerated volume levels and then tried again. In a few days, I could finally keep all three voices under control. Interestingly, I had to repeat this process every few months because my right hand would forget and begin accenting the wrong notes again. But a half-hour or so of practicing the separate pairs of voices reinforced the good habits, and I was off and running!
If you're curious, you can listen to me play the entire piece in Video #49A.
★ BE SURE TO WATCH ON FULL SCREEN. Click on the icon at the bottom on the right:
Video #49-A: Misionera (Fernando Bustamante) Performed by Douglas Niedt, Guitarist
TO BE CONTINUED
DOWNLOADS
1. Download a PDF of the article with links to the videos. Depending on your browser, it will download the PDF (but not open it), open it in a separate tab in your browser (you can save it from there), or open it immediately in your PDF app.
Download the PDF: HOW TO LEARN A PIECE (SONG) ON THE CLASSICAL GUITAR Part 11-A (with links to the videos)
2. Download the videos. Click on the video link. After the Vimeo video review page opens, click on the down arrow in the upper right corner. You will be given a choice of several different resolutions/qualities/file sizes to download.
Video 41: Exaggerate the Volume Between Two Voices
Video 42-A: No differentiation between melody and accompaniment Lágrima (Francisco Tárrega) m5-8
Video 42-B: The Melody, Interpretation No. 1, Lágrima (Francisco Tárrega), m5-8
Video 42-C: The Melody, Interpretation No. 2, Lágrima (Francisco Tárrega), m5-8
Video 43: String Squeaks, Lágrima (Francisco Tárrega), m1-4
Video 44: Buzzes and Muted Notes, Cavatina (Stanley Myers), m1-8
Video 45: Adjust the balance between the voices, Lágrima (Francisco Tárrega), m1-4
Video 46: Play the Soprano Voice (Melody) Loud and Alto Voice Quiet, Lágrima (Francisco Tárrega), m1-4
Video 47: Play the Soprano Voice (Melody) Loud and Bass Voice Quiet, Lágrima (Francisco Tárrega), m1-4
Video 48: Bass Voice Louder than Alto Voice, Misionera (Fernando Bustamante), m17-20
Video 49: The Kleenex Trick and TremoloMute Bridge Dampening System on Misionera (Fernando Bustamante)
Video 49-A: Misionera (Fernando Bustamante) Performed by Douglas Niedt, Guitarist